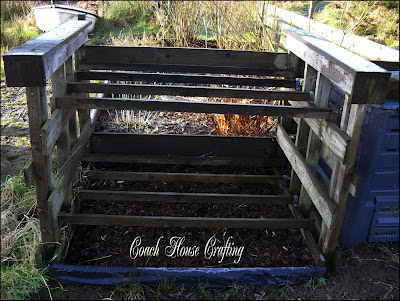
During Spring and Summer I have loads of garden pots full of either veggie seedlings, perennial seedlings or just general plants waiting for their permanent home.
But when it comes to hardening these plants off before they're planted out or just needing somewhere to contain these many pots and protect them from being blown over by the terrible winds we get up here, well it's a nightmare.
The seedlings have to go out each day and come in each night for a short while and the ones that can stay out permanently in their pots were constantly blowing over, so I decided to make something that would make life easier for me, will protect those pots and space save as well.
Here's my solution - no more schlepping about with pots for me!
Okay so maybe it's not the most pretty of solutions and it does need another coat of protector but this took me just half a day to make, used up scrap wood and pallets and does the job perfectly.
So how does it work? Well like this
Still not getting it? I mean holding one of those free garden pot holders is hardly a space saver is it! Nope, but this holds Twelve of those free pot holders - more of a space saver now isn't it!
Here's what I did:
opened it in CS5 - Oh wait, wrong project, that would be the photography projects I'm doing!- Used 2 old pallets to make the sides. These were then attached to a stake I hammered into the ground at one end of each pallet - the other end was screwed to the fence that already existed. (ps make sure both pallets are pretty much the same where the slats are concerned)
- Then I measured the width of those free plastic pot holders the garden centres give away and placed battens across the top slat from one pallet to the other. I used 3 battens to the top slat and 3 to the bottom. This gave me enough for 6 pot holders to the top and 6 to the bottom.
- Covered the base with plastic and bark mulch.
- Stained the wood for protection.
When deciding how many rows you want you do need to bear in mind the height of the plants you'll be putting there, that's why I only have 2 stages to this one - it means I can use the top or bottom for pretty much any of my pot plants.
Obviously it's not in full use at the moment cos all my plants and seedlings are under cover of the polytunnel but come Spring and this will be full of pots and best of all they stay put no matter what winds whip up!
Hope you like the idea and maybe give it a go yourself!

Linked to:
'Show Me What Ya Got'
'The Ivy Cottage'
'Kammys Corner'
'Liluna'
'Tipjunkie'
'Gingersnapscrafts'
'Radcrafter'
'Craftenvy'
'The Shabby Nest'
'Finding Fabulous'
'French country cottage'


4 comments:
That looks so handy it makes me want to....well almost want to start some plants for spring!!
Every spring my husband and I go buy flowers and every year I kill them all!! Now my husband calls these shopping trips "the anual round up and plant slaughter"...
He is so funny....NOT!
hugs,
Dana
Love finding a great new blog to follow on Linky. I'm following you now with the new Linky tool, so follow back so we can stay connected, Lori
I am impressed with your green thumb! Thank for you sharing your link on "Cowgirl Up!". Hope to see you back next week.
;) Samantha @ Crafty Texas Girls
This is so clever! I love your idea! :D
Post a Comment