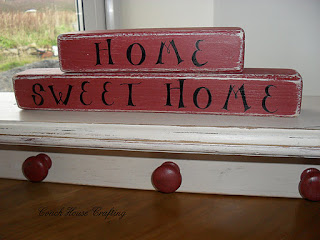
A while back I had a go at 'these' ones and loved the outcome but I'm really wanting to have a go at the ones that look like childrens building blocks.
So here is what I came up with:
and:
You wouldn't believe how simple these were to make.
Both sets began the same way. For the 'HOME' set I cut 4 blocks from a length of 2"x2" scrap wood and each one was sanded quite alot. To get the curved edges I used a seriously hard core piece of sandpaper (I do have mechanical tools for the job but I luuurve hand sanding) and then I used 2 other grades to smooth it out.
 |
| unsanded left, sanded right. But I'm guessing you knew that! |
Next I gave it 2 thin coats of Patio Paint, waited for it to dry and then sanded those corners and edges back.
When it came to the lettering I discovered the ink was out in the printer - don't you just love it when that happens! NOT!! - and my Cricut machine blade obviously needs replacing as it just teared anything I put in it - I'm soooo not organised!
Just as I was about to produce a mammoth sulk I remembered a book on lettering my mum gave me a couple of weeks ago which is full of font samples in the back. Saved!!!
So I simply traced the letters the way I did for 'this' project onto paper, traced again on the reverse of the paper, laid it on the block and scribbled over it to trace the letter to the block.
Finally I used my 'stabilo' & 'Sharpie' permanent pens and traced the letters - seemples!
 |
| Sitting nicely on an old book on my sideboard. |
 |
| Finished 'HOME' blocks. |
The 'Home Sweet Home' blocks were produced the same way except for longer cuts of the 2"x2" obviously.
Originally I painted them Laura Ashleys 'Duck Egg' but as it dried I decided it wouldn't really look quite right with the other projects it was going to go with so I went over the 'Duck Egg' with Patio paints 'Patio Brick'.
Once dried I sanded those edges and corners again and a little to the fronts as well.
Originally I wanted to do the lettering White but it looked awful. I'm a bit picky when it comes to my lettering and if I feel the control isn't right then I'm not going to like the outcome. Obviously with no White pen (Do those exist?) I had to use paint and an adapted paintbrush - it's so never going to work!
Looked terrible so I started again and traced letters the same way as above and went over it with the trusty 'Stabilo' & 'Sharpie' pens.
 |
| 'Home Sweet Home' sitting on my 'Shabby Shelf ' which hasn't been put up yet! |
I absolutely enjoyed making these. It's always nice when a project takes such a small amount of time especially if you have larger pieces on the go too.
I'm going to make more of these blocks for Christmas decorations so look out for more of em!
Thanks for popping in again. Hope you liked em. Please leave a comment as I read every single one and love to get them. xx

Linked to:
'Keeping it simple'
'The girl creative'
'The Southern Institute'
'C.R.A.F.T'
'Coastal Charm'
'Sew Chatty'
'Three Mango Seeds'
'Not Just a Housewife'
'Reasons to skip the Housework'
'Todays creative blog'
'Delightful Order'
'seven thirty three'
'Funky Junk Interiors'
'Ginger snap crafts'


7 comments:
Linda, how creative you are!! These are great! I am now your newest follower, via the Southern Institute. I hope you will follow me, too! Blessings to you!
Great job, Linda! I love the font you used, too. I saw some old country blocks at Goodwill and I did look at them a bit, but passed. I may have to go back and see if they are still there.
wonderful and you are so creative
- KAT -
Just Lovley job :)
it looks old fashioned :)
and do not miss,,,,
S
A
T
U
R
D
A
Y
S
H
O
W
O
F
F
It is FUN :)
WELCOME
Håkan ( The Roseman)
How funny, Linda! I just posted on painting some child's blocks, too! Great minds think alike! lol! Your's turned out so sweet! And yes....they do make white pens. lol!
xoxo laurie
I shared a link to this post on my site today. I love your sanded round edges and corners and they are a great visual for my readers.
You can check out my tutorial here where I link back to your blocks:
http://www.crystalandcomp.com/2011/11/fall-craft-ideas-thanksgiving-wooden-blocks-with-free-printable/
You have the right to showcase your beautiful place.
New York retirement community
Post a Comment