This started off its life as a picture that had been on our walls for years - in the bathroom!!???!!, however originally it was my sister in laws so it's been around a while:
 |
| Seriously faded. The colours are all Blue. |
We used to love the picture, in fact hubby still does but once I'd actually taken the picture out of the frame is was sooooo obvious how much it had faded.
Once I'd taken it all apart I gave it a good sand down making sure the awful gold flake area was done extra well.
Then I gave it a coat of Patio Paints in 'Patio Brick'. Originally I had intended to then go over it with a cream paint and sand it back but I changed my mind - I kept it in the Brick colour.
It was also intended to be a pin/memo board with areas for letters ready for posting and also an area for a calender but I changed my mind about that as well...
Then it was just going to be a pin/memo board but guess what? Changed my mind about that too.... see, this is why I don't plan my projects - I always change them.
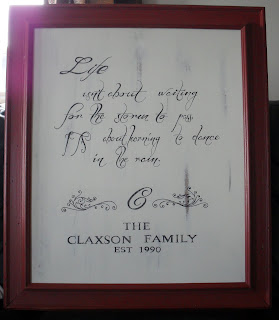
Finally I decided I would make it into a board with a quote. As it would be hanging in the hallway I figured it would be a cute thing to have.
I spent an age trying to find something to use that I could paint onto that would fit the frame and then I had a brain wave ..... yep me....
I used the backboard that originally held the picture in place - cool idea eh!
It took a bit of sanding back because I had to use the back of to write on because the front was too rough and had a weird texture. The back however had had years of tape stuck to it so the sanding took a wee while.
Once it was sanded down I painted it with Patio Paints 'Cloud White' and then a couple of coats of 'Contemporary' emulsion paint.
Once dry I sanded it back to reveal the White and also the dark board beneath:
 |
| It is actually more sanded than this piccie shows plus this piccie needs turning CCW - Oops! |
Next was the frustrating bit.
I knew what phrase I wanted to use - "Life isn't about waiting for the storm to pass, it's about learning to dance in the rain" - BUT I'd ran out of computer ink and was waiting for new ink to arrive.
Could I wait a few days for the ink? Could I eckers like! I had to come up with something else.
So I opened CS5 on my laptop and opened a load of new pages in A4 size. On each one I wrote part of the quote and just hoped and prayed I'd managed to do each one in the same size as I had to enlarge them past the maximum font size.
The best thing about laptops is that the screen is backlit - makes a perfect lightbox.
To copy the letters from the laptop onto paper I turned the laptop round so that the screen was sitting on my knee and simply traced them onto paper:
 |
| Look at that for backlighting! |
Once I had the image on paper I simply turned it over and traced that image on the back so that I could then put it to the board, scribble over it and have the letters imprinted where I needed them. *HINT: Use a pencil that is dark - these are usually the softer ones. It makes a big difference when tracing the letter to the board. A finer, lighter pencil just won't show enough on the piece you've traced to.
Once the letters were on in pencil I grabbed my permanent pen (a Stabilo & a Sharpie), lay on the floor and went over all those letters.
I always find 'Sharpie' bleeds when you varnish so I try not to use it too much but I've always found that any permanent pen struggles to work on paint and I am constantly (every few strokes) having to get the pen to run again on waste paper - very annoying!!! So if anyone knows of a permanent pen that actually works well on paint pleeeeease let me know.
Once the pen had dried I then gave it another sand down to age it a little.
 |
I'm quite chuffed with how it's turned out. I maybe would change the font next time - This one is 'Before the Rain' and I would prefer the words to cover more of the area.
Overall though it's gonna look great with the 'shabby shelf' and the table.
Thanks for taking a peek, hope you enjoyed it.

This post is linked to
'Ginger Snap Crafts'
'Someday Crafts'
'Night Owl crafting'
'The Girl Creative'
'Delightful order'
'Bear rabbit bear'
'The DIY showoff'
'Flamingo Toes'
'The Shabby Nest'
'Miss mustard Seed'
'Finding Fabulous for Less'


2 comments:
You did an amazing job! Also, congrats!! I think you have tons to share & enjoy your creations, so I'm giving you a Liebster Award. Check it out at http://www.fromragstorainbows.com/2011/10/liebster-blog-award.html
What a lovely idea. Thanks for linking to Things I've Done Thursday.
Melanie
bearrabbitbear.blogspot.com
Post a Comment