Showing posts with label recycle. Show all posts

Wednesday, 6 May 2015

Easy DIY Pallet wood Adirondack chairs

Personally I don't think a garden can ever have too much seating, whether it be stone seats hidden away, huge swing chairs in the middle of a lawn or plenty of comfy Adirondack chairs round a firepit.
A couple of years ago I made 2 Adirondack chairs from plans I found on the 'Ana White' website which proved to be very popular at home and fought over the handful of times we decided to sit out in the garden. So popular that I decided I needed to make a couple more this year just so that I don't have to race the kids to them during the next BBQ.
The ones I made 2 years ago are quite angular, I chose the plan because it was exceedingly simple to follow and I had all the encessary sized wood from pallets that I had taken apart.
Before I remind you of those first chairs let me take a second to remind you of the best pallet breaker to ever be designed - I chose the 4 way bar.


This 4 way pallet bar turned this heap of pallets

into this

and the best bit is that I could do it all by myself. Each pallet took literally seconds to break apart and meant that not only did I get all the long lengths of wood but the spacers also - which is where the chunkier wood came from.
This was my first attempt at the Adirondack chair and literally every piece of wood came from a pallet.


Deciding I wanted to add some colour to the garden I chose to paint them in Cuprinols 'Summer Damson' garden shades.


I've now completed 2 more Adirondack chairs with matching footstools but I didn't use the original plans because I wanted a more rounded chair for the second half of the garden. Again it's all pallet wood except for the main bottom rail which is scrap 6x2.


The chairs has since been painted in Cuprinols 'Fresh Rosemary' garden shades but I've yet to take a photo of them finished.
The plans for these second ones are in my head. I didn't want to make it up as I went along but I really couldn't find exactly what I was loking for on the internet so I conjured these up using 3 different online designs with my own bits added. It wasn't until I'd finished them that I realised the footstool doesn't match 100% - the main leg is angular on the end not rounded to match the chair - oops!

Sunday, 25 January 2015

DIY Easy pallet wood planter

It's the time of year when I'm looking for new planters for the garden but being the tight fisted so and so that I am I simply refuse to buy them so out came the pallet wood and a bit of ingenuity. I need several planters for Roses that will eventually be going out into the garden ground but for this year they need a home while the garden is finished. The planters had to be exceptionally easy to make (because I get bored easily), use as little wood as possible but still look like more than just a square box.
The first one I made looked ok but I'd cut corners such as not pre drilling so the finished effect wasn't as good as it could have been - I decided that one would be the prototype and set about making another one but took my time to do it properly. The finished planter still only took one day to make so I'll definitely be making several more.

This is the finished look - no painting just a light sand and a coat of outdoor varnish for protection.


There are probably many tutorials online much better than anything I can give but I'll show step by step how I made this and maybe it will encourage someone to give it a go.

Assemble all your wood pieces once you have decided the size you want. This may sound obvious but on the prototype I made each panel up before cutting and making the next one and I ran out of wood the right size half way through. I managed to source some eventually but I would have saved myself so much aggravation just doing it properly from the start.
I decided to make my planter 20" high by whatever width the pallet wood ended up being. As it turned out I used wood that was a little over 3.5".
I cut 16 pieces @ 20" and 4 pieces the width of the boards joined together (I actually need 8 width pieces but we'll come to that later).

First I lay 4 of the pieces down and used the cool set square I attached to my workbench as something to straighten them against, this saved me so much time and effort in trying to hold all the pieces level and together.

Loving my set square as it helps keep it all together.

Next I attached a scrap piece of wood across the middle to hold it all together while I mark out for the arch in the bottom - I forgot to take a photo though.

For the arches at the top and bottom I made a mark 2" in from either end at the bottom and used a plate to mark out a circle from those marks. I repeated this at the top and bottom of all 4 sides.


Marks for arches.

Next I used the Jigsaw to cut out those marks.
TIP: Once you have cut those arches out do not remove the scrap wood from the middle until you have secured one of the fixing battens. I made this mistake and it took me ages to get that arch to look right again because the wood dropped.

See the scrap wood - don't remove it yet.
Next secure the fixing batten top and bottom - I fixed them 3" up from the bottom and 3" down from the top. Once they are secure it's safe to move the scrap wood from the middle. Then turn the pieces over and screw into the fixing battens to make it super secure - don't forget to pre drill.

Top & bottom arches cut

You need to make 2 exactly like that and then make 2 more but the fixing battens will need to be a different width allowing for the sides you just made to sit snug against the new sides.
I held the two finished sides up to the one I was now making and marked out where the battens sat so I could use that width for the fixing battens for the next 2 sides - does that make sense?
In this photo you can see what I mean. The 2 sides are held against the one I'm making - the pencil shows you the width I'm measuring.

Pencil showing width to measure.

With that done you fix the shorter battens to the next 2 sides and you should have 2 of each of these

Finished pieces ready for joining

Next I simply built the box and screwed the sides in together - pre drilling the holes first and using a screw head sinker like this, the effect is so much more pleasing and prevents splitting of wood.

Drill bit and screw head sinker.

Looking inside this is what the planter looks like screwed together. It's perfectly solid by this point.

Add caption

Next I cut 3 pieces of scrap wood to fix to the bottom making sure the slats had enough gap to allow for water drainage.

Slats fixed to the bottom inside.

Then I needed to lay a liner in it, usually I use some of hubbys thick DPM but I was feeling especially lazy and know the DPM can be a hassle to fix so I literally used a super thick bin liner which fit perfectly and fixed it to the top batten supports with my nail gun.
To hide the plastic and make it look a bit nicer I cut some odds and ends of really thin finishing wood I found and attached it to the top of the plastic using the nail gun again into the batten.


Finishing wood over plastic on left.

Finally, a quick sand down with 60 grit and a quick sand with 240 grit -I usually go all the way from 60, 80, 120 etc but I wanted to keep the rustic look.
One coat of external varnish and it's good to go.

Finished look

Sharing at:
SewcanDo
Niftythriftysunday 
Artisbeauty

Friday, 18 January 2013

Quick & easy Leather luggage tags

ON HOLIDAY UNTIL FEBRUARY 10TH


I had planned to make luggage tags for our upcoming holiday ages ago, I was going to be o so organised - yeah right!
Yesterday I realised I still hadn't made any and it was looking pretty much like I was going to have to suffice with those shop bought cardboard printable tags - not so pretty and/or personalised huh!
So, I had some spare time and figured I'd have a go myself but if they took longer than 15mins each to make or the first one looked naff, I'd give up and go with the crappy cardboard ones.
I've done plenty of research over the last few weeks (that's me all over, loads of research but no doing) so I knew basically what I wanted the finished look to be, the problem was that the look I wanted wasn't going to be quick, so after all that research I just made it up as I went along and here's how they turned out:

Luggage tag
Not too shabby huh!
The best bit is that they took 10 mins to make. If I'd had more time and had been in a better mood (and if my craftroom wasn't such a tip right now) there are things I would have done differently but these will do for this holiday.
Here's how I did it:

Decide on fabric. I had some swatches of leather fabric as our friend is an upholsterer and gives me the leftover or out of date swatches, so I chose Chocolate leather:

Leather swatches

At first I cut 2 rectangles of leather (I didn't measure them) and tried to sew them together wrong side to wrong side but they moved about too much and looked reeeeeeally bad (to thick to get pins through without bending them - I tried!). At that point I could have given up! Yup, 2 mins in and i had had enough -  I hate it when things don't go how I want them to even though it's usually because I haven't thought things through properly or I'm trying to do things quickly instead of properly as was the case here.
To get over the slidey fabric syndrome I got 2 pieces of leather larger than the size of luggage tag I wanted to make, lay them wrong side to wrong side, traced a rectangle on top using white pencil and then sewed the tag from that, leaving one short end open and holding the whole thing together with clips:

Held together and 3 sides sewn.

Next I trimmed the edges as close to the stitch line as I dared on all four sides (I had to guess where the line would be at the un-sewn end as the pencil had worn off and I didn't think to re-draw it).

Cut as close as possible to the sewn line.

The next step was to decide on a tag for the tag (you know what I mean......right?).
To get a better finish next time I would use bias binding but for now I used ribbon folded in half, ironed and then sewn up the edge. Again I didn't measure the length I just cut what I thought would be enough:

Fold ribbon in half.

Once you've sewn the edge of the ribbon simply stuff both ends into the opening of the leather and then stitch the entire opening closed.

For the pocket that will hold the name and address I used laminate sheeting. Most tutorials online suggest vinyl like the stuff blankets are often cased in but I couldn't find any (until I'd finished - typical) so I used laminate sheeting.
I cut a rectangle of laminate to fit the front of the leather and then stitched another piece of folded ribbon  across the top of the laminate where it will be left open on the leather (this is where you will insert card for name):

Sew the ribbon to the laminate

Finally I positioned the laminate onto the leather tag, used clips to hold it in place as it moves easily and then sewed down both sides and the bottom end leaving the top ribbon end of the laminate open.
That's it, that's all I did!

Finished.
Most online luggage tag tutorials suggest that you use a plastic sewing machine foot to sew the vinyl as it glides easier but I didn't have that problem with the laminate, I used the normal metal foot.
Another tip if using vinyl instead of laminate is to place some tissue down the edges of the vinyl and sew through that instead of directly through the vinyl. You can then tear the tissue away once you've finished sewing, I suspect this is to help the foot glide better but also to help control the holes that the machine makes in the vinyl. Again I did neither of those things with the laminate.
I'm going to make better ones in the summer but if you're looking for a quick and easy luggage tag to make in a hurry then this is the one for you.
Shared at:
Dear creatives
Shabby Nest 
Itsahodgepodgelife 
One Artsy Mama 
Craft Junkie too 
French Country Cottage 
Shabby Art Boutique 
Diana Rambles

Monday, 30 January 2012

Make your own compost tumbler

I was giving my compost tumbler it’s annual coat of wood protection yesterday and thought it would be a great opportunity to show you guys how I made it so maybe you’ll feel you could have a go yourselves.
I have to say that this tumbler works so much better than the other two plastic box type ones I bought, I think it has something to do with how easy it is to tumble this one and aerate the goodness inside.
I didn’t take photos of each stage because I made it before blogging so I’ll try not to make this too confusing but if you can manage to fathom the steps out from my tutorial, write them down, familiarise yourself with them and you could make this in a day. It took me 2 days but only because I had to work stuff out as I went and I never organise myself beforehand – I looked for tools and materials as I needed them.
Here’s the finished piece – it’s no work of art but it’s efficient and not too difficult to make.


 diy, garden diy, compost tumbler <SAMSUNG DIGITAL CAMERA>
I got inspiration for the design from a web page but unfortunately I didn’t keep a record of that page and cannot find it now – if I do happen to find it though I will of course post it on here.

Basic list of tools:
  • Scrap wood – 3x2” for frame, batten for frame plus scrap boarding for drum sides.
  • Plastic drum – cleaned of it’s contents.
  • Scaffold pole or some other pole about 2ft longer than the length of the drum.
  • Length of plastic pipe / tubing, about 4-5” wider than the width of the drum.
  • Hinges, nuts/bolts, screws, door clasps, handles (I used scrap kitchen unit handles)
  • Piece of metal gauze or even a piece of that green netting used for fences will do.

OK first off, the frame:
 diy, garden diy, compost tumbler <SAMSUNG DIGITAL CAMERA>
Finished frame
As you can see I used substantial wood as it has to hold some weight (that’s not a bow in the wood it’s the camera – honest!).
Using 2 lengths of wood for each side I created 2 crosspoles. The cross points of the two pieces should be high enough that you’re not breaking your back bending when you rotate the tumbler.
Both pieces were bolted together with nuts, bolts and washers (I used an electric drill to pre drill the holes).  I made it so that my pole sat snugly in those top crosspoles so that when I turn it it’s the tumbler that turns and not the actual poles as the poles may end up moving off the cross poles.
Then I added 1 piece of scrap wood to the bottom of each X to help retain the shape and to just help support it. If you look at the above image you’ll see that these bottom pieces of wood are screwed from outside to inside of the X frame.
Next I screwed on two scrap pieces of wood across the back to hold the X pieces upright and in the right position – you need to measure your plastic drum and add clearance either side of it when deciding how far apart to place the ‘X’ posts. There’s no scientific rule though on how much clearance, just go with what you think.


diy, garden diy, compost tumbler <SAMSUNG DIGITAL CAMERA>
Cross poles bolted together
Give the whole frame a protective coat of creosote substitute.

Now onto the tumbler itself.
I managed to get hold of 2 of these containers. I looked up on Google what they contained (chemical signs make no sense to me) and found them to just hold detergents so after a good scrub (once the door was cut obviously) they were good to go.
First off I turned the container onto its long side and marked in pencil a square opening in the centre - this square needs to be comfortable enough to get the compost out of.
I then drilled a hole in the corner of the pencil square big enough to get my jigsaw blade in to then cut the square out – keep the square, it’s the door!


compost tumbler, ladies diy, gardening,diy <SAMSUNG DIGITAL CAMERA>
Tumbler door


Next I turned the container back up on its end and drilled out a hole in the centre of the top the same size as the circumference of a scaffold pole (or other metal pole). I then turned it over to the other end and did the same thing. At this point just insert the pole to make sure the hole is correct in size and place, then take it out again and set the pole aside.
Next we need an air vent so turn the drum back onto its long side and drill a hole in the centre just above the door opening you made. This hole needs to be the same size as a piece of plastic tubing so measure the circumference of your tubing first.
Roll the drum over to it’s other side and drill the same hole again. Check that your plastic tube  fits straight through the top hole and the bottom hole you just made, then remove the tube.
This tubing now needs to have several small holes drilled into it along it’s entire length – these holes will help aerate inside the tumbler. To fix this now holey pipe in its place, slide it back into the tumbler through your drilled holes – it needs about 1 – 2” clearance on both ends.
To stop this tube simply slipping back out insert a bolt and nut through a drilled hole on it where the tube enters and exits the drum (on the outside of the drum obviously). This then prevents it moving.
Next we need to make a rake for inside the drum to help mix the stuff we put in there. For this I used a piece of scrap batten and hammered long nails all the way along the length of the batten. This batten is then secured inside the drum by screwing it in place from the outside of the drum. Although my rake fits the entire length of the inside of the drum, you have to make it in 2 shorter lengths because one long one will not go through the door opening.


garden diy, ladies diy, compost tumbler, recycle barrel <SAMSUNG DIGITAL CAMERA>
This shows the rake at bottom, drain hole at bottom, main scaffold pole left to right & air tube top to bottom.
We also need to drill a drainage hole in the bottom of the drum. I drilled a fairly big hole and then simply cut a piece of wire gauze and secured it over the top of the hole (from the inside) just so the hole didn’t block up with compost. You can see my drainage hole in the above photo – it’s the black gauze just below the rake.
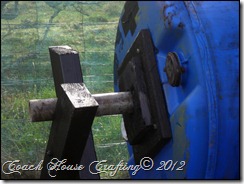
Now go back to those holes we drilled top and bottom of the drum for the scaffold pipe - We need to reinforce the outside of these holes so that the turning of the drum doesn’t just wear them away or split the plastic drum.
I used scrap wood and cut out 2 blocks for each side, these were then secured together and a hole drilled through them the same size as the scaffold pole. These were then secured to the drum using bolts and nuts – I kept nuts on the inside but the preference is yours.
recycle, garden diy, compost tumbler <SAMSUNG DIGITAL CAMERA>
Reinforced ends.
Finally go back to that door you cut out and set aside and attach one side of your hinges to it with bolts and the other side of the hinges on to the drum just above the square opening you cut, again using bolts.
To keep the door closed I found a couple of clasps that I attached to the door and the drum but you can use whatever you find or whatever works.
I also added a couple of metal handles - 1 just above the door and 1 further round, this is how you turn the drum.
Finally slide that scaffold pole (or whatever pole you have) straight through its holes which are top and bottom of the drum (and which now becomes the sides of the drum), and lift each end onto the cross poles of the frame you made.
All you have to do now is make sure your site it on level ground – I didn’t at first and the drum moved to one end – and then start filling it with all those composting goodies. Turn it as often as you remember.

I’m sorry if this tutorial was a little confusing, I’ve tried to make the steps as simple as they are but as long as you get the basic concept you should be able to produce it.

Thanks for staying this far, hopefully you're not too confuddled and will come back for more!


Linked to:

'Skip to my Lou'
'Easypeasy Grandma' 
'The girl creative' 
'Sumo's sweet stuff' 
'Momma to binks' 
'Not just a housewife' 
'Sassysites' 
'Cherished Bliss' 
'Craft Junkie Too' 
'Its a hodgepodge life' 
'Under the table and dreaming' 
'Sew chatty'