Showing posts with label Garden. Show all posts

Sunday, 22 March 2015

Recycled garden pot holder

I have decided to recycle this post from a couple of years back for 2 reasons - 1) Lack of actual gardening at the moment and 2) It's that time of year when we're sowing seeds like mad so a space saver comes in real handy.
Recycling old posts is not something I tend to do as the garden is forever changing but I felt there are certain projects that never age and hopefully this may solve the issue of space for a few people. The original photo of this project (included below) has done it's rounds on Pinterest but credit rarely goes back to the original source but I have no problems with people pinning and sharing this - enjoy!

Gardening here in the Scottish Highlands is unlike any kind of gardening I experienced at home in  England and I initially made so many mistakes and lost so many plants due to my stubborness and naive determination to continue growing the plants I loved rather than discovering what would actually work here.
It was during those years of frustration that I sulked a tad where the gardening was concerned and turned my attention to building containers, obelisks and arbours from scrapwood - it kind of made me feel like I was achieving something despite having obliterated all my lovely plants. Plus containers meant I could move plants around according to the weather conditions.
That's the time I came up with this space saver idea. I needed something that would make use of height in my greenhouse and free up some space and at the same time it needed to be light enough to carry in and out as I needed.


This is the space saver:


garden space saver, recycled wood, recycled milk carton


It was really easy to make too with limited skills and tools  and used only scrap wood and plastic milk cartons I saved. I made this one in half a day but it could take even less time if you organise your tools and materials beforehand which I don't tend to do!
So tools and materials needed:
  • Scrap wood. Any scrap wood can be used and adapted but I used batten, 3"x2" and plyboard.
  • Wood to use as the milk container supports - I used 1.5"x 1/4" beading.
  • Screws and/or nails.
  • Hand saw or electric cutter.
  • Tape measure (always handy but I hardly ever use them)
  • Stain for protecting. I used Cuprinol garden shades  Natural Stone.
  • Plastic milk cartons. I used 30 on mine but you can make the frame and add the cartons as you collect them.

The first stage is to make a rectangle frame using battens (or your chosen wood) and then add corner supports to the top of the frame only. (I didn't have any particular size of frame in mind I simply made it up as I went along - that's how I roll).

 scrap wood frame, garden space saver, recycled wood frame

Once we have the frame done we need to attach some feet to support it. I used batten and 3"x2" for mine.
Once the batten is cut screw or nail it to the bottom of the frame like this:

 recycled wood space saver, recycled milk carton, garden space saver

Once those are attached to each side of the base end stand the frame up and cut 2 more pieces slightly larger from 3x2, or whatever wood you have. These are then screwed or nailed to the existing feet from the top down like this:

 recycled milk carton, scrap wood frame, greenhouse space saver


You can also see from the above photo that I then screwed the rectangle frame down into the first foot that was attached, this is just for extra stability.

Next we need to make some supports for the lengths of wood that will hold the milk containers.
I used plyboard for this as it was all I had suitable that was lying around. I basically cut 6 rectangles (3 for each side) and each rectangle had 2 grooves cut out of it from the top of the longer side to roughly half way through. These cuts need to be a suitable depth to hold whatever wood you are using for the container supports  like this:

garden space saver, scrap wood, recycled milk carton


Once all the rectangles are cut and grooved they simply need attaching to the sides of the frame - I just spaced mine at equalish distances.


Once this is a completed it's just a simple case of cutting 6 lengths of wood for the container supports (I used thin beading) making sure the lengths are cut long enough to extend further than the supports at each end.

 greenhouse pot holder, recycled wood, recycled milk carton

Finally give it all a coat of protective paint and start filling it with your pots by simply sliding the container supports through the handles of your milk containers.
This space saver is ideal for veggie seedlings being hardened off because you simply lift it and place it outside in the morning and then bring it back in at night, there's no bending and schlepping around with plastic pot holders that always tend to split and crumble right when you don't need them to.
It's also fabulous for rooted flower cuttings that need similar hardening off treatment and if you use the containers for herbs it can be easily placed against a warm wall right near the house.
OR if you're a crafter like myself it would be fabulous for holding crafting goodies such as pens, paints, ribbons, stamps etc etc.
Pretty versatile huh!

 crafting space saver, craft holder, craft space saver


Now lets talk about those milk containers and how you can use pretty much all of the container as useful garden helpers.

First off take one of the plastic milk caontainers you've collected - all sizes are good but I personally would find the 2 pinters too small for this project but the bigger the container the bigger size pot it will hold. I used 4 pinters and 6 pinters.
OK so we need to pierce the side of the container with scissors (leave the lid on to keep the air in otherwise the container will simply collapse) and then cut right round the container so you get this:

plastic plant labels, recycled plant labels

The top part with the lid is all finished and ready for your newly built space saver.
Personally I try to leave the lids on the containers that will go on the top 2 layers of the space saver to stop any water draining into the layer below. The bottom layer of the space saver doesn't matter so much.

Now we're left with the bottom half of the container we cut so take your scissors and cut down the length of the container stopping where you see the next rigid line that goes all the way round the container. Turn at this point and cut round the circumference once again until it seperates from the bottom of the container, then take this middle section and cut straight down the middle of it to produce this:

 diy plant labels, recycled garden labels, milk carton plant labels

Now all you need to do is use the middle section to cut strips off at whatever width you would like your plant labels to be. Once you've done this you then cut points onto one end of the cut strips and use the container base to store them.
See, the whole container has a use - yay!

 plastic garden label, milk carton pot labels

Here you can see the strips before having the points cut and then the pot contains some where the points have been cut.


I hope this tutorial made sense to you all and that you can replicate it in some way for your home and garden, I would love to hear from anyone that has made it for themselves.

Sunday, 25 January 2015

DIY Easy pallet wood planter

It's the time of year when I'm looking for new planters for the garden but being the tight fisted so and so that I am I simply refuse to buy them so out came the pallet wood and a bit of ingenuity. I need several planters for Roses that will eventually be going out into the garden ground but for this year they need a home while the garden is finished. The planters had to be exceptionally easy to make (because I get bored easily), use as little wood as possible but still look like more than just a square box.
The first one I made looked ok but I'd cut corners such as not pre drilling so the finished effect wasn't as good as it could have been - I decided that one would be the prototype and set about making another one but took my time to do it properly. The finished planter still only took one day to make so I'll definitely be making several more.

This is the finished look - no painting just a light sand and a coat of outdoor varnish for protection.


There are probably many tutorials online much better than anything I can give but I'll show step by step how I made this and maybe it will encourage someone to give it a go.

Assemble all your wood pieces once you have decided the size you want. This may sound obvious but on the prototype I made each panel up before cutting and making the next one and I ran out of wood the right size half way through. I managed to source some eventually but I would have saved myself so much aggravation just doing it properly from the start.
I decided to make my planter 20" high by whatever width the pallet wood ended up being. As it turned out I used wood that was a little over 3.5".
I cut 16 pieces @ 20" and 4 pieces the width of the boards joined together (I actually need 8 width pieces but we'll come to that later).

First I lay 4 of the pieces down and used the cool set square I attached to my workbench as something to straighten them against, this saved me so much time and effort in trying to hold all the pieces level and together.

Loving my set square as it helps keep it all together.

Next I attached a scrap piece of wood across the middle to hold it all together while I mark out for the arch in the bottom - I forgot to take a photo though.

For the arches at the top and bottom I made a mark 2" in from either end at the bottom and used a plate to mark out a circle from those marks. I repeated this at the top and bottom of all 4 sides.


Marks for arches.

Next I used the Jigsaw to cut out those marks.
TIP: Once you have cut those arches out do not remove the scrap wood from the middle until you have secured one of the fixing battens. I made this mistake and it took me ages to get that arch to look right again because the wood dropped.

See the scrap wood - don't remove it yet.
Next secure the fixing batten top and bottom - I fixed them 3" up from the bottom and 3" down from the top. Once they are secure it's safe to move the scrap wood from the middle. Then turn the pieces over and screw into the fixing battens to make it super secure - don't forget to pre drill.

Top & bottom arches cut

You need to make 2 exactly like that and then make 2 more but the fixing battens will need to be a different width allowing for the sides you just made to sit snug against the new sides.
I held the two finished sides up to the one I was now making and marked out where the battens sat so I could use that width for the fixing battens for the next 2 sides - does that make sense?
In this photo you can see what I mean. The 2 sides are held against the one I'm making - the pencil shows you the width I'm measuring.

Pencil showing width to measure.

With that done you fix the shorter battens to the next 2 sides and you should have 2 of each of these

Finished pieces ready for joining

Next I simply built the box and screwed the sides in together - pre drilling the holes first and using a screw head sinker like this, the effect is so much more pleasing and prevents splitting of wood.

Drill bit and screw head sinker.

Looking inside this is what the planter looks like screwed together. It's perfectly solid by this point.

Add caption

Next I cut 3 pieces of scrap wood to fix to the bottom making sure the slats had enough gap to allow for water drainage.

Slats fixed to the bottom inside.

Then I needed to lay a liner in it, usually I use some of hubbys thick DPM but I was feeling especially lazy and know the DPM can be a hassle to fix so I literally used a super thick bin liner which fit perfectly and fixed it to the top batten supports with my nail gun.
To hide the plastic and make it look a bit nicer I cut some odds and ends of really thin finishing wood I found and attached it to the top of the plastic using the nail gun again into the batten.


Finishing wood over plastic on left.

Finally, a quick sand down with 60 grit and a quick sand with 240 grit -I usually go all the way from 60, 80, 120 etc but I wanted to keep the rustic look.
One coat of external varnish and it's good to go.

Finished look

Sharing at:
SewcanDo
Niftythriftysunday 
Artisbeauty

Tuesday, 3 June 2014

Diy pallet wood decking

Pallet wood decking is hardly an original idea nowadays is it, there seem to be many people jumped on that band wagon and the internet is full of different designs and ideas.
I have to admit Mr CH was hardly thrilled at the prospect of a pallet wood deck when I first stated that I would be making one but he humoured me none the less and helped me lay the finished boards once I had levelled and squared up the pallet base.

It didn't look much to behold at this point and I actually did consider giving up


But with a little bit ofpatience and loads of nails we were able to create this with more pallet wood and pallets to act as steps to the french doors


I know alot of peoplewould prefer proper decking and maybe some fancy fandangled rails around it but the cost of this decking was the price of a tub or two of Ronseals decking stain - that makes me very happy.
As for the rails - watch this space.
Incidentally those Purple Adirondack style chairs were pretty easy to make too and guess what - yup, all from pallet wood also.


Linked to:

Show me what you got 
Kammys Korner 
I Gotta Create

Saturday, 12 October 2013

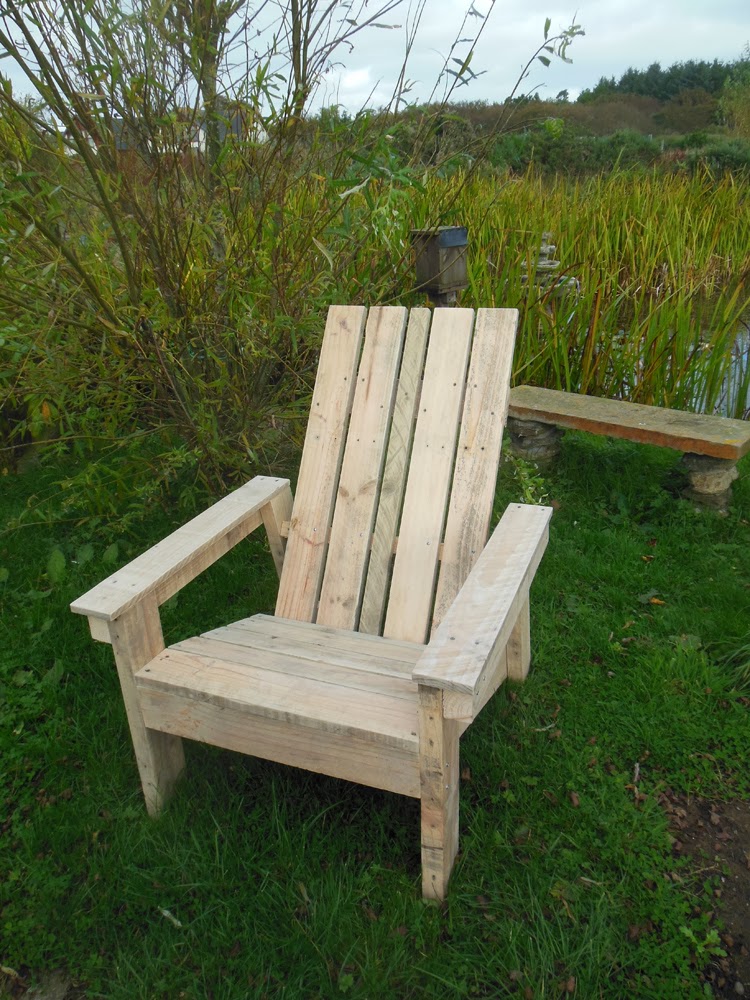
DIY Adirondack chair.

Usually when I build something I devise a plan in my head of what I want the finished item to look like and then I pretty much make it up as I go along, it's just the way I've always been - I've never built anything from plans! Until now that is.

I've wanted to build an Adirondack chair for ages but just haven't had enough scrap wood to even make a start so when hubby had all those pallets delivered I was adding up the projects I could do as I was ripping them apart.
My pallet wood pile is precious to me though so I made the decision to make the chair following plans I found online on the Anna White website.
I have mixed feelings about these plans because while it helped immensely to have the guesswork taken out of dimensions and angles etc I found alot of the measurements inaccurate for the size of wood that was suggested to use. Most of the issues were easy enough to work round but the finished look isn't as per the diagram because I had to use a 2" piece of wood as a back slat instead of the 4" the plans stated - this is because the width of the back support is 19.5" yet the plans tell you to use five 4" slats and secure them to the 19.5" batten leaving a 0.5" gap in between, this totals 21" NOT the 19.5" that the plans state. There were a couple more discrepancies like this and had I been more experienced I would have noticed this before starting but I didn't! The finished chair still looks awesome though especially when you take into account that the wood cost me nothing more than time taking the pallets apart - all I have to do now is decide on a colour.

Adirondack chair, DIY, Pallet wood, Adirondack, Garden furniture

 Garden furniture, DIY garden, adirondack furniture, chair


 adirondack chair, garden DIY, pallet wood

I'm currently making the matching footstool via the same website but I'm having the same issue with inaccurate measurements. The length of the footstool is 23.5" and yet the plans require you to use six 4" slats with the 0.5" gap in between - this totals 27.5" NOT 23.5" so I'm yet again left with a 2" slat at the bottom.
I've checked the website and everyone else that has made the same chair appears to have been able to use the stated amount and sizes of wood so maybe I am doing something wrong, I just can't igure out what.

Tuesday, 21 August 2012

Greenhouse space saver plus milk carton recycle

Wow, I've been absent for a while huh! well apologies for my lack of posting but I'm now back and will have new projects all ready to post on here pretty soon. Until I have them edited though I will repost a couple of my popular back posts and I thought this greenhouse space saver was the perfect post for these glorious gardening days!


I'm hiding indoors at the moment because the wind sounds awful outside. I placated the guilty feeling by convincing myself that I would use the indoor time to make my mums birthday card (it's her birthday in about 6 days) but I made the huge mistake of putting Create & Craft on the TV.  Just while I check my emails mind!
Yeah right!
I then logged in to my blog  to reply to some emails and comments but we all know what happens then don't we?  yup, I'm too engrossed in reading other blogs  that heading through to the cold craft room has just lost its appeal.
I could go outside and potter in the poytunnel BUT I figured instead of that I could just blog about a project I completed a couple of years ago before I had the polytunnel and needed some space saving ideas for the greenhouse - those rows of pots with seedling veg and flowers in em were just taking up too much room because I had to put them on just the one layer of staging.

Brainwave people!

I created this space saver (though excuse the dirty holders)

space saver, pot holder, DIY, garden diy, garden woodwork

The best bit is that it was easy enough to make with no technical tools needed if you don't have them AND it's all scrap wood AND it recycles those plastic milk containers.

OK so how to make it!
First gather your tools ( I have a habit of looking for what I need when I need it - not a good idea).
You'll need:
Wood - I used roof batten, small scrap bit of plywood, some scrap beading and some scrap pieces of  2"x 2". You can use any size you have though.
Screws (I literally use anything I can find. I used black plasterboard screws for this)
Nails if you don't want to use screws.
Tape measure.
Hammer.
Screwdriver.
Saw (unless you use a cutter as I do)
Pencil.
Milk cartons (I used 30 but you can make the frame and add them as you get them)
Scissors.

I made a basic 4 sided frame using scrap roofing batten and  nails or screws or whatever you have, and made corner supports for the top only.

 garden project, garden diy, garden space saver, seedling holder


Next I made 2 bottom plates to support the whole thing. I just used whatever cuts of wood we had for this as long as the bottom plate used is wider wood than the  top plate.

 garden diy, garden woodwork, seedling holder, greenhouse space saver, milk carton recycle

Screw the two bottom base blocks together then screw the actual square frame to the blocks - remembering to keep the corner supports to the top.

Then I cut some pieces of plywood into a rectangle shape and cut out 2 grooves to each one to hold the cross supports that the bottles attach to.


Those rectangle pieces were then attached to the frame with screws as shown above.
Next I cut some small beading to use as supports for the Milk cartons, making sure the cuts I made in the rectangles kept the supports supported but not so tightly that they were awkward to lift out.

Finally grab some milk cartons (I used either 4 pint or six pint ones) and cut around the carton just about where the label starts. You don't need deep holders if they are for seedling pots.
*TIP - put the lid on the carton before you cut it. This keeps the air in and makes it rigid for that first incision with the scissors - try to pierce it without the cap and it will just collapse*.
Once you have them cut just slot them onto the frame through the milk carton handle. Leave the lid on if you want but you can take the lid off to aid drainage too.

Now you're left with a load of bottoms to milk cartons so lets use em to make plant labels.

Cut down the middle of the leftover bases to the next mark that goes all the way round the container (would have been the bottom of the label) then turn and cut all the way round the circumference of the container so you end up with a large rectangle of plastic.
Finally cut slices off that plastic as wide as you require your labels to be and then cut points on one end od each and voila! Plastic plant labels for free.

 milk carton recycle, garden diy, seedling holder, garden woodwork, scrapwood diy

I use these labels all the time and because they're free to make I don't worry about cleaning them when they're really bad, I just throw them away and make some more. You can stick them in a container of bleach though as they are easy enough to clean that way.
p.s. Once you've cut the side off the container to make your labels you are left with small pots made from the very bottom, I use these holding the labels or collecting seed etc. So even the bases can be used!


Linked to:


'I heart Nap Time'
'Nifty thrifty things' 
'Youngancrafty' 
'My romantic home' 
'Funky junk interiors' 
'Country momma cooks' 
'My 1929 charmer' 
'Sew can do' 
'Keeping it simple' 
'diy home sweet home' 
'sassy sites' 
'ProjectQueen' 
'Kammys corner' 
'Organiseyourstuffnow' 
'Gingersnapcrafts'
'Common ground'

Tuesday, 6 March 2012

Herb planter & Fish food holder

Herb / Tomato planter & Fish food holder.


I have so many projects on the go at the moment and nothing actually finished so what's a girl to do when it comes to writing a post for her blog?
I considered doing nothing but that just felt wrong!
I considered featuring someone elses blog but I've done that so many times that it feels like that's just a lazy cop out!
I even considered posting nothing but some cute pictures of my pets but I figured maybe you guys won't be as gaga at their cuteness as their biased owner is - so what to do?

Well, I scraped the barrel - literally - and decided to show you 2 projects I did way back that may have no interest to you but then again they may.

The first is a Fish food holder.
I know, who needs one of those right? Well we did!
We have a natural mini lake here and just before we moved in we emptied the contents of our teeny weeny pond into this lake.
The fish seemed to dissappear from view and for a couple of years we didn't see them, until one day a huge Golden fish appeared, then another and then a silvery looking one followed by a load of Orange or Black Goldfish (huh, how ironic - Orange & Black Goldfish!!).
those Golden ones and the Silvery one turned out to be Koi and they were thriving in this natural pond so we bought a load more. They too thrived and we had some humongous fish that we loved to sit and watch and feed.
This is where the feed holder came in:

 scrapwood holder, fish food container

Schlepping about for fish food can be tiresome when you get to the pond and realise you've forgotten to pick it up so that's why I decided to make this holder. It means we can fill the inside container with food and then just close the lid and lock it up, it makes it so much easier to feed those fishies.

 scrapwood holder, fish food container


(excuse the state of the boat, I forgot to turn it over and now it's full of water - oops)
All made from scrapwood too as usual - yay!

Then I have this herb/flower planter to show ya!

 Herb planter, scrapwood planter, wooden planter, plant holder


You need a bit of imagination for this but originally this was 2 seperate containers.
In my never ending search for greenhouse spacesavers I came up with this idea for growing my Tomato plants.
Imagine the top container isn't there - got that?
Now imagine a couple of bamboo canes inserted through holes drilled into the upright stakes - kay?
So now we have that bottom container with the two side stakes and 2 horizontal bamboos. Next I would fill it half way up with compost and then sink 2 open bottomed plant pots into the compost. Fill the plant pots with compost and put 1 Tomato plant in each pot - perfect Tomato grower and light enough to move around as needed.
Perfect for Herbs too.

I grow Tomatoes in my PT now and use raised beds hence why I turned 2 of the Tomato grower boxes into one space saving planter.
I'm thinking upright Fuschia for the bottom and trailing Fuschia for the top - I luuuuurve Fuschia!


Linked up to:
JAQS Studio
Threemangoseeds 
AthomewithK
TipJunkie 
Notjustahousewife 
DIYhshp

Tuesday, 7 February 2012

Pallet wood space saver

I love coming up with solutions for the home and garden that are either space saving or just make life easier for me, so when I come up with something that does both things for me ......... well let's just I would have wet myself if I didn't have a bladder with an iron constitution!
During Spring and Summer I have loads of garden pots full of either veggie seedlings, perennial seedlings or just general plants waiting for their permanent home.
But when it comes to hardening these plants off before they're planted out or just needing somewhere to contain these many pots and protect them from being blown over by the terrible winds we get up here, well it's a nightmare.
The seedlings have to go out each day and come in each night for a short while and the ones that can stay out permanently in their pots were constantly blowing over, so I decided to make something that would make life easier for me, will protect those pots and space save as well.


Here's my solution - no more schlepping about with pots for me!


pallet wood project, garden space saver, garden pot holder


Okay so maybe it's not the most pretty of solutions and it does need another coat of protector but this took me just half a day to make, used up scrap wood and pallets and does the job perfectly.
So how does it work? Well like this


 pallet wood project, garden space saver, garden pot holder


Still not getting it? I mean holding one of those free garden pot holders is hardly a space saver is it! Nope, but this holds Twelve of those free pot holders - more of a space saver now isn't it!


Here's what I did:
  • opened it in CS5 - Oh wait, wrong project, that would be the photography projects I'm doing!
  • Used 2 old pallets to make the sides. These were then attached to a stake I hammered into the ground at one end of each pallet - the other end was screwed to the fence that already existed. (ps make sure both pallets are pretty much the same where the slats are concerned)
  • Then I measured the width of those free plastic pot holders the garden centres give away and placed battens across the top slat from one pallet to the other. I used 3 battens to the top slat and 3 to the bottom. This gave me enough for 6 pot holders to the top and 6 to the bottom.
  • Covered the base with plastic and bark mulch.
  • Stained the wood for protection.
It was that easy. I now have a pallet wood space saver that holds a total of 12 pot holders - 6 in rows of 2 at the top and 6 in rows of 2 at the bottom.
When deciding how many rows you want you do need to bear in mind the height of the plants you'll be putting there, that's why I only have 2 stages to this one - it means I can use the top or bottom for pretty much any of my pot plants.

 pallet wood project, garden space saver, garden pot holder

 pallet wood project, garden space saver, garden pot holder


Obviously it's not in full use at the moment cos all my plants and seedlings are under cover of the polytunnel but come Spring and this will be full of pots and best of all they stay put no matter what winds whip up!
Hope you like the idea and maybe give it a go yourself!


Linked to:

'Show Me What Ya Got'
'The Ivy Cottage'
'Kammys Corner' 
'Liluna' 
'Tipjunkie' 
'Gingersnapscrafts'
'Radcrafter'
'Craftenvy' 
'The Shabby Nest' 
'Finding Fabulous' 
'French country cottage'