Thursday, 27 September 2012

Happy Anniversary

I went through a faze earlier this year determined to make birthday and anniversary cards myself rather than buying them, after all I do love making them.  I get a bit cheesed off that I don't have the fancy fandangled machines that produce the perfect edges and shapes (even my straight cutter is dodgy now and I have to resort to a craft knife for cutting) but I've discovered ways of achieving the look I want with the few tools I have.
One day I will replace my broken Cricut and I'll purchase some nice card & paper and some of those lovely accessories plastered over Create & Craft tv, but for now I'll cope.

This is a card I made in July for my Sister & her husbands 25th wedding anniversary


These things never turn out quite how I imagined simply because I never know what card and paper I'm gonna use till I get going - I never plan ahead!

The stamp is from LOTV and I coloured it using my Promarkers.
The paper with the heartswas basically shoved through my sewing machine for that effect.
The flowers are the best part for me. I basically cut 3 flower shapes from Mulberry paper and followed an online tutorial to make the bigger ones and then cut strips of Mulberry paper and turned it as i rolled it to make the smaller ones.
The hat pins are simply glass bead sewing pins with jewellery findings glued on with my trusty 'Fixsall' glue.
The squirly wire is just that - thin craft wire wrapped round a pen for the shape and then glued on with 'fixsall'.


Friday, 21 September 2012

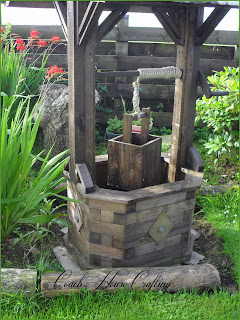
I made this wishing well a couple of years ago on a whim. I literally decided one day to make it with whatever scrap wood I could round up, but because I had absolutely no plan to work with I had to make it up as I went along using whatever wood I had managed to find.
The shape of the base probably caused me the most angst because I didn't want a bog standard square or round one. I'm not sure what this shape would be called but cutting all those little pieces to the exact right size and then nailing em all together was not as easy as I thought - 6" nails are not the easiest to hammer in, and back then I was too lazy to re-drill.
Once the base was made I then found scrap ply to line the inside and then the sides and the wood structure to the roof was made up bit by bit with whatever size wood I had enough of that I thought would be strong enough to hold a slated roof.
I used an old broom handle to make the rope pulley and created a fake handle out of wood scraps. Then I made a square bucket from wood scraps and pinched hubbys tow rope to wind round the pulley.
I am proud to say that every inch of this was cut, nailed, screwed and designed by myself. The only part that hubby had was to slate it and attach a lead ridge tile to it.
The final part was cut some diamonds out of ply, nail em to the base and then attach some little Lead Tudor Roses that hubby had had laying around for years.


Lead Tudor Rose:

wishing well, wooden well, DIY wishing well


Wishing well:
 wooden well, wishing well, scrap wood well


Bucket with rope pulley:
garden wishing well, DIY wooden well, garden ornament

The only problem we have found with the well so far is that it was supposed to be moveable - it's not!
We had to move it 50 yards or so and literally had to take it apart and re-roof it - it weighs a freaking tonne.
Since moving it I have decided that I'm not keen on the base now and am thinking about creating a stone one around it!
Linked to:
Delightful Order 
Bear rabbit Bear Crafts

Wednesday, 19 September 2012

Tealight holder - simple & easy

I've wantedto make a tealight holder or two for a while now but with so many projects on the go I felt real bad about starting something else. Soon got over the guilt though and tackled the tealight holder - mainly because I wanted to do something that I could finish in a quick time.

Here's the finished holder

tealight holder, wooden tealight holder, scrap wood, scrapwood tealight holder

Pretty cute huh?
So easy to make too. I just found an old lump of wood ( even wood with splits will work because it adds to the character), gave it a good sand down ( a very good sand down because this wood was actually an old fence post) and then I sectioned it off into quarters, found the middle point of each of the four sections and drilled a hole for the tealight.
I used a 40mm Forstner bit for the tealight holes but you could also use a 40mm flat drill bit.
Once that was done I gave it another light sand - including the tealight holes - and then gave it 2 coats of medium Oak wood dye and 1 coat of Satin finish varnish.

Looks lovely all lit up and burns my Yankee candle tealights brilliantly.

My next post will be abother holder I made only this one is upright and looks amazing too.


Linked to these partays

Joy 2 Journey
Funky Junk Interiors 
It's a Hodgepodge Life 
My 1929 charmer 
The Southern Insitute 
I should be mopping the floor 
Under the table and dreaming