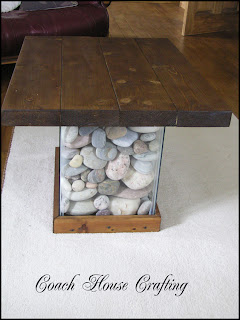
Beach pebble table re-do.
One of the first projects I ever completed for our new house was this coffee table made from an old fish tank, some beach pebbles and some scrap wood.
Over the past year the wood table top has gradually shrunk and separated and has gotten to the stage where it looks horrendous!
This was one of my first ever wood projects and so I never really understood the need to completely dry the wood out before using it, I figured storing it in my husbands shed would be sufficient for drying purposes but in hind sight I can see just how much moisture is in the air in there and with no real sunlight from windows, the wood wasn't as dry as I had thought.
So this is what has happened to every corner and even to the in fills:
See how much the wood has separated? The tip of the corners have stayed pretty tight but that's due to the screws I used there.
So I finally decided to get a new top made with wood that has been stored in my polytunnel where it has completely dried out.
The top is made from 5" x 2" wood that I have plenty of thanks to hubby saving it for me from a building he demolished.
I never work from plans because I'm pretty good at memorising what I want and as long as I can visualise the finished effect then I'm happy to just go with it - besides, a table top is hardly complicated to do.
Basically I cut the wood to the length I wanted the table to be, glued the edges, butted the sides together and clamped the whole thing together for a couple of days - I omitted the clamping last time which I would never do again.
A couple of days later I sanded the top down with various paper grits and using first a circular sander and then a detail sander - this wood needed alot of sanding! (The last top was sanded entirely by hand - Eek!).
Once it was sanded I gave it a couple of coats of Wickes wood dye in a Medium Oak colour and left it for a further 2 days.
Once this was dry it was evident just how different the wood dye tone was on the old top compared to the new top despite using the same tin of dye on both:
Next I gave it a couple of coats of Satin wood varnish.
Once it was dry I simply transferred the base plate from the old top and screwed it to the underside of the new top - this holds the whole thing together and secures it inside the fish tank:
Then it was simply a case of slotting that on to this:
If you look close you should be able to see the lip just inside the top of the fishtank running the length of each side - this is what the wooden battens on the base of the top will sit on, creating this:
Much better!


4 comments:
That is one awesome table!! I love it!
The wood looks fabulous! Nice work!
Very creative way to reuse a fish tank - what a conversation piece!
Fantastic job, Linda! I love the idea, the wood, the whole thing! By the way, the "old" table was not bad either!..
Post a Comment