Finally!
I have one project finished. yay!
And here it is
I made a different table lamp a while ago (check it out HERE) and have been itching to make another one. Originally I was going to make one similar to my last one but use square blocks of wood instead of circles but then I cam across this small hunk of naff looking wood
Maybe some people would have chucked it on the burn pile but I instantly knew what I wanted to use it for even though it had obviously been drenched in creosote at some point in the past.
So I got the orbital sander out and got to work on it, followed by the detail sander.
It didn't actually take too long to sand. In fact I had to stop myself going too far (it's soooo addictive) because I wanted to leave some darker areas so i got different tones with the finished colour.
Next part involved that monstrous looking drill bit!
I found a drill bit that was a tad wider than the lamp wire and long enough to drill through to about 1" from the base of the wood. Once I had that bit drilled I then had to drill an upward angle from the back to meet the drill hole going through the middle, then I threaded the lamp wire through and pulled it out the back.
Here's the pendant sitting on the top.
Next I gave it 2 coats of Antique Oak wood dye and one coat of clear satin Varnish.
Then came the lampshade. I bought a cheap one from 'B&Q' (I checked the charity shops first but no luck) and blinged it up with the fabric flowers I made.
I am now addicted to making fabric flowers, there are numerous tutorials online so I haven't done one here but be warned - once you start you won't be able to stop.
So there's my new table lamp. Easy to make, cheap to make and that makes it all the more interesting to look at.
Enjoy!
Linkin up to
Joy2Journey
The Southern Institute
My 1929 Charmer
Sew can do
Friday, 18 May 2012
Thursday, 17 May 2012
EditMe Challenge wk20
Meet Nancy from A Rural Journal.com this weeks guest judge and owner of this beautiful cat and image
I am a 52 year-old farm wife and mother of two grown sons. My union
iron worker husband and I live in a 100+ year-old farm house in eastern
Nebraska, United States. In my spare time, I enjoy photography,
knitting, reading, cooking, hiking and blogging (which I've been loving
since 2007.) We live on 80 acres of conservation reserve land in a rural
county of about 20,000 people. We have three dogs, several farm cats,
geese, ducks, turkeys, chickens and one guinea -- all of which keep me
company and extremely busy. My blog
is primarily a place to feature my rural photography, talk about what's
happening on our quiet, lazy farm and to meet talented, friendly people
from all over the world.
Here is the SOOC image
And here is my edit
I decided this week that I was bored with CS5 so I thought I would do the entire edit in Picmonkey - I've heard alot about Picmonkey but have never used it before so I just played until I got something half decent.
- Opened in Picmonkey.
- Cropped tighter.
- Boosted the colours and played about until I got some definition in the coat and its colours.
- Used a focus filter to focus mainly on the head.
- Blurred the background a bit more.
- Added some warmth somehow - sorry I don't remember how.
- Added one of the textures which added a bit more warmth.
- Added a border and photo edges.
I must say I'm quite impressed with Picmonkey. This edit was quick and easy, it only took me longer because I wanted to see what each thing did. It would never replace my CS5 but I'll definitely use parts of it again when editing in the future.
Thank you to Branson & Stephanie as always - a fab challenge.
Thank you also to Nancy our guest judge.
If you guys want to give this challenge a go then head on over to the EditMe blogsite and feel free to join in.
Thursday, 10 May 2012
EditMe challenge Wk19
EditMe Challenge wk19
This week's fabulous guest judge is Andi @ The Hollie Rogue!
A bit about Andi: I am Andi--an elementary teacher turned SAHM to two little ones, a wife, follower of Christ, crafter, etsy shop owner, and lover of all things vintage. I am a self-taught wanna-be photographer who just loves to learn new things about the art of photography. I am on a journey to learn more about myself and my passions through this amazing avenue of blogging.
Here's the SOOC
Here's my edit
- Opened in CS5
- Cropped tighter.
- Adjusted vibrancy.
- Adjusted tones.
- Adjusted saturation.
- Adjusted in curves,
- Ran a Coffeeshop action.
- Gave it a border via canvas size.
Have to thank Branson and Stephanie for hosting this brilliant challenge and thank you also to Andi for such a cute image to play with.
Now if you guys want to take part in this challenge then feel free to hop on over to the EditMe Challenge blogsite and join in. Or just check out all the other awesome edits.
Wednesday, 9 May 2012
Lack of posts
Lately I have had a serious lack of posts on this blog. It's not because I'm bored of blogging or that I'm spending too much time getting my weightloss blog up and running ;), it's simply because I have not finished one single project lately to put on here.
The garden is the culprit! It's that time of year when I have to get busy out there or the whole thing just romps away and then I have no chance of catching up with it.
As much as I'd love to indulge you with photos of my doings I'm pretty sure that no one is going to be interested in a slab I've laid or the Horse tail weed I am constantly pulling out or even the tightening of the plastic to the polytunnel. Of course I could be wrong but somehow I doubt it!
So I was going to feature some rather trendy blogs I've started following but TBH right now I simply do not have the time to do them justice - yes, the garden calls again!
So for now I am going to feature one of my older projects and then tonight I am going to spend some time writing a post on the fabulous goodies y'all have been posting lately.
Then hopefully - all pinkies and toes crossed - I will have one of my projects finished so I can show it off on here. I'm hoping to spend time on the picnic bench or the Adirondack chair - all made from scrap wood - but we've just decided that we're going to lay a crazing paving patio as we have heaps of flat stone from when we demolished the stone house and if it comes to a choice between building a picnic bench and playing on a mini digger I know which will win!
I'm hiding indoors at the moment because the wind sounds awful outside. I placated the guilty feeling by convincing myself that I would use the indoor time to make my mums birthday card (it's her birthday in about 6 days) but I made the huge mistake of putting Create & Craft on the TV. Just while I check my emails mind!
Yeah right!
I then logged in to my blog to reply to some emails and comments but we all know what happens then don't we? yup, I'm too engrossed in reading other blogs that heading through to the cold craft room has just lost its appeal.
I could go outside and potter in the poytunnel BUT I figured instead of that I could just blog about a project I completed a couple of years ago before I had the polytunnel and needed some space saving ideas for the greenhouse - those rows of pots with seedling veg and flowers in em were just taking up too much room because I had to put them on just the one layer of staging.
Brainwave people!
I created this space saver (though excuse the dirty holders)

The best bit is that it was easy enough to make with no technical tools needed if you don't have them AND it's all scrap wood AND it recycles those plastic milk containers.
OK so how to make it!
First gather your tools ( I have a habit of looking for what I need when I need it - not a good idea).
You'll need:
Wood - I used roof batten, small scrap bit of plywood, some scrap beading and some scrap pieces of 2"x 2". You can use any size you have though.
Screws (I literally use anything I can find. I used black plasterboard screws for this)
Nails if you don't want to use screws.
Tape measure.
Hammer.
Screwdriver.
Saw (unless you use a cutter as I do)
Pencil.
Milk cartons (I used 30 but you can make the frame and add them as you get them)
Scissors.
I made a basic 4 sided frame using scrap roofing batten and nails or screws or whatever you have, and made corner supports for the top only.

Next I made 2 bottom plates to support the whole thing. I just used whatever cuts of wood we had for this as long as the bottom plate used is wider wood than the top plate.
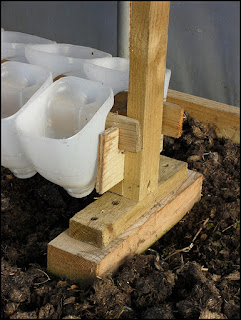
Screw the two bottom base blocks together then screw the actual square frame to the blocks - remembering to keep the corner supports to the top.
Then I cut some pieces of plywood into a rectangle shape and cut out 2 grooves to each one to hold the cross supports that the bottles attach to.
![]()
Those rectangle pieces were then attached to the frame with screws as shown above.
Next I cut some small beading to use as supports for the Milk cartons, making sure the cuts I made in the rectangles kept the supports supported but not so tightly that they were awkward to lift out.
Finally grab some milk cartons (I used either 4 pint or six pint ones) and cut around the carton just about where the label starts. You don't need deep holders if they are for seedling pots.
*TIP - put the lid on the carton before you cut it. This keeps the air in and makes it rigid for that first incision with the scissors - try to pierce it without the cap and it will just collapse*.
Once you have them cut just slot them onto the frame through the milk carton handle. Leave the lid on if you want but you can take the lid off to aid drainage too.
Now you're left with a load of bottoms to milk cartons so lets use em to make plant labels.
Cut down the middle of the leftover bases to the next mark that goes all the way round the container (would have been the bottom of the label) then turn and cut all the way round the circumference of the container so you end up with a large rectangle of plastic.
Finally cut slices off that plastic as wide as you require your labels to be and then cut points on one end od each and voila! Plastic plant labels for free.

I use these labels all the time and because they're free to make I don't worry about cleaning them when they're really bad, I just throw them away and make some more. You can stick them in a container of bleach though as they are easy enough to clean that way.
p.s. Once you've cut the side off the container to make your labels you are left with small pots made from the very bottom, I use these holding the labels or collecting seed etc. So even the bases can be used!
Linked to:
'I heart Nap Time'
'Nifty thrifty things'
'Youngancrafty'
'My romantic home'
'Funky junk interiors'
'Country momma cooks'
'My 1929 charmer'
'Sew can do'
'Keeping it simple'
'diy home sweet home'
'sassy sites'
'ProjectQueen'
'Kammys corner'
'Organiseyourstuffnow'
'Gingersnapcrafts'
'Common ground'
The garden is the culprit! It's that time of year when I have to get busy out there or the whole thing just romps away and then I have no chance of catching up with it.
As much as I'd love to indulge you with photos of my doings I'm pretty sure that no one is going to be interested in a slab I've laid or the Horse tail weed I am constantly pulling out or even the tightening of the plastic to the polytunnel. Of course I could be wrong but somehow I doubt it!
So I was going to feature some rather trendy blogs I've started following but TBH right now I simply do not have the time to do them justice - yes, the garden calls again!
So for now I am going to feature one of my older projects and then tonight I am going to spend some time writing a post on the fabulous goodies y'all have been posting lately.
Then hopefully - all pinkies and toes crossed - I will have one of my projects finished so I can show it off on here. I'm hoping to spend time on the picnic bench or the Adirondack chair - all made from scrap wood - but we've just decided that we're going to lay a crazing paving patio as we have heaps of flat stone from when we demolished the stone house and if it comes to a choice between building a picnic bench and playing on a mini digger I know which will win!
With gardening in mind, here's my repost
I'm hiding indoors at the moment because the wind sounds awful outside. I placated the guilty feeling by convincing myself that I would use the indoor time to make my mums birthday card (it's her birthday in about 6 days) but I made the huge mistake of putting Create & Craft on the TV. Just while I check my emails mind!
Yeah right!
I then logged in to my blog to reply to some emails and comments but we all know what happens then don't we? yup, I'm too engrossed in reading other blogs that heading through to the cold craft room has just lost its appeal.
I could go outside and potter in the poytunnel BUT I figured instead of that I could just blog about a project I completed a couple of years ago before I had the polytunnel and needed some space saving ideas for the greenhouse - those rows of pots with seedling veg and flowers in em were just taking up too much room because I had to put them on just the one layer of staging.
Brainwave people!
I created this space saver (though excuse the dirty holders)

The best bit is that it was easy enough to make with no technical tools needed if you don't have them AND it's all scrap wood AND it recycles those plastic milk containers.
OK so how to make it!
First gather your tools ( I have a habit of looking for what I need when I need it - not a good idea).
You'll need:
Wood - I used roof batten, small scrap bit of plywood, some scrap beading and some scrap pieces of 2"x 2". You can use any size you have though.
Screws (I literally use anything I can find. I used black plasterboard screws for this)
Nails if you don't want to use screws.
Tape measure.
Hammer.
Screwdriver.
Saw (unless you use a cutter as I do)
Pencil.
Milk cartons (I used 30 but you can make the frame and add them as you get them)
Scissors.
I made a basic 4 sided frame using scrap roofing batten and nails or screws or whatever you have, and made corner supports for the top only.

Next I made 2 bottom plates to support the whole thing. I just used whatever cuts of wood we had for this as long as the bottom plate used is wider wood than the top plate.

Screw the two bottom base blocks together then screw the actual square frame to the blocks - remembering to keep the corner supports to the top.
Then I cut some pieces of plywood into a rectangle shape and cut out 2 grooves to each one to hold the cross supports that the bottles attach to.
Those rectangle pieces were then attached to the frame with screws as shown above.
Next I cut some small beading to use as supports for the Milk cartons, making sure the cuts I made in the rectangles kept the supports supported but not so tightly that they were awkward to lift out.
Finally grab some milk cartons (I used either 4 pint or six pint ones) and cut around the carton just about where the label starts. You don't need deep holders if they are for seedling pots.
*TIP - put the lid on the carton before you cut it. This keeps the air in and makes it rigid for that first incision with the scissors - try to pierce it without the cap and it will just collapse*.
Once you have them cut just slot them onto the frame through the milk carton handle. Leave the lid on if you want but you can take the lid off to aid drainage too.
Now you're left with a load of bottoms to milk cartons so lets use em to make plant labels.
Cut down the middle of the leftover bases to the next mark that goes all the way round the container (would have been the bottom of the label) then turn and cut all the way round the circumference of the container so you end up with a large rectangle of plastic.
Finally cut slices off that plastic as wide as you require your labels to be and then cut points on one end od each and voila! Plastic plant labels for free.

I use these labels all the time and because they're free to make I don't worry about cleaning them when they're really bad, I just throw them away and make some more. You can stick them in a container of bleach though as they are easy enough to clean that way.
p.s. Once you've cut the side off the container to make your labels you are left with small pots made from the very bottom, I use these holding the labels or collecting seed etc. So even the bases can be used!
Linked to:
'I heart Nap Time'
'Nifty thrifty things'
'Youngancrafty'
'My romantic home'
'Funky junk interiors'
'Country momma cooks'
'My 1929 charmer'
'Sew can do'
'Keeping it simple'
'diy home sweet home'
'sassy sites'
'ProjectQueen'
'Kammys corner'
'Organiseyourstuffnow'
'Gingersnapcrafts'
'Common ground'
Sunday, 6 May 2012
Spring has Sprung
We may be a tad behind the rest of the UK up here in the Scottish Highlands when it comes to the arrival of Spring, however snouting around in the garden today I noticed that some of the plants are well and truly bursting into growth - how joyful!
Mind you, we could easily be hit with a week of snow which will kill everything off but at least i got some piccies of the pretty flowers
This is Saxifrage and it's absolutely plastered with gorgeous pink flowers. Plus, this is amazingly easy to grow - I got fed up planting plants one time so I simply left this one on top of the gravel, no planting at all, and it has romped away.
This next one is that dreaded Gorse. Most of the year I hate the stuff with a vengeance, it's a self seeding giant of a plant that is nigh on impossible to get rid of and has spikes that hurt at the slightest touch, and if one of those spikes really gets you it leaves a black mark that hurts for days. This stuff will pierce pretty much all body armour!
The Gunnera! Gunnera Manicata to be exact! Love it!
I used to grow this plant in a big container when we had a small garden and thought it looked amazing. I really didn't think it would survive up here right next to the coast but a day trip to Dunrobin castle proved it would. They had the stuff growing in their grounds and it was moosive, I mean the leaves were a good 6ft each.
Now we have some land I have 2 clumps of Gunnera in the ground right next to the pond and each year they are just going to get bigger and bigger - yay!
This year I am hoping to take a concrete cast of one of the leaves like *this*. I'm also going to try it with some Hosta leaves.
In the polytunnel the fruit trees have flowered profusely and it looks like we're set to have a bumper crop of Apples, Pears, Cherries, Plums and Figs.
The Bees were very busy on the trees when I took this photo and as I'm learning to work through my fear of all things buzzy I took loads of close up pictures, sadly I only ever managed to get the arse end though - oh well!
Mind you, we could easily be hit with a week of snow which will kill everything off but at least i got some piccies of the pretty flowers
This is Saxifrage and it's absolutely plastered with gorgeous pink flowers. Plus, this is amazingly easy to grow - I got fed up planting plants one time so I simply left this one on top of the gravel, no planting at all, and it has romped away.
This next one is that dreaded Gorse. Most of the year I hate the stuff with a vengeance, it's a self seeding giant of a plant that is nigh on impossible to get rid of and has spikes that hurt at the slightest touch, and if one of those spikes really gets you it leaves a black mark that hurts for days. This stuff will pierce pretty much all body armour!
The Gunnera! Gunnera Manicata to be exact! Love it!
I used to grow this plant in a big container when we had a small garden and thought it looked amazing. I really didn't think it would survive up here right next to the coast but a day trip to Dunrobin castle proved it would. They had the stuff growing in their grounds and it was moosive, I mean the leaves were a good 6ft each.
Now we have some land I have 2 clumps of Gunnera in the ground right next to the pond and each year they are just going to get bigger and bigger - yay!
This year I am hoping to take a concrete cast of one of the leaves like *this*. I'm also going to try it with some Hosta leaves.
In the polytunnel the fruit trees have flowered profusely and it looks like we're set to have a bumper crop of Apples, Pears, Cherries, Plums and Figs.
The Bees were very busy on the trees when I took this photo and as I'm learning to work through my fear of all things buzzy I took loads of close up pictures, sadly I only ever managed to get the arse end though - oh well!
Friday, 4 May 2012
EditMe Challenge Wk18
EditMe challenge Wk18
Our guest judge this week is a dedicated Edit Me participant, Kaylene Maalste from L'INSTANT. We are so happy to have her this week! Here's a little more about her...
I
am retired and live in Berri, Australia with my husband and bossy cat. I
have always been interested in creating, in my early days it was
playing around with beading, paper maiché, mosaics, quilting and
embroidery. I always felt that I needed to focus my creativity into one
if not two mediums and I have accomplished this with Art Quilts and
photography. My surrounding countryside is full of many different
landscapes, in fact sometimes I do not need to even leave my garden. I
love taking photographs and then playing with them in my editing
software (Photoshop PSE 10) and several great plug-ins. I cannot draw
so the computer screen has become my canvas. I participate in challenges
that have given me the opportunity to develop my editing skills. I use
a CoolPix L120 camera (basically a point and shoot), and I am looking
forward to the day I can move up the camera ladder. My husband is very
supportive and has grown used to me asking him to pose for me, and
coming to an abrupt halt when we are driving so I can take a shot.
Here is this weeks Sooc
and here is my edit:
Thank you as always to Branson & Stephanie for hosting such an awesome challenge.
If you'd like to take part in the EditMe Challenge then head on over to the blogsite, download the image and have a play.
Our guest judge this week is a dedicated Edit Me participant, Kaylene Maalste from L'INSTANT. We are so happy to have her this week! Here's a little more about her...
Here is this weeks Sooc
and here is my edit:
- Opened in CS5
- Cropped the image to create a landscape effect.
- Removed the fence wire and posts.
- Adjusted the image via curves.
- Adjusted vibrancy, strength, exposure, detail to create a HDR effect.
- Added texture.
- Done!
Thank you as always to Branson & Stephanie for hosting such an awesome challenge.
If you'd like to take part in the EditMe Challenge then head on over to the blogsite, download the image and have a play.
Friday, 27 April 2012
Guest post
Today I'm guest posting for Kaysi over at 'Keeping it simple'.
I love creating items for the home and garden using scrap or recycled materials. If I see something I like at the garden centres or online then I find a way to make something similar with as little cost as possible - preferably no cost at all.
My guest post for Kaysi today is all about showing you exactly how I created this lovely bench planter from scrap wood, in just a couple of days and making it up as I went along,
This planter with built in seat was amazingly simple to build and can easily be completed over a weekend.
With just a few adjustments you can adapt it to be able to use whatever scrap wood you have laying about or can scrounge. As it happened for me my husband saved a load of lengths of 5"x2" from a wood workshop he demolished. I'd been wondering what I could make with the wood and that's when I happened upon this idea, plus I still have enough lengths left to build a picnic table for the garden and maybe even an Adirondack chair as well (tutorial on my blog soon).
To start with you need to collect all your tools and materials. I tend not to do this and always regret it later on when I'm hunting around looking for what I need and usually find I don't have it.
You'll need:
Please say Hi to Kaysi and hopefully enjoy the tutorial enough to maybe have a go at something similar yourself!
Enjoy!
Linked to these partays:
I love creating items for the home and garden using scrap or recycled materials. If I see something I like at the garden centres or online then I find a way to make something similar with as little cost as possible - preferably no cost at all.
My guest post for Kaysi today is all about showing you exactly how I created this lovely bench planter from scrap wood, in just a couple of days and making it up as I went along,
This planter with built in seat was amazingly simple to build and can easily be completed over a weekend.
With just a few adjustments you can adapt it to be able to use whatever scrap wood you have laying about or can scrounge. As it happened for me my husband saved a load of lengths of 5"x2" from a wood workshop he demolished. I'd been wondering what I could make with the wood and that's when I happened upon this idea, plus I still have enough lengths left to build a picnic table for the garden and maybe even an Adirondack chair as well (tutorial on my blog soon).
To start with you need to collect all your tools and materials. I tend not to do this and always regret it later on when I'm hunting around looking for what I need and usually find I don't have it.
You'll need:
- Wood. I didn't calculate what I needed and never work from plans but it's obviously going to be more convenient to measure beforehand. You'll need wood for the main construction and the seat, battens for a base ledge, slats to create the base and wood to make the top rim.
- Screws/nails.
- Tape measure & pencil
- Hand saw or Cross cutter (electric all the way for me).
- Dewalt drill or similar.
- Plastic if you want to line the planter.
- Fence paint or exterior varnish.
Please say Hi to Kaysi and hopefully enjoy the tutorial enough to maybe have a go at something similar yourself!
Enjoy!
Linked to these partays:
Thursday, 26 April 2012
EditMe challenge wk17
EditMe Challenge Wk17
I've missed the last couple of challenges but I simply couldn't resist getting back into the swing of it with this weeks image.
Our guest judge this week is Diane from Butterflies In Time Photography. Here is a little bit more about her...
Hi, My name is Diane O’Connor and I share my photography work at Butterflies In Time Photography.
Truth be told, photography is not my main profession (not yet anyway)
but I do have a never-ending craving to be creative in everything I
do. Although I only began to seriously delve into photography in 2011,
my husband encouraged me long before this to do “something creative”.
Well, after much contemplation, I bit the bullet and here I am and I
absolutely love it! I truly am a diehard photo-enthusiast who takes
pictures of everything (and I mean everything!), wherever I go.
Here's Dianes image:
and here's what I did with it:
Thank you as always to Brandy & Stephanie for hosting the challenge.
If you fancy having a go at the challenge then mosey on over to the EditMe blogsite and join in.
I've missed the last couple of challenges but I simply couldn't resist getting back into the swing of it with this weeks image.
Our guest judge this week is Diane from Butterflies In Time Photography. Here is a little bit more about her...
Here's Dianes image:
and here's what I did with it:
- Opened in CS5.
- Created a background copy.
- Used a tool (sorry don't know the name of it) that let me select parts of the image to seperate from the background. This took me an age because I'm not familiar with this tool.
- Inverted the selected flowers and deleted the background.
- Cloned some of the leaf edges that had been made messy due to the previous action.
- Added 3 different textures and set each one to Multiply.
- Messed about with the opacity of each action until I got what I wanted.
- Created a 30 pixel border via canvas size.
- Flattened the image.
Thank you as always to Brandy & Stephanie for hosting the challenge.
If you fancy having a go at the challenge then mosey on over to the EditMe blogsite and join in.
Tuesday, 24 April 2012
Beach pebble table re-do
Beach pebble table re-do.
One of the first projects I ever completed for our new house was this coffee table made from an old fish tank, some beach pebbles and some scrap wood.
Over the past year the wood table top has gradually shrunk and separated and has gotten to the stage where it looks horrendous!
This was one of my first ever wood projects and so I never really understood the need to completely dry the wood out before using it, I figured storing it in my husbands shed would be sufficient for drying purposes but in hind sight I can see just how much moisture is in the air in there and with no real sunlight from windows, the wood wasn't as dry as I had thought.
So this is what has happened to every corner and even to the in fills:
See how much the wood has separated? The tip of the corners have stayed pretty tight but that's due to the screws I used there.
So I finally decided to get a new top made with wood that has been stored in my polytunnel where it has completely dried out.
The top is made from 5" x 2" wood that I have plenty of thanks to hubby saving it for me from a building he demolished.
I never work from plans because I'm pretty good at memorising what I want and as long as I can visualise the finished effect then I'm happy to just go with it - besides, a table top is hardly complicated to do.
Basically I cut the wood to the length I wanted the table to be, glued the edges, butted the sides together and clamped the whole thing together for a couple of days - I omitted the clamping last time which I would never do again.
A couple of days later I sanded the top down with various paper grits and using first a circular sander and then a detail sander - this wood needed alot of sanding! (The last top was sanded entirely by hand - Eek!).
Once it was sanded I gave it a couple of coats of Wickes wood dye in a Medium Oak colour and left it for a further 2 days.
Once this was dry it was evident just how different the wood dye tone was on the old top compared to the new top despite using the same tin of dye on both:
Next I gave it a couple of coats of Satin wood varnish.
Once it was dry I simply transferred the base plate from the old top and screwed it to the underside of the new top - this holds the whole thing together and secures it inside the fish tank:
Then it was simply a case of slotting that on to this:
If you look close you should be able to see the lip just inside the top of the fishtank running the length of each side - this is what the wooden battens on the base of the top will sit on, creating this:
Much better!
One of the first projects I ever completed for our new house was this coffee table made from an old fish tank, some beach pebbles and some scrap wood.
Over the past year the wood table top has gradually shrunk and separated and has gotten to the stage where it looks horrendous!
This was one of my first ever wood projects and so I never really understood the need to completely dry the wood out before using it, I figured storing it in my husbands shed would be sufficient for drying purposes but in hind sight I can see just how much moisture is in the air in there and with no real sunlight from windows, the wood wasn't as dry as I had thought.
So this is what has happened to every corner and even to the in fills:
See how much the wood has separated? The tip of the corners have stayed pretty tight but that's due to the screws I used there.
So I finally decided to get a new top made with wood that has been stored in my polytunnel where it has completely dried out.
The top is made from 5" x 2" wood that I have plenty of thanks to hubby saving it for me from a building he demolished.
I never work from plans because I'm pretty good at memorising what I want and as long as I can visualise the finished effect then I'm happy to just go with it - besides, a table top is hardly complicated to do.
Basically I cut the wood to the length I wanted the table to be, glued the edges, butted the sides together and clamped the whole thing together for a couple of days - I omitted the clamping last time which I would never do again.
A couple of days later I sanded the top down with various paper grits and using first a circular sander and then a detail sander - this wood needed alot of sanding! (The last top was sanded entirely by hand - Eek!).
Once it was sanded I gave it a couple of coats of Wickes wood dye in a Medium Oak colour and left it for a further 2 days.
Once this was dry it was evident just how different the wood dye tone was on the old top compared to the new top despite using the same tin of dye on both:
Next I gave it a couple of coats of Satin wood varnish.
Once it was dry I simply transferred the base plate from the old top and screwed it to the underside of the new top - this holds the whole thing together and secures it inside the fish tank:
Then it was simply a case of slotting that on to this:
If you look close you should be able to see the lip just inside the top of the fishtank running the length of each side - this is what the wooden battens on the base of the top will sit on, creating this:
Much better!
Labels:
Fish tank table,
furniture,
pebble table,
tutorial,
wood,
woodwork
Monday, 23 April 2012
Book review - Invasion - Jon S Lewis
Invasion - Jon S Lewis
'MIB' meets 'Stargate'
Colt McAlister is drawn into a war against things he thought only existed in comic books.
After a car wreck takes the lives of his parents, Colt moves to Arizona to stay with his grandfather. There, an informant tells him that his parents were actually murdered because his mom, a journalist, was getting ready to write a story exposing Trident Industries.
Along with Oz and Danielle, his new comrades at Chandler High, Colt vows to uncover the truth. But the more they learn, the more bizarre reality becomes. Mind control, jet packs, and flying motorcycles only scratch the surface of what they discover.
Colt is recruited by a secret organization called the Central Headquarters Against the Occult and Supernatural. But the battle isn't just against an out-of-control giant corporation. A gateway to another world is opening, and the invasion has already begun.
The first few pages of this book had me hooked. The storyline was kind of 'Men in Black' crossed with 'Stargate' and although it was immediately over the top it kinda had you enjoying it!
A couple of chapters in however and I was dreading reading the next page let alone the next chapter, the plot suddenly became boring and that enjoyable unbelieveable 'MIB' action just wasn't enough to pick up what the author had managed to lose.
I read this book to the very last page because that is what I agreed to do but it was hard.
This book has many 4 star reviews so and for the first couple of chapters I honestly thought I would be giving it the same however I wonder if the reader needs to be more of a teenager than someone hitting 40.
'MIB' meets 'Stargate'
Colt McAlister is drawn into a war against things he thought only existed in comic books.
After a car wreck takes the lives of his parents, Colt moves to Arizona to stay with his grandfather. There, an informant tells him that his parents were actually murdered because his mom, a journalist, was getting ready to write a story exposing Trident Industries.
Along with Oz and Danielle, his new comrades at Chandler High, Colt vows to uncover the truth. But the more they learn, the more bizarre reality becomes. Mind control, jet packs, and flying motorcycles only scratch the surface of what they discover.
Colt is recruited by a secret organization called the Central Headquarters Against the Occult and Supernatural. But the battle isn't just against an out-of-control giant corporation. A gateway to another world is opening, and the invasion has already begun.
The first few pages of this book had me hooked. The storyline was kind of 'Men in Black' crossed with 'Stargate' and although it was immediately over the top it kinda had you enjoying it!
A couple of chapters in however and I was dreading reading the next page let alone the next chapter, the plot suddenly became boring and that enjoyable unbelieveable 'MIB' action just wasn't enough to pick up what the author had managed to lose.
I read this book to the very last page because that is what I agreed to do but it was hard.
This book has many 4 star reviews so and for the first couple of chapters I honestly thought I would be giving it the same however I wonder if the reader needs to be more of a teenager than someone hitting 40.
Subscribe to:
Posts (Atom)


