Monday 31 October 2011

Wooden blocks

Whilst scouring the net for inspiration (as always cos my imagination is non existant) I noticed alot of wooden blocks with lettering or phrases on them - love em!
A while back I had a go at 'these' ones and loved the outcome but I'm really wanting to have a go at the ones that look like childrens building blocks.

So here is what I came up with:


and:


You wouldn't believe how simple these were to make.
Both sets began the same way. For the 'HOME' set I cut 4 blocks from a length of 2"x2" scrap wood and each one was sanded quite alot. To get the curved edges I used a seriously hard core piece of sandpaper (I do have mechanical tools for the job but I luuurve hand sanding) and then I used 2 other grades to smooth it out.

unsanded left, sanded right. But I'm guessing you knew that!

Next I gave it 2 thin coats of Patio Paint, waited for it to dry and then sanded those corners and edges back.
When it came to the lettering I discovered the ink was out in the printer - don't you just love it when that happens! NOT!! - and my Cricut machine blade obviously needs replacing as it just teared anything I put in it - I'm soooo not organised!
Just as I was about to produce a mammoth sulk I remembered a book on lettering my mum gave me a couple of weeks ago which is full of font samples in the back. Saved!!!
So I simply traced the letters the way I did for 'this' project onto paper, traced again on the reverse of the paper, laid it on the block and scribbled over it to trace the letter to the block.
Finally I used my 'stabilo' & 'Sharpie' permanent pens and traced the letters - seemples!

Sitting nicely on an old book on my sideboard.

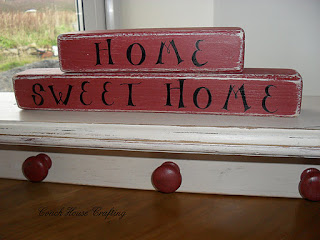
Finished 'HOME' blocks.

The 'Home Sweet Home' blocks were produced the same way except for longer cuts of the 2"x2" obviously.
Originally I painted them Laura Ashleys 'Duck Egg' but as it dried I decided it wouldn't really look quite right with the other projects it was going to go with so I went over the 'Duck Egg' with Patio paints 'Patio Brick'.
Once dried I sanded those edges and corners again and a little to the fronts as well.
Originally I wanted to do the lettering White but it looked awful. I'm a bit picky when it comes to my lettering and if I feel the control isn't right then I'm not going to like the outcome. Obviously with no White pen (Do those exist?) I had to use paint and an adapted paintbrush - it's so never going to work!
Looked terrible so I started again and traced letters the same way as above and went over it with the trusty 'Stabilo' & 'Sharpie' pens.

'Home Sweet Home' sitting on my 'Shabby Shelf ' which hasn't been put up yet!


I absolutely enjoyed making these. It's always nice when a project takes such a small amount of time especially if you have larger pieces on the go too.
I'm going to make more of these blocks for Christmas decorations so look out for more of em!

Thanks for popping in again. Hope you liked em. Please leave a comment as I read every single one and love to get them. xx


Linked to:

'Keeping it simple'

'The girl creative'


'The Southern Institute'

'C.R.A.F.T'

'Coastal Charm'

'Sew Chatty'

'Three Mango Seeds'

'Not Just a Housewife'

'Reasons to skip the Housework'

'Todays creative blog'

'Delightful Order'

'seven thirty three'

'Funky Junk Interiors'

'Ginger snap crafts'

Friday 28 October 2011

LIEBSTER BLOG AWARD


Sharon from the inspirational blog 'From Rags to Rainbows' has kindly awarded me with the Liebster Blog Award. Yay!!!!

The Liebster Blog Award is given to up and coming bloggers who have less than 200 followers. Liebster is a German word meaning clean, sweet, kind, nice, good, beloved, lovely, kind, pleasant, valued, cute, endearing and welcome.

Thank you so much for considering my blog worthy Sharon. It was an amazing suprise and as I haven't been blogging that long it's a wonderful incentive for all those endless photos we bloggers take and all those hours spent typing when the rest of the household is doing exactly what every sane person should be doing at 3am - sleeping!

For those of you who are not already avid followers of Sharon, you really should get on over to 'From Rags to rainbows' and check out her blog. She has a passion for all things crafty but I especially love her furniture makeovers - check out 'Little Green Table', it's one of my favourites.


To keep this award going and pass it along to other new deserving blogs, the recipient must now recognize five other bloggers with less than 200 followers that have stood out in the crowd.

The rules for the Liebster Award are:

1. Thank the giver and link back to the blogger who gave it to you.

2. Reveal your top 5 picks and let them know by leaving a comment on their blog.

3. Copy and paste the award on your blog.

4. Have faith that your followers will spread the love too!

So, here are my 5 randomly ordered blogs:

'Not Enough Hours' :- Brittany is a gorgeous lady who loves to refinish furniture like so many of us and loves digging for treasures.


'Ethereal plus what I love'
:- "Decorating with what you love, what you can afford and what makes you smile when you walk through the door". Need I say more? Check out francines blog.

'Serendipity':- A fun blog, Sara includes DIY, Random thoughts and Special needs on her blog interface.

'My Heart's Song':- Genevas blog is a one stop shop for inspiration. I particularly like the kitchen cabinet makeover.

Unfortunately I could only add 4 blogs as my other followers either had more than 200 followers or did not leave a link to their webistes/blog.

Congratulations to the above blogging ladies!

OK guys, now you know you want to get on over to those blogs and check em out!


Wednesday 26 October 2011

Family motto

This project was one I'd had on my mind for ages. It's actually 1 part of what will be 3 sections - the first section, 'a shabby shelf', is finished already, the second part is this frame and the third part is a table that is currently in the workshop.

This started off its life as a picture that had been on our walls for years - in the bathroom!!???!!, however originally it was my sister in laws so it's been around a while:

Seriously faded. The colours are all Blue.

We used to love the picture, in fact hubby still does but once I'd actually taken the picture out of the frame is was sooooo obvious how much it had faded.
Once I'd taken it all apart I gave it a good sand down making sure the awful gold flake area was done extra well.
Then I gave it a coat of Patio Paints in 'Patio Brick'. Originally I had intended to then go over it with a cream paint and sand it back but I changed my mind - I kept it in the Brick colour.
It was also intended to be a pin/memo board with areas for letters ready for posting and also an area for a calender but I changed my mind about that as well...
Then it was just going to be a pin/memo board but guess what? Changed my mind about that too.... see, this is why I don't plan my projects - I always change them.

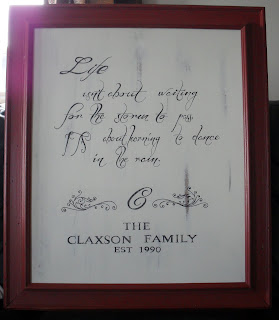
Finally I decided I would make it into a board with a quote. As it would be hanging in the hallway I figured it would be a cute thing to have.
I spent an age trying to find something to use that I could paint onto that would fit the frame and then I had a brain wave ..... yep me....
I used the backboard that originally held the picture in place - cool idea eh!
It took a bit of sanding back because I had to use the back of to write on  because the front was too rough and had a weird texture. The back however had had years of tape stuck to it so the sanding took a wee while.
Once it was sanded down I painted it with Patio Paints 'Cloud White' and then a couple of coats of 'Contemporary' emulsion paint.
Once dry I sanded it back to reveal the White and also the dark board beneath:

It is actually more sanded than this piccie shows plus this piccie needs turning CCW - Oops!

Next was the frustrating bit.
I knew what phrase I wanted to use - "Life isn't about waiting for the storm to pass, it's about learning to dance in the rain" - BUT I'd ran out of computer ink and was waiting for new ink to arrive.
Could I wait a few days for the ink? Could I eckers like! I had to come up with something else.
So I opened CS5 on my laptop and opened a load of new pages in A4 size. On each one I wrote part of the quote and just hoped and prayed I'd managed to do each one in the same size as I had to enlarge them past the maximum font size.
The best thing about laptops is that the screen is backlit - makes a perfect lightbox.
To copy the letters from the laptop onto paper I turned the laptop round so that the screen was sitting on my knee and simply traced them onto paper:

Look at that for backlighting!

Once I had the image on paper I simply turned it over and traced that image on the back so that I could then put it to the board, scribble over it and have the letters imprinted where I needed them. *HINT: Use a pencil that is dark - these are usually the softer ones. It makes a big difference when tracing the letter to the board. A finer, lighter pencil just won't show enough on the piece you've traced to.
Once the letters were on in pencil I grabbed my permanent pen (a Stabilo & a Sharpie), lay on the floor and went over all those letters.
I always find 'Sharpie' bleeds when you varnish so I try not to use it too much but I've always found that any permanent pen struggles to work on paint and I am constantly (every few strokes) having to get the pen to run again on waste paper - very annoying!!! So if anyone knows of a permanent pen that actually works well on paint pleeeeease let me know.

Once the pen had dried I then gave it another sand down to age it a little.


I'm quite chuffed with how it's turned out. I maybe would change the font next time - This one is 'Before the Rain' and I would prefer the words to cover more of the area.
Overall though it's gonna look great with the 'shabby shelf' and the table.

Thanks for taking a peek, hope you enjoyed it.


This post is linked to
'Ginger Snap Crafts'
'Someday Crafts'
'Night Owl crafting'
'The Girl Creative'
'Delightful order'
'Bear rabbit bear'
'The DIY showoff'
'Flamingo Toes'
'The Shabby Nest'
'Miss mustard Seed'
'Finding Fabulous for Less'

Monday 24 October 2011

Sideboard makeover

I think I may need therapy!
Seriously!!
I'll begin here, now.
My name is Linda and I am addicted to Shabby chic!!
There I said it, I feel so much better now. Doubt I'm cured though.

This project started off as a £5 sideboard at the local cahrity shop. So determined to have it and take it home there and then that I insisted that myself, my daughters and their friend could quite easily carry it outside, down the steep alleyway and all the way up to the car park. Never mind that all three girls were in high heels (how stupid to go shopping in shoes you can't carry goodies in!).
"It won't fit in the car mother!!" That's not really a helpful comment is it - who needs reality when a piece of furniture is destined to go home with you?
"It will if you three catch the bus home!" The looks on their faces were classic. I'd like to think that I wouldn't have gone that far but.............
So the bemused shop assistants who kept trying to get me to pull up outside (nah, no need for that I insisted) opened the doors fully wide for us and ushered everyone out the way.
I grabbed the end first and immediately put it back down rather sheepishly. Reality had sunk in a) no way could the girls pick this up. B) No way was it going down the alley without someone suffering a broken leg, and C) No way was it going to fit in the car.
"I'll just leave it here for now and get my husband to pick it up" - note I said that in a tone that would suggest I thought everyone in the shop was stupid for not having thought of that in the first place - don't you just love people like that!

Anyway, hubby said it wouldn't fit in his little van so a friend had to pick it up and keep it in his van. For 3 days! 3 days!! You can imagine can't you, the anger, the impatience and the sulking?

So here is the sideboard as it was


Yep, THAT is what all the fuss was about! Hard to believe eh?

Right from the start I knew what I wanted to do with it.
The glass was to come out, shelves to be repositioned and maybe just one to each side, the top was going to be renewed with 6x2 wood that was to be stained and the unit itself was to be a solid cream colour.
So the glass came out as did the shelves and I sanded it to within an inch of its life.
Then I gave it a coat of spray primer. The stuff I used is actually car primer and it was cheap - £1. I know alot of people recommend NOT using the cheap stuff but this one actually did cover well (though not perfectly) and set very quickly. Soooo much better than painting a primer on.
Then I started on the colour coat. We have tins of 'Classic Cream' paint that we bought for the house but thought it looked too yellow on the walls but I figured I'd give it a go on this.
It covered well but putting it on with a brush (even brand new ones) was doing my head in. I hate even the slightest tiny bit of dust or tiny hair and I found I was having to sand down after every coat.
This was making it take an age to complete.
On the back board I decided to stencil a pattern that matched the feature wall in our front room. You can check out how I made the stencil 'here'.
At first I loved the finished stencil look but the more I looked at it the more I thought "what the hell was I thinking?"


I really do not like it now but I left it simply because I was sick of all the painting by this point.
During the final sanding I kinda got carried away and then decided that the piece would look much better as a shabby piece. It so does!
The shelves were also sanded but despite my original 'plan' they went back in in their original place.
As for the top. Well I decided I didn't want the chunky wood top I wanted to do more sanding - see, told you I need therapy!.

This is the finished piece


>


It really is more sanded than it looks - honestly! I just haven't got the hang of taking decent piccies yet!
The bottles on the top I got for 79p each from a bargain store when I was in England recently. The flowers in the vases were not what I really wanted but they were all I could find in the bargain shop.
The book on the other end is an old one that my mum gave me.

So thanks for stopping by, pop back anytime.


This post is linked to:

'Craft-O-Maniac'

'Three Boys'
'Restore Interiors'
'Three boys vintage furniture'
'It's a Blog Party'
'Kammys corners' 
'Common ground' 
'Cherished Bliss' 
'Its a hodgepodge life' 
'Domestically speaking'

Friday 21 October 2011

Shabby Shelf

Projects have been a tad slow for me over the last wee while. I have loads of ideas and inspiration jingling around in my head but it tends to get to the point where I have so many projects going on that none of them actually get finished - how many others suffer from this infliction I wonder?

Anyways I've had a project for the hallway planned for ages. I wanted to make a pinboard from an old frame, a shabby shelf with hooks and some kind of table for underneath.
The pinboard idea has changed numerous times and is now nothing like a pinboard nor is it finished.
The table for underneath the shelf is still sitting in the shed and still looks exactly like what it is - a pine chest of drawers.

The Shabby shelf however is complete - Tada!


This entire shelf started out in life as a drawer - yep a drawer! A drawer that came from the pine chest I was given and the remainder of which will make a nice little table for below the shelf.

Basically I took 2 drawers apart, took the pine knobs off the front and used the fronts as the shelf ledge.
The first one I did I painted 'Patio Brick' and then went over with 'Oyster' from Laura Ashley paints (I picked up a tester pot for 50p).
Unfortunately when I sanded it down for that shabby look it ended up looking pink - so not the look I was going for. I'm not sure if it was the sanding down that created the Pink hint or the Laura Ashley paint having a pinkish tinge to it, either way - Urghhhh!
So I sidelined that shelf and then made another one, this time painting it 'Cloud White' and 'Oyster' and then sanded it down for that shabby look.

For the corbels I got the idea from a fabulous website called 'Not just a Housewife'. I'd bookmarked those corbels intending to make them just like Stacy but for the life of me I could not get one to resemble the other and lost patience. In the end I decided to use them as end brackets instead.
I cut these corbels from scrap wood with my trusty Dewalt jigsaw after I made a template by drawing the shape on paper first, cutting it out and using these to draw round.  They then got the same treatment and paint colours as the shelf top.


The back board was the back board from the drawer I took apart and made the shelf with.

Next I painted 3 of the pine knobs from the drawers in 'Patio Brick' and sanded them back a tad before fitting them to the back board.
During this process I came up with a simple idea for holding the knobs while painting them. Up until now I would awkwardly hold them, drop them more often than not and have to paint or spray them in sections.
So I drilled 3 extra long screws all the way through a piece of scrap wood (the sides of the drawers) and then screwed the knobs on making it super duper easy to paint and not having to sit on anything while they dried. Seemples!


Remember the shelf I first did that turned out Pink?  Well I didn't want to just waste it so I joined it back to back with the new shelf top and it gave the ledge that chunkier look - score!


So there you have it, my new shabby shelf.

Thanks for taking a look.


This post is linked to:

'Finding Fabulous'

'The Shabby Nest'
'Miss Mustard Seed'
'Craft Junkie Too'
'Thirty Handmade Days'
'Remodelaholic'
'Craft Envy'
'Nifty Thrifty Things'
'My 1929 Charmer'
'A world of crafts'
'Craftomaniac'
'Keeping it simple'
'The southern institute'
'Ginger Snaps Craft'
'DIY by Design'
'Under the table and dreaming'
'Not Just a Housewife'
'Sassy Sites'
'Funky Junk Interiors'

Tuesday 18 October 2011

Roadtrip!

Imagine how excited I was last week when hubby and I decided to travel down to my mums to help her move. No matter that we would be travelling 500 miles south towing an empty trailer (full on the way back mind), I was getting to go home to England and would have so many photo opportunities on the journey that I was simply giddy!
I made sure every camera had a full battery plus backup and took along a DSLR and 2 P&S, no way was I going to suffer from the usual 'low battery' warning, nope not this well organised girlie!
However I have one of those husbands that insists he prefers to drive long distances at night so guess what photo opportunities I actually got on the way down - yup none, nothing, nada! Triffic huh - so much for organising!

Still I got to go home - yay! I cared not about the endless gridlock of traffic (something we do not suffer with here in Caithness), nor the mist that actually turned out to be smog and I could even tolerate the parking charges (something else we do not suffer from in Caithness) because I have missed England a whole heap these last few years.
If I could pick up and take what we have here back to England (i.e mortgage free house, land, the beach, forests, clean air, no traffic) I would. I miss my family and I miss civilisation.
BUT I can't do that so we'll stay put I guess though I imagine the clean air, the beaches etc etc will go some way to alleviate my missing of England lol. Though if we could just have some warm weather I'd be so much happier.


OK you want piccies not a a sob story huh! So lookie at this Queen Anne style chair


Gorgeous isn't it?
OK maybe the fabric is a bit ghastly but just imagine it reupholstered in something like one  of these


I just can't wait to get going on it.
I also got a large pouffe that is going to be recovered to match. Excited!

And what about these books?


I saved a fair few old books as it semed so sad to let them go.
The bottom one in the picture is one my mum was given in the forties, it's 'Alice in Wonderland' and if we just take a peek inside you'll see the gorgeous colour plates


I love it! It's now sitting in place on my dresser with the Poem book and 'Lita'


How ruddy cute is that? 'Charlie Bears' rock!!

I also got a wooden rolling pin that had been my nans. I know, I know a rolling pin may seem a silly thing to keep but it it had some burn marks on it that have a story behind them and I just couldn't let it go. I'm looking for ideas for what to do with it - I do not need another rolling pin lol.
I also managed to reinherit all those gifts that I'd bought mum over the years from holidays abroad - eek!  So I now have plenty more craft projects to get going with despite having several on the go already.


Anyway thanks for listening, come back soon as the next project will be some shabby shelves made from a drawer and a charity shop side board makeover.


Monday 10 October 2011

Shabby racks & home made stencils

I'm right in the middle of making over a sideboard I picked up from the charity shop for a fiver a while ago but in true crafty person style I can't resist doing the odd small project alongside the larger ones while the larger ones are drying.

I recently showed you 'these' coat racks that I made and made mention in that post of a rack that was still undergoing some work.
Well it's finished and here it is:

 shabby racks, shabby chic, coat rack, wood coat rack


I followed the same method as the previous coat rack regarding 'Patio Paint' colours but I then fixed this rack to another length of wood that had had the same 'shabby' treatment.
Before giving the coat of varnish though I added the text 'May every Journey Bring you Home'.

The last text I added to a 'shabby' project were 'these' letters for the bathroom but that time I used a paintbrush to do the text. This time though I needed more flexibility due to all the squirls so decided to risk the 'sharpie' pen. I much prefer to use 'sharpie' for text but it doesn't flow very well on these paints for some reason and I had to keep scribbling on paper to get the flow back - very annoying and very time consuming. I couldn't have done this sort of flourishy text with a brush though - well I could, but it probably would have looked naff!

Once the whole thing  had dried I gave it one coat of satin floor varnish and took extra care not to spend too much time brushing over the text because in my experience 'sharpie' tends to bleed.


HOMEMADE STENCILS:

I've also had to do some stencilling for that cheap sideboard that I'm revamping. I looked everywhere on the net but couldn't find a stencil that I felt would look right and then remembered some wallpaper that I had bought for 50p to line the inside of a wardrobe I was vamping. (another finished project for another day)
The pattern was exactly what I wanted so I traced the image and was half way though cutting it out when I realised it wouldn't make a stencil. Duh!!! The positive and negative parts weren't compatible and I ended up with a just a big gap and  couldn't for the life of me figure out how to alter the pattern to make a stencil. So I sulked instead!
It was during this sulk that I had one of my rare 'lightbulb moments'. I was sat staring at the wallpaper on the feature wall in our front room (It's one of those wallpapers that looked better on the roll than it does on the wall) and I realised the whispy flower would make a great stencil.
So to make the stencil I traced the flower with greaseproof paper and then traced that tracing using a 'sharpie' onto one of the flimsy plastic office file holders you can buy dirt cheap. I bought one for 40p at Tesco and cut it in half to give me two stencils.
Once that was done I used a craft knife to cut it all out. This took an age and 2 days later I have still got a numb forefinger from the pressure.
You could use a stanley knife (exacto knife) but I found it really difficult to get the curves correct with one of those.
I have a craft knife that has many different blades and I found a very narrow one worked best.
*A little tip: move the stencil as you cut as much as you can, it makes life so much easier than trying to trace it with a knife and you're less likely to run off the edge.


That's the finished stencils all cut out.

Next I masking taped it to the internal back of the sideboard. Alot of people recommend spraying it with repositionable adhesive first but I hate the stuff and refuse to use it - I can just imagine the mess I'd make with it.
I actually made two stencils for this flower, 1 was the actual petals and the other was the stem. If I'd tried to make this with one stencil then I would have ended up with a lot of flimsy areas and would definitely have had to use the spray adhesive to get a decent fix.


This image shows  the  second stencil attached over the top of the dried flower pattern.
I didn't use a proper stencil brush for this project as I didn't have one, I just used a stiff bristled 'Harris' brush.
*Top tip: If you're doing it the way I did then be extra careful with the brush. Make sure you stipple accurately and don't press too hard or the bristles could go under the stencil. Also do not overload the brush - when you first dip it in paint stipple it out on waste paper to remove the excess before hitting the stencil. Finally, when you peel the stencil back check the underneath for any bleeding and clean it if need be before repositioning.


That's the final dried stencil.
The colours I used are Laura Ashleys 'Duckegg' matt for the flower and Laura Ashleys 'Apple' matt for the stems. Both paints were tester pots I picked up for 50p - bargain!


Thanks for popping in.


Linked to:

'Skip to my lou'
'Boogie Board Cottage'
'Sugar Bee Crafts'
'Sassy Sites'
'Tip Junkie'
'Not just a Housewife'
'Ginger snap crafts'
'Night Owl Crafting'
'Bear rabbit bear'
'Kristens junk Drawer'
'Ask Anna'
'Making the world cuter'
'Sew can do'

Saturday 8 October 2011

Age that coat rack

I officially love the shabby chic look now, it's taken me an age to appreciate it but I got there eventually.
I've only done a couple of small projects so far, the first one being 'these' letters for the bathroom and my latest finished one being these coat hooks.

 shabbychic coat rack, hanmade, homemade, home diy

I bought these coat hooks a few weeks back because they were only 99p each otherwise I wouldn't have bothered as they're not really the style I was looking for. But, can't pass up a bargain right!

So next I had to figure out what I was going to do to them - enter my new found passion of all things shabby!
Basically I aged them the way I did with the bathroom letters i.e 1 coat of 'Patio Paint' in Wrought Iron Black, 1 coat of Cloud White and 1 coat of Daisy Cream.
I then had at them with sandpaper until I achieved the look I wanted.

This is how they turned out

 handmade, shabby rack, patio paints

Sorry there's no picture of them in their final positions but one of them isn't finished yet as I'm going to mount it onto another piece of wood and add some lettering.
The actual finished one is on the bathroom door but TBH I'm not 100% happy with how it looks in position, hence no picture.

Thanks for stopping by and taking a quick looksee.


Linked to:

'Craft Junkie Too'
'Crafts keep me sane'
'Craft-o-maniac'
'The Southern Institute'
'A world of crafts'
'EasyPeasy Grandma'
Funky Junk Interiors' 
'Craft Envy'

Wednesday 5 October 2011

Edit Me - week 21

You know how last week I promised that I'd start taking proper notes on the steps I've taken to edit these images? Well I did start to - honestly! It's just that I made soooooo many mistakes and started over sooooooo many times that it was literally luck that I ended up with an image I liked.
I do remember the basic steps but that's pretty much it - again! Sorry!

Anyway without further adieu, this weeks image for edit is from Amy of 'Artistically Amy', check out her blog for more great images. Thank you Amy - love the picture and the blog!

Yet another lovely image and yet again I had no clue what to do with it for ages - my imagination appears to be decreasing as my age increases - what is with that!

Here's the SOOC


And here's my edit


Sooooo, the steps I took are along the lines of:
Opened the image in CS5 and created a copy layer. Then I cropped the image just slightly, went to the canvas size and added 1 inch to all sides to add a Black border.
Next I added a channel mix layer, increased the red to 150% and reduced the Green & blue to -24&. I then did the same to the Green channel (increased Green to 150% and reduced the others to -25%) and the same to the Blue channel.
This basically boosted the colours.
Next I went to layers - adjustment layer - levels and moved the slider until I got what I wanted (very technical huh).
Then I created yet another layer and created a brush border by basically playing with the brushes and messing.
Finally flatten the image and all done!

So if this edit interests you and you want to see others or even join in yourself then head on over to 'My Reflection of Something', try not to get sidetracked by all the cool stuff going on there and download the image - you never know what you can do till you give it a go!


Tuesday 4 October 2011

Old aged letters

I never really got the 'shabby chic' look, it all seemed such a waste of time to me. After all why would anyone want to go to all that trouble of lovingly painting furniture to then just rough it up, sand it down and make it look old again?
It just seemed so ... well....pointless!

But then during one of my 'visit as many random blogs as possible' moments I happened across the most amazing gorgeous 'shabby' 'aged' 'distressed' (whatever you wanna call it) project on an amazingly inspirational blog and I was hooked.
The project in question was a wall sign and the blog I was loving was 'eleven-o-one creations' Not just fabulous signs either, just check out the 'Furniture Portfolio' of 'eleven-o-one creations', it's Amazing.
Once I'd seen the signs that Fran had created I was determined to create my own however no matter how much I searched the net I just couldn't find a tutorial that seemed to result in the same look as Frans' creations and as I've never done these paint effects before I wasn't confident that I could pull it off without some form of guidance (I'm not patient enough to spend days practising till I figure it all out).
So I contacted Fran to ask if she knew of a decent tutorial and I was so chuffed when Fran took the time to get right back to me with a tutorial all of her own. Thank you Fran.

Although ultimately I want a couple of signs for my upstairs bathroom I decided I would learn the technique on some wooden blocks that I wanted to letter for the same bathroom. I wanted to create the word 'Relax' in wooden blocks.
One of the reasons I wanted to start there was because I have recently updated my craft stamps and have unmounted them from their wooden blocks, mounted them on UMount and filed them away in files to save on storage.
But I was left with numerous blocks like these


I knew they'd come in handy for something though and figured they'd be great for the bathroom letters.
That is some super tacky glue they use to mount the stamps to the blocks though and it took me a fair while to scrape it all off. The sanding down was a breeze however and I kinda didn't want to stop!


That's them all sanded and ready to go.
Usually I like symmetry and wouldn't go for the different sizes but I decided to be adventurous here.

Fran had told me in her tutorial the paints she would normally use but me being the most impatient person alive I couldn't wait for a paint supply to arrive and so I figured I'd try using 'Patio Paints' and see how they worked.
While I'd been researching the 'Milk Paint' that Fran mentioned I noticed on their website a series of colour layers that resulted is a finish similar to Frans so I used the 'Patio Paints' as close to those colours as I could.
The first 2 layers were 'Wrought Iron Black' followed by 1 layer of 'Cloud White' and finally 1 coat of 'Daisy cream'.
The hardest part of the project was the drying time for each layer, like I said I'm not terribly patient!
While they were drying though I opened up 'Photoshop' on the puter, created the letters I needed in a calligraphy font and printed them out onto regular paper.
Next I went back to the now dried out blocks and went at them with P80 electro coated sandpaper. This was a real fun part but be warned, you have to know when to stop! It's sooooooo easy to get carried away and then you end with something that just looks wrong!
At this stage I stopped the 'roughing up' just short of finished as I figured there'd be more to do once the letters were on, after all solid, new looking letters would look a bit naff on a weathered piece of wood.
The look I wanted was Black edges with the corners and a few other areas sanded down to the bare wood. I also like the White showing through before the Black, it gives it a more weathered look.
Next I transferred those letters to each block by tracing the letter on the reverse of the paper before laying it on the block (original side up obviously) and tracing - ok scribbling - over the top.


 wooden blocks, relax, patio paints, shabby chic, handmade

You're then left with a fine outline on the actual block which you need to go over with your choice of pen or paint.
On my first attempt I used a 'sharpie' pen. The 'Sharpie' is much easier to use than a paintbrush and the edges are much more defined

 wooden blocks, relax, patio paints, shabby chic, handmade

However 'Sharpie' has a tendency to smudge or bleed with some varnishes so if you intend to varnish the project use a paint - I learned that one the hard way and I ended up having to sand the whole lot down, front and back and start again.
Next time round I used the 'Wrought Iron Black' 'Patio Paints' and cut down an artist brush so it was small enough to use - this is not ideal though and TBH I'm not 100% pleased with the result.
Once the lettering was dry I gave it another sand down and then gave it just the 1 coat of floor varnish.

The finished result

 wooden blocks, shabby chic, handmade, patio paints


 shabby chic, wood blocks, relax, handmade, homemade

They are a bit mored weathered and aged than is showing on the photo.
I'm actually quite chuffed with them and am loving this look now. I can see many many future projects being lovingly painted just to be roughed up and sanded down to look old again. lol.

I'm dedicating this post to fran of 'eleven-o-one creations'. Thank you Fran for taking the time to help me out and for your inspirational blog.


Linked to:

'Today's Creative Blog'
'Reasons to skip the Housework'
'Ginger snap crafts'
'Nightowl Crafting'
'Lil Luna'
'Delightful Order'
'Bear rabbit bear'
'Not just a housewife'
'Happy Hour Projects'
'Miss Mustard seed - Furniture Feature Friday'
'The Shabby Nest'
'You had me at craft'
'Restore Interiors'
'sew can do'
'Delightful Order'
'My1929charmer'