Tuesday 31 January 2012

Texture Tuesday

Texture Tuesday -


Fuschia, Sarah's Delta, floral image
Fuschia Sarah's Delta.


The texture challenge this week on Kim Klassens blog is to use her fabulous 'simplicity' texture.

This is a completely new challenge for me and sooooo out of my comfort zone as I'm only just learning what textures are all about but was inspired to have a go by some of the other entries.
I stuck to using just the Simplicity texture here as I have a tendency to overdo things if I try to include too many steps. All I did after that was reduce the opacity a teeny amount.

Kims blog is a new one for me - I just happened upon a link on Artistically Amys blog and spent ages there going through the rest of Kims content before deciding to take part in the challenge and I must say I luuuuurve this texture and am quite chuffed with how it's transformed my boring fuschia image.


kimklassencafe


This post is linked to:

'Cherished Bliss'
'Project queen' 
'A fresh perspective' 
'Deb duty photography'

Monday 30 January 2012

Make your own compost tumbler

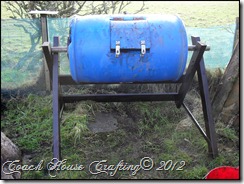
I was giving my compost tumbler it’s annual coat of wood protection yesterday and thought it would be a great opportunity to show you guys how I made it so maybe you’ll feel you could have a go yourselves.
I have to say that this tumbler works so much better than the other two plastic box type ones I bought, I think it has something to do with how easy it is to tumble this one and aerate the goodness inside.
I didn’t take photos of each stage because I made it before blogging so I’ll try not to make this too confusing but if you can manage to fathom the steps out from my tutorial, write them down, familiarise yourself with them and you could make this in a day. It took me 2 days but only because I had to work stuff out as I went and I never organise myself beforehand – I looked for tools and materials as I needed them.
Here’s the finished piece – it’s no work of art but it’s efficient and not too difficult to make.

 diy, garden diy, compost tumbler <SAMSUNG DIGITAL CAMERA>
I got inspiration for the design from a web page but unfortunately I didn’t keep a record of that page and cannot find it now – if I do happen to find it though I will of course post it on here.

Basic list of tools:
  • Scrap wood – 3x2” for frame, batten for frame plus scrap boarding for drum sides.
  • Plastic drum – cleaned of it’s contents.
  • Scaffold pole or some other pole about 2ft longer than the length of the drum.
  • Length of plastic pipe / tubing, about 4-5” wider than the width of the drum.
  • Hinges, nuts/bolts, screws, door clasps, handles (I used scrap kitchen unit handles)
  • Piece of metal gauze or even a piece of that green netting used for fences will do.

OK first off, the frame:
 diy, garden diy, compost tumbler <SAMSUNG DIGITAL CAMERA>
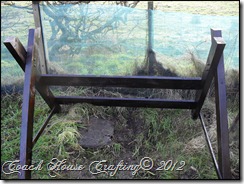
Finished frame
As you can see I used substantial wood as it has to hold some weight (that’s not a bow in the wood it’s the camera – honest!).
Using 2 lengths of wood for each side I created 2 crosspoles. The cross points of the two pieces should be high enough that you’re not breaking your back bending when you rotate the tumbler.
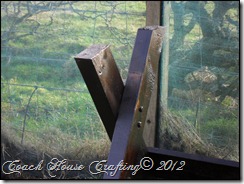
Both pieces were bolted together with nuts, bolts and washers (I used an electric drill to pre drill the holes).  I made it so that my pole sat snugly in those top crosspoles so that when I turn it it’s the tumbler that turns and not the actual poles as the poles may end up moving off the cross poles.
Then I added 1 piece of scrap wood to the bottom of each X to help retain the shape and to just help support it. If you look at the above image you’ll see that these bottom pieces of wood are screwed from outside to inside of the X frame.
Next I screwed on two scrap pieces of wood across the back to hold the X pieces upright and in the right position – you need to measure your plastic drum and add clearance either side of it when deciding how far apart to place the ‘X’ posts. There’s no scientific rule though on how much clearance, just go with what you think.

diy, garden diy, compost tumbler <SAMSUNG DIGITAL CAMERA>
Cross poles bolted together
Give the whole frame a protective coat of creosote substitute.

Now onto the tumbler itself.
I managed to get hold of 2 of these containers. I looked up on Google what they contained (chemical signs make no sense to me) and found them to just hold detergents so after a good scrub (once the door was cut obviously) they were good to go.
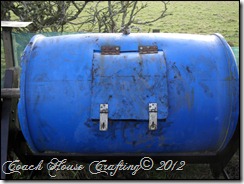
First off I turned the container onto its long side and marked in pencil a square opening in the centre - this square needs to be comfortable enough to get the compost out of.
I then drilled a hole in the corner of the pencil square big enough to get my jigsaw blade in to then cut the square out – keep the square, it’s the door!

compost tumbler, ladies diy, gardening,diy <SAMSUNG DIGITAL CAMERA>
Tumbler door


Next I turned the container back up on its end and drilled out a hole in the centre of the top the same size as the circumference of a scaffold pole (or other metal pole). I then turned it over to the other end and did the same thing. At this point just insert the pole to make sure the hole is correct in size and place, then take it out again and set the pole aside.
Next we need an air vent so turn the drum back onto its long side and drill a hole in the centre just above the door opening you made. This hole needs to be the same size as a piece of plastic tubing so measure the circumference of your tubing first.
Roll the drum over to it’s other side and drill the same hole again. Check that your plastic tube  fits straight through the top hole and the bottom hole you just made, then remove the tube.
This tubing now needs to have several small holes drilled into it along it’s entire length – these holes will help aerate inside the tumbler. To fix this now holey pipe in its place, slide it back into the tumbler through your drilled holes – it needs about 1 – 2” clearance on both ends.
To stop this tube simply slipping back out insert a bolt and nut through a drilled hole on it where the tube enters and exits the drum (on the outside of the drum obviously). This then prevents it moving.
Next we need to make a rake for inside the drum to help mix the stuff we put in there. For this I used a piece of scrap batten and hammered long nails all the way along the length of the batten. This batten is then secured inside the drum by screwing it in place from the outside of the drum. Although my rake fits the entire length of the inside of the drum, you have to make it in 2 shorter lengths because one long one will not go through the door opening.
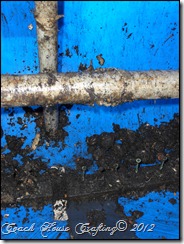

garden diy, ladies diy, compost tumbler, recycle barrel <SAMSUNG DIGITAL CAMERA>
This shows the rake at bottom, drain hole at bottom, main scaffold pole left to right & air tube top to bottom.
We also need to drill a drainage hole in the bottom of the drum. I drilled a fairly big hole and then simply cut a piece of wire gauze and secured it over the top of the hole (from the inside) just so the hole didn’t block up with compost. You can see my drainage hole in the above photo – it’s the black gauze just below the rake.
Now go back to those holes we drilled top and bottom of the drum for the scaffold pipe - We need to reinforce the outside of these holes so that the turning of the drum doesn’t just wear them away or split the plastic drum.
I used scrap wood and cut out 2 blocks for each side, these were then secured together and a hole drilled through them the same size as the scaffold pole. These were then secured to the drum using bolts and nuts – I kept nuts on the inside but the preference is yours.
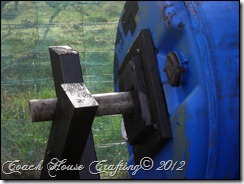
recycle, garden diy, compost tumbler <SAMSUNG DIGITAL CAMERA>
Reinforced ends.
Finally go back to that door you cut out and set aside and attach one side of your hinges to it with bolts and the other side of the hinges on to the drum just above the square opening you cut, again using bolts.
To keep the door closed I found a couple of clasps that I attached to the door and the drum but you can use whatever you find or whatever works.
I also added a couple of metal handles - 1 just above the door and 1 further round, this is how you turn the drum.
Finally slide that scaffold pole (or whatever pole you have) straight through its holes which are top and bottom of the drum (and which now becomes the sides of the drum), and lift each end onto the cross poles of the frame you made.
All you have to do now is make sure your site it on level ground – I didn’t at first and the drum moved to one end – and then start filling it with all those composting goodies. Turn it as often as you remember.

I’m sorry if this tutorial was a little confusing, I’ve tried to make the steps as simple as they are but as long as you get the basic concept you should be able to produce it.

Thanks for staying this far, hopefully you're not too confuddled and will come back for more!


Linked to:

'Skip to my Lou'
'Easypeasy Grandma' 
'The girl creative' 
'Sumo's sweet stuff' 
'Momma to binks' 
'Not just a housewife' 
'Sassysites' 
'Cherished Bliss' 
'Craft Junkie Too' 
'Its a hodgepodge life' 
'Under the table and dreaming' 
'Sew chatty'

Saturday 28 January 2012

Scrap wood gardening helpers

I'm loving being able to get out into the garden lately. The weather is cold but as long as that ruddy awful wind stays at bay then I'll be outside renovating the garden.
At the moment I'm building a stone wall in front of a new fence so that I can then back fill it and fill it with scented plants. I can't wait for it to be finished but as is always the way with me it won't be totally complete until we've gotten around to finishing the length of the fence and subsequently the rest of the stone wall.

This is the sort of wall I lurve but am too lazy to get the hang of all that cement work

 garden diy, garden project, compost container
Stone Art
So this is more the look I'm going for
Retaining wall

I'm managing to get a lot of it done with what is there though and am getting quite a workout with the stone collecting and earth moving - both jobs entail walking back and forth a looooong way.
Won't be a professional finish but hey, I'm doing it all myself and am chuffed with it so far!

I've also been wanting to  build a compost holder for my polytunnel for a while now - ever since I first saw Monty Dons wooden ones on Gardeners World - but just never got round to it, so I decided to just get on with it this week - it took a couple of hours only and used up scrap wood leftover from a computer table. I figured the Melamine finish would help protect the wood somewhat.

Here's Montys potting shed with those seedmix containers


Heres what I started with:

 scrap wood, melamine, compost container, garden diy

A heap o Melamine with metal bits all over.

Once I'd got rid of all the metal parts I cut a base and then decided what height I wanted the back edge and the front rim and cut 2 sides to those dimensions. I have to say at this point that I did this entire project with no tape measure - despite hubby being a builder and despite the fact that I should have loads of my own I could not find one tape measure anywhere, I think we have a tape measure elf thief!
My measuring consisted of using bits of wood for marking and edges of wood for straight lines, soooo not the way to go!

This is the base and sides complete
 melamine, garden diy, compost container

Next I marked the back sizes on a piece of wood and cut it with my Jigsaw.
Same goes for the front.

 garden diy, compost container, melamine, scrap wood

I added the strips to the top of the side edges purely because the edges were raw and not protected.
That's it done and here it is in it's final position.

 garden diy, scrapwood garden, compost container


Now I can make my own mix of compost in bulk much more easily than just adding the ingredients to the staging and mixing, which always meant quite a loss of the black stuff!
So easy to make too which is always good because I like to see results the day I start a project - I'm just so impatient!


Linked to:

'Fingerprints on the fridge'
'A world of crafts' 
'Cherished Bliss' 
'Project queen'

Friday 27 January 2012

EditMe challenge Wk4


This weeks guest judge and adorable baby photo provider is Ashley Sisk of  'Ramblings and Photos' . If you are an avid photographer and want to get the hang of editing those photos you've taken that you feel could do with a little 'tweak' or even a complete leg removal then you need to check out Ashleys blog. I have and believe me when I say that the tutorials are A.mazing!


Here is the very adorable SOOC image


and here's my edit

 ahley sisk, editme challenge, photo challenge, sooc


  • Opened the image in CS5
  • Used the Coffeeshop vintage clipping frame mask
  • Used a texture already on my puter.
  • messed around with the opacity of all the layers.
  • Oversharpened the image.
  • Saved the image before I started over again for the 9th time in 2 hours!

As always I want to thank the hosts of the EditMe challenge for taking the time to make these challenges a joy to take part in.

Thanks to you guys for also for taking the time to read this. Head on over to the EditMe website 'here' to check out the other entries and/or have a dabble yourself and also check out Ashleys blog 'here' for a whole load of help and inspiration.


Tuesday 24 January 2012

Chocolate!

This blog has never been intended to be a diary so I promise you I won't let days like these become too frequent, however I have a need to put something down that people will see which will hopefully inspire me to stick to my 'goal'.
You see I have been 'fighting the flab' for some years now. I was always skinny and active as a teenager/young adult and until now have always blamed excused my weight gain as a side effect of carrying twins............21 years ago!
I've finally, after years of crash dieting, admitted that bearing children has nothing to do with my weight gain and even less to do with what I put in my mouth now.
I am addicted to chocolate - there I admitted it, and THAT is what has caused the weight gain. Well that and the fact that I can eat till I feel sick, rest a while and then eat a ton more - it's quite disgusting really.
Thing is I've finally had enough! Last night I ate yet another huge bar of Chocolate and felt sick beyond belief, I then started on a huge bag of Jelly Tots - I do not seem to be able to grasp the concept of putting sweets aside for another day!
Problem is I had another episode of heart palpitations after all that sugar and I really understood how out of control this has got.

So on that note (and the fact that my weight loss at Slimming World this week will be zero) I made a decision.
Take control Linda!
Weight loss will be a bonus but I am sick of feeling bloated and achey all the time, this weight has to come off, but how?
Well Slimming World is fabulous, I lost 1 1/2st last year (though xmas saw 10lb back on) but I've stopped all my exercise including running and walking.

Running is going to be my best mate this year - plus it exercises the dogs - and one of my daughters has asked to run with me (once the nights are lighter though as she leaves for college in the dark & comes back in the dark at the mo)and we are entering the Loch Ness 10k in September - yay!
I entered this 10k in 2010 and made an appalling time of 1hour 17 minutes despite me 'thinking' I had run all the way (I'd probably more likely jogged), and this was also a worse time than my Castle of Mey 10k run where I'd walked a lot!

I can't believe I'm sharing this picture with you as it's hideous but I need to be reminded of why I want to lose weight.


yup, 3 chins, Arnie arms and a whole plethora of ripples. Gotta go my friends!


Anyway, that is what I needed to put on my blog for all to see. Once training has started I will probably add the odd update and include a few piccies just to keep me going but I promise it will not turn into a weight loss/running diary.


Monday 23 January 2012

Inspired.com

OK so I missed 'Showcase Saturday' this week but I honestly have a good excuse - I took my daughters to see 'Warhorse'. That's a good excuse right??
So maybe it wouldn't be ordinarily BUT the nearest cinema here is 2 hours drive away and because the city gets busy and car parking a premium we have to make sure we're there early which means a 7am start out. Plus because we never go to the city due to the distance we tend to arrange a shopping trip so although we started out at 7am the movie didn't start till 2.45pm and then by the time we get out we have a 2hr drive back.
Normally this wouldn't be a problem because hubby and I would share the driving but hubby stayed home so I was the only driver. Also not normally a problem but I have Narcolepsy and although medication has my sudden sleep attacks fully controlled I do have to pay heed to any warning signs of tiredness. Basically if I get tired I have to nap straightaway, if  I don't I will hallucinate, become punch drunky sounding and not be able to concentrate.
We made it home by 7pm though with just one ten minute nap needed by me - yay!

Getting back to my excuse though, the above is the reason I missed saturdays blog, though I have no excuse for not then picking it up Sunday except that I've been busy building a stone wall all by myself and was too knackered basically!

Those excuses sound feasible and acceptable yes?

Anyway I decided to showcase a few blogs today instead because there are a couple of blogs newish to me that I am totally in awe of and want to share.
What makes a blog / site awesome to me? Well content mainly and the style of writing but if I'm honest then freebies are always a winner, so on that note;

'The Coffeshop Blog'

This site is awesome and I so wish I had found it months ago.
I regularly take part in the 'EditMe' challenge and that is how I came to discover this amazing site. It is full to the brim of FREE actions and presets for manipulating your photos and give professional results. It also has a multitude of FREE textures and digital papers to further enhance your images.
No need to worry about knowing how to use them either there are tutorials galore on Coffeshop.
I have downloaded several actions and I have to say they are amazingly easy to download and use.
The tutorials also cover how to use the downloaded actions, presets etc etc and how to get the most from them.
A coupleof my favourites include 'Coffeshop faded daydreams'  and 'Coffeshop vanilla latte action'.
If you have any interest in working with, manipulating or even just enhancing images using most of the current software available then you need to check this site out.
Anything I blog about it will never do it justice, you need to get over there, check out what's available and simply play with them.

'Free Digital Scrapbooking'

Scrapbooking and cardmaking is something I'm hoping to do more of this year and digital scrapbooking has taken my fancy, I've even started with digital stamps that I can then colour with Promarkers (though I've yet to find a bleedproof cardstock).
This site has heaps of awesome, adorable scrapbook kits FREE to download. These kits include everything from background papers to all the embellishments you need.
Easy peasy to download and there is so many different themes to choose from that you will definitely find something you like.
Check it out and enjoy your downloads.

'Sawdust and paper scraps'

I don't remember how I came about finding this blog but I've been hooked on it ever since and regularly spend more time there than is probably strictly healthy.
Sandra is a diy'er, builder of "stuff", house renovator plus a wife and mother to boot and the projects she has completed are nothing less than amazing and very professional looking.
I always like to hear of like minded women who are willing to give power tools a go but Sandra even puts me to shame and I'll use most things cept the dreaded table saw.
Sandra has built an amazing master closet equipped with drawers etc all made by herself. Seriously you need to check the master closet out, any one of us would be sooooooo proud to have built something like that.
Then there's the craft room table, seriously ladies you are soooo gonna slather over it, it's just so amazingly lovely (that's as long as you roll the tongue back in after seeing the entire craft room that is!) And what is even more amazing is that Sandra gives tutorials for that table (which is easier to make than it looks), even the corbels and doors - swoon!
Sandra really is a talented lady and she has inspired me to have a go at making built in units myself. I usually limit myself to furniture makeovers or building small things from scrapwood but I am now going to indulge in actually spending some money on NEW - yes brand spanking new - materials and build the built in bathroom unit and built in bedroom closet that I so want but couldn't afford.
THANKYOU Sandra, you amazing lady!

I wasn't going to add images but hey, I can't resist because I really am so amazed at what Sandra has accomplished.

Told ya! Gorgeous aint it! Stop slathering now ladies.

I soooo want this closet. A lady made this - how ruddy cool is that!

So there you have it. Hope you enjoy those blogs as much as I do.
Thank you for staying this far, leave a comment if you fancy it I do try to email reply to all comments though I can only do that if you're not anonymous!


Wednesday 18 January 2012

EditMe challenge Wk3

EditMe challenge Wk3

This weeks fabulous image we get to edit is from Marilyn of  'The Artsygirl Connection' and was taken at Disneys Animal Kingdom last year. Head on over to Marilyns fab blog to check out her other awesome Disney images alongside a fabulous crafty section and an inspirational causes/projects section where Marilyn talks of and of course photographs the projects she has created to raise awareness for good causes. Seriously, you guys need to check it out - but not till you get to the end of this page obviously! lol.

So here is the SOOC


Here's my edit

 editme challenge, photo challenge, sooc

You honestly would not believe the palaver I had with this one. A fab image to begin with and I just couldn't get the effect I was wanting (not that I actually knew what that was, but I would when I got it).
Initially I wanted to clone out those holidaymakers who draw the eye but try as I might I just couldn't get it perfect enough.
So I then decided to do a tight crop instead to crop em out but I wasn't happy with that either.
So here's what I did:
  • Opened in CS5.
  • Cropped the image.
  • Opened HDR and toggled a bit.
  • Used 'coffeeshop' sharpen action.
  • Opened curves and messed.
  • Opened variations and messed.
  • Created an extra 15 pixels of Red canvas.
  • Screamed because it's still not what I want.
There you have it. I may have a mess around with it again and I'll post any improvements on it here if I do.
As usual I want to thank the EditMe team for hosting this challenge, myself and many others enjoy this weekly challenge immensly and always look forward to the next image.

So if you guys want to check out the challenge click 'here', you never know you may even find yourself joining in.
Thanks for stopping by and staying long enough to read this.


Saturday 14 January 2012

Showcase Saturday

My finished projects are seriously thin on the ground at the moment with nothing finished or even really close to being finished. This is mainly due to the mild weather we have had and the time of year - months stuck indoors over winter mean that any sign of mild, windless weather and I'm outside in the garden or the polytunnel.
Today though I decided to get to grips with taking some photos of my dogs to put on my blog to fill the gap on there that is getting bigger and bigger. BUT it kinda didn't work out, in fact dogs are even worse to photograph than birds and this is the sum total of all my efforts


5 dogs on 4 acres of land does not make for an easy photoshoot, in fact it's nigh on impossible! So I gave up! Plus Huntly just would not give up that teddy for anything.

Instead I have decided to start a 'Showcase Saturday' where I will feature some of the trendy blogs out there. Last year I did this as 'Wotcha Wednesday' but New Year and all that.....

So first up for this new 'Showcase Saturday' is .................drum roll............................


This is one mighty mega site that is fabulous for digital stamps and art. I mean it's seriously chock full of galleries, inspiration, challenges, tutorials and even a forum.
Tutorials range from making paper flowers to designing your own digi stamps thru to colouring your stamps with various markers. Plus there are also video tutorials to check out.
The challenges offer fabulous prizes and the inspiration from the entrants is amazing as it's all in one place.
I'm fairly new to the site but as I intend to make plenty of cards this year and have bought my first digi stamp I will be spending alot of time there.


I love this blog and associated Etsy shop and it's where I bought my first digi stamp - Ellie.
The blog also has a tutorials page and I particularly enjoyed the tutorial explaining how to transfer digi stamps to t.shirts.
The most amazing part for me though is all the amazing cards that are showcased. Whenever I'm lacking inspiration or knowledge this will certainly be the place to go.


This is one seriously talented lady and her cards really are outstanding and original.
She has a tutorial page (which is how I found her) and her skin tone tutorial with promarkers is brilliant!
Pop on over if you are a digital stamper or even a traditional stamper there's so much to look at, you'll love it.

Well there you have it my very first Showcase Saturday especially for all you cardmakers and crafters out there.
Enjoy!


Wednesday 11 January 2012

Edit Me: Wk2 2012

Crikey that came round awful quick didn't it!
Oh well I'm not complaining because I just love seeing what the next image is that has been submitted  for the EditMe challenge.

This weeks guest judge and image owner is Tara of Wild Ginger Photography whose website is full of amazing images ranging from adorable babies to fine art.
Grab a coffee, head on over to Tara's place and prepare to go all googly over the adorable images.

So here is the SOOC submitted by Tara


and this is my edit


I did warn you! Adorable huh?
It's no secret that I panic a tad when it comes to editing images of children, after all, these are someones adored ray of hope and sunshine and I am sooooooo aware of how easy it would be to insult a person with an edit that I interpret as 'different' and others interpret as .... well..... wrong! (I love putting googly eyes on things and turning them into neon glowing objects) sigh!
Can't do that with such gorgeous images as this one though - even I would agree it was just wrong!

So here's how I did it. (yes I do remember almost every step for a change - yay me!)
Opened the image in CS5, created background copy (many mistakes mean I now remember that one!), tight crop keeping image dimensions,  added another new layer and filled this layer with white.
Then I added extra canvas around the image in layer1 and then added a bit of space inside the image on the background copy.
Added a layer mask to the background copy, went into filters, brush strokes  added a sprayed strokes effect and then trimmed the canvas size.
Finally I did a tiny bit of sharpening and then just played with exposure, levels etc until I got the look I wanted.

Thank you to both Tara and the EditMe challenge team for hosting this challenge, judging our edits and submitting such gorgeous photos.
Thank you also to all you faithful followers and looker inners (I've just made that word up). I hope you enjoy this challenge and don't forget to head on over to Taras website and /or the EditMe blogsite to check out the other participants entries or to even have a go yourself.


Tuesday 10 January 2012

Bad Blogger award!

And the bad blogger award goes to......................................ME!
New into 2012 and I'm already lapsing on the blogging. It's not on purpose though, I just don't have a project finished and edited ready for sharing with y'all yet!
So I figured that instead I would treat you all to a couple of goodies I recently found whilst foraging in the deep dark depths of my husbands shed but first I am going to share some other pictures with you.

I recently discovered that I tend to moan a fair bit about the cold weather here in the Highlands. The lack of amenities here(this means literally everything) and the barrenness of the area is usually top of the list of my rantings, however, I was recently looking through some of the piccies I have taken in the locality and was reminded that while we may not have perfect hammock weather (though I do have one cos you never know...) or a cinema or fast food places or decent shops or even a decent bus service (think I'm losing the point here) we DO have this:

Mountains and rugged landscape.

The beaches are amazingly clean, pure sand and Blue waters. (though the weather is always too crap to go in it)

Mountains galore! they're covered in snow all winter.

And that's just the start of it. Next time I'll show you the harbours, the lighthouses and the sunsets.
I'm lucky really aren't I!

And just to brighten up these gloomy, cold winter days here's a couple of lovely bright flowers to cheer us all up.

Tulips.

Lily.

See, brighter and cheerier already huh!
Now for those couple of goodies I found in the hubbys shed:


OK it's a tad crappy and beaten up and well..........knackered looking but surely there's some life left in it?
I haven't a clue how to go about restoring it but I'm thinking Cream colours for the outside and some gorgeous contrasting colour inside.
Any ideas where to start? And what the heck do I do to all that rusty metalwork?
Unfortunately one snap lock is missing and although I found the twin to this in another part of the dungeon shed it was even more beaten up and had no locks intact at all.
So let me know what you think as I've not got a clue where to start.

Now look at this beauty


Maybe "beauty" isn't the most accurate of descriptions but it could be couldn't it?
This is an exceptionally heavy old safe that my husband was given while working for a post office. We hauled this thing across country determined it was going to get a makeover and then was going to get pride of place under the stairs in our new home. 8 years later we move into our new home, get ready for the makeover and ...........................lose the ruddy key!
This fabulous safe is now destined to sit in the depths of the abyss forever. I've tried everything I can think of to trace the makers of the safe but nada, nothing!
Not even sure a locksmith could do much with it without rendering it useless.
Still, I've not given up all hope just yet. One day.............

So thanks for stopping by, hope you enjoyed looking. Pop back again soon, I promise I'll try to be a better blogger from now on.


Wednesday 4 January 2012

Edit Me: Wk 1: 2012

Yay the 'EditMe Challenge' is back after the holiday break and boy have I missed it.

The challenge has a brand new member to the team who just so happens to also be the judge for this week. So a huge Hello to Sarah of  'Naptime MomTog' I hope you enjoy checking out all the Edits for this week and future weeks to come Sarah!
This weeks photo to edit is Sarahs son Dustyn and his adorable dog Dudley and if you head on over to her fabulous blog you will find many more gorgeous images.

My initial reaction to this photo was 'Eek, another one of someone's beloved child. Another chance to get it all wrong and possibly insult somone'. However I loved the image - who couldn't love a picture of a child and his best pal - so I figured I'll just go for it and see what happens.

Here's the SOOC


and here's my edit:


Being a New Year and all that I had promised myself that I would finally remember to write down the steps I took in my Edit, however this time I didn't record them because I really did just open the image and play.
I did open the image in CS5 though, made a background layer and then simply messed with whatever I could find to get the tone I wanted, which happened to be a bit of a HDR type thing.
I hear talk of various filters that people use for edits but I haven't a clue how to use half of those things or even where to get them from in the first place lol - Hmmmmm, maybe I should make it a goal this year to dabble and learn a bit more about editing photos.
Anyway once I had the tone I wanted I cropped the image slightly and added a Black border.
I did think about adding some wording but with my imagination being as basic as it is I just couldn't figure out what adaptation of a boy and his dog to use or where to put it. So I convinced myself it doesn't need it anyway - which it really doesn't.

Anyway there you have it. I hope you enjoyed this Edit Me Challenge, if you want to join in and have some fun editing images then mosey on over to the Edit Me blog page and you're in!
Thank you again to Sarah for the piccie and for judging and for joining the team so we all get to have such fun!