Monday, 24 June 2013

Garden whimsy bird bath

I would never have described myself as a lover of whimsy in the garden, in fact I would go so far as to say that I found alot of whimsy 'tacky'. So you can imagine my own surprise when I decided to make a bird bath for the garden using coloured glass vases and bowls - hubby was certainly sceptical.
I wasn't entirely sure that this new whimsy garden feature would even make it to the actual garden but I have to say both hubby and I are kind of delighted at just how cute it looks nestled in among the pot plants. (apologies for the copyright on my garden blog name).


Cute huh? And yet so easy to make.
This used just 4 pieces of glass - the glass plate for the base, 2 glass vases and 1 glass bowl.
The base of the first vase was glued to the plate using clear silicon sealant then the second vase was glued to the first upside down and finally the bowl was glued to what was the base of the second vase.
It was all left to set for a good 48 hours or so and voila, a bird bath that actually gets used by birds!


What's more is that I'm so loving 'whimsy' that I'm now planning on making even more of it for the garden. These are the kind of things I'm thinking of


All I need for this one is some table legs and some fan blades - hmmmmmm!
http://www.etsy.com/uk/shop/LucyDesignsonline

My garden hose already looks like this anyway so it shouldn't be too much of a stretch to achieve this

http://dirtgarden.wordpress.com/

I absolutely love this, we all have old rusty tools laying around don't we ........oh, just me then!

http://www.empressofdirt.net/garden-art-made-from-old-tools/

I had a go at making something like this today, let's just say it's not as easy at it looks

https://www.bronzefroggallery.com/

Saturday, 18 May 2013

Free online blogging class + FREE 1 years web hosting worth $84

{FREE} 4-Week Profitable Blogging For Beginners Class


Interested in monetising your blog but not sure where to start? then perhaps you might want to consider taking part in Blogelinas FREE 4 week online blogging class. Here's what is on offer for FREE
  • A class manual – packed with 60 pages of information that will help take the overwhelming out of starting your own blog
  • 4 weekly online class sessions where you can ask your questions and get personalized feedback
  • A FREE year of web hosting. Blogelina is able to provide each person who registers for Blogelina’s Online Class complimentary year of web hosting ($84 value)! That’s right – no strings attached, no hidden requirements
  • Blueprints, step-by-step tutorials, networking with other bloggers - Everything you need to grow your blog.
  • Save yourself a lot of time, trouble, and money – learn from my own experiences what to do and not to do.
We all like a no strings attached freebie right, so if you fancy taking part in this popular online class for FREE - even if it's simply for curiositys sake - then click any of the links within this post and sign up. Simples!

{FREE} 4-Week Profitable Blogging For Beginners Class

Friday, 19 April 2013

Toaster holder

I don't remember where I first found this idea as it was a day when I was scouring the net for inspiration. I didn't really take much notice of the idea at first but it must have settled itself somewhere in the part of my brain that actually functions and quite literally from nowhere it suddenly made sense to make one.
It's a simple idea for a tray to hold the toaster so that all those annoying crumbs don't settle all over the worktop and inside the cupboard that houses it.
It was so simple to make from scrap wood.

I cut a square of ply measuring 13" x 13" (I measured the base of my toaster first) and gave it a quick sand.


Next I added some 1" x1" scrap wood all round the base - glued and screwed.


Then I added scrapwood to the sides - glued and screwed - and used a Jigsaw to shape two of the edges and add a handle hole to the same two edges.


I gave it a quick sand down and left it at that. It does the job perfectly - no more crumbs.


Thursday, 11 April 2013

MY DIY recycled wormery with tutorial

The bitingly cold weather appears to be hanging on here and it doesn't make for a happy gardening experience so yesterday I figured I'd spend the day clearing up jobs in the greenhouse and polytunnel. Once I got in there though I suddenly had a whim to build a wormery. I've wanted to build a wormery for a while just to see if it composts down those kitchen scraps quicker than my compost heap but it had to be made using items I could salvage from around here (not buying a thing). I didn't have the tubs I wanted to use last time so gave up on the project, however I now have a surplus of those plastic tubs so I gathered 3 of them and 1 lid and headed off to the greenhouse / workshop.


 I decided I wanted the lid to be black instead of clear to absorb a bit of heat in the winter so I gave it a coat of black paint I bought for the indoor log burner.


Next I had to adapt the bottom bin which would be the one used to collect the liquid from the wormy compost. Alot of the tutorials online suggested placing a brick or two in the bottom so that the next tub wouldn't sit all the way down and the liquid end up drowning the poor worms but even if I did own a brick or two, which I don't (have never even seen a brick here in the Highlands) it's not what I wanted to do.
So I decided in my wisdom to screw a square block to two of the internal sides so that the next tub could sit on those - like this


I did then realise (when I took the time to actually think the process through) that in my "wisdom" I had actually made the liquid tub no longer watertight - duh!
Oh well, I'll just have to empty it regularly won't I!
As for the actual reality of screwing those blocks on, well let's just say I could have kicked the whole thing over the valley because I made a real meal of it. The main problem being that I wouldn't even allow a 1/4" difference between the two because if both sides didn't sit level it would bug the hell out of me.
With the bottom liquid catching tub done I moved on to the next level. This next tub needed teeny tiny holes drilling in the base to allow all the liquid to drip through to the bottom tub (I'm kinda going on blind faith that the worms won't follow suit) and then I drilled air holes all the way around the top of the tub


 This second tub then sat niftily on top of those blocks in the bottom tub


 The final top tub then had the same air holes drilled around the top and holes drilled in the base so that the worms can move on up as they need to.


With the lid on all I needed to do was add the ingredients and the all important worms.
Research told me that I needed to first put some damp cardboard on the base of the middle tub (hopefully this is designed to stop them pesky worms dropping to their watery death below) followed by some damp shredded paper, then some soil with the worms and finally some kitchen waste.
Once all the layers are in place I then simply put more damp cardboard on top of it all and then stack the third tub (with the lid on top) and then wait for those worms to do their thing!
So, where do I get the worms? I remember when I last got a load of horse manure that it was full of the correct Brandling worms but I've not got any recent manure so what to do? Well apparantly the compost heap is very likely to have some so I donned my Marigolds and plunged my hands into the compost heap.
After 10 minutes of rooting I found nothing! Nada! Not only was there no Brandling worms but there were no worms whatsoever - that can't be good can it?
So my newly built wormery is just sitting there because I refuse to buy blinkin worms. I'm just going to have to go and get a trailer load of manure.
Buying worms!!!! Whoever would think of such a thing! Worms!!!!


Saturday, 9 March 2013

My next project

I may not have started it yet but my next project will be a camera case for my Nikon Coolpix S6300 that my husband recently bought for me from Duty Free while we were on holiday in Jamaica.
With this in mind (and me not being the most sewing pattern minded of crafters) I've been researching what patterns are available online (free of course).

This is the sort of thing I want and I found it at 'Sew-mad blogspot'  and it includes an awesome tutorial.


This one is from 'CraftyStylish' and I love it's originality however i don't think I have the patience to figure it out.


Super cute and super simple, that's what I like to hear! Pink Penguin gives us an awesome tutorial for this quilted case.


I'm also thinking of adding a detachable strap so that it can be across my body when I'm out but I can then take the strap off if I just want to carry in my handbag.
Now all I have to do is figure out a fabric combination!!!! This could take a while!!!!

Tuesday, 5 March 2013

Feature showcase

Well this is a tad awkward! I'm so busy outside while the weather is so mild that I haven't had a chance to get my crafty on (insert sad face). So what's a girl to do when she has followers that she wants to keep but has no crafty goodness to offer? Should I recycle an old post? Well initially it did sound like a good thought but then that just feels naughty and like I'm making no effort. So instead I am going to showcase some crafty goodies that are floating around the blogosphere at the moment that I think are inspirational or just down right dandy.


First up is Julie from 'belle maison'. Julies blog is full of inspirational DIY & furniture makeovers ranging from some fabulous chic red chairs to an entertainment armour transformed to a home office.
Seriously Julies blog is full of inspiration and with plenty of giveaways thrown into the mix, however if there is one item that I am totally and utterly head over heels for it has to be the headboard and footboard she transformed into a loveseat - this is so not my usual 'thing' but I want this


How gorgeous is that!  Take a trip over to 'belle maison' you will not be disappointed.


Kristen over at 'Farmstyle studio'  describes herself as "completely self taught and constantly striving to implement new techniques and looks to keep with current design trends" and her furniture revivals are completely up my street.
Take a look at this Beechwood dresser


I adore this and this is exactly what I wish I had the imagination to achieve. But basically I don't!


Finally I just had to include 'How to recycle'.
'How to recycle' state that their mission is "to assure safe and sanitary disposal of solid waste in every community and to reduce reusable or renewable wastes from entering landfills."
This is what initially caught my eye 
How cool is that - a wine cork chair! certainly better than going to landfill.
They also have recycled vehicles, paper and egg cartons. Go take a look and be inspired to recycle some weird stuff! 


I promise there will be some crafty goodies of my very own on here soon but for now I hope those were tantalising enough for you guys.


Friday, 18 January 2013

Quick & easy Leather luggage tags

ON HOLIDAY UNTIL FEBRUARY 10TH


I had planned to make luggage tags for our upcoming holiday ages ago, I was going to be o so organised - yeah right!
Yesterday I realised I still hadn't made any and it was looking pretty much like I was going to have to suffice with those shop bought cardboard printable tags - not so pretty and/or personalised huh!
So, I had some spare time and figured I'd have a go myself but if they took longer than 15mins each to make or the first one looked naff, I'd give up and go with the crappy cardboard ones.
I've done plenty of research over the last few weeks (that's me all over, loads of research but no doing) so I knew basically what I wanted the finished look to be, the problem was that the look I wanted wasn't going to be quick, so after all that research I just made it up as I went along and here's how they turned out:

Luggage tag
Not too shabby huh!
The best bit is that they took 10 mins to make. If I'd had more time and had been in a better mood (and if my craftroom wasn't such a tip right now) there are things I would have done differently but these will do for this holiday.
Here's how I did it:

Decide on fabric. I had some swatches of leather fabric as our friend is an upholsterer and gives me the leftover or out of date swatches, so I chose Chocolate leather:

Leather swatches

At first I cut 2 rectangles of leather (I didn't measure them) and tried to sew them together wrong side to wrong side but they moved about too much and looked reeeeeeally bad (to thick to get pins through without bending them - I tried!). At that point I could have given up! Yup, 2 mins in and i had had enough -  I hate it when things don't go how I want them to even though it's usually because I haven't thought things through properly or I'm trying to do things quickly instead of properly as was the case here.
To get over the slidey fabric syndrome I got 2 pieces of leather larger than the size of luggage tag I wanted to make, lay them wrong side to wrong side, traced a rectangle on top using white pencil and then sewed the tag from that, leaving one short end open and holding the whole thing together with clips:

Held together and 3 sides sewn.

Next I trimmed the edges as close to the stitch line as I dared on all four sides (I had to guess where the line would be at the un-sewn end as the pencil had worn off and I didn't think to re-draw it).

Cut as close as possible to the sewn line.

The next step was to decide on a tag for the tag (you know what I mean......right?).
To get a better finish next time I would use bias binding but for now I used ribbon folded in half, ironed and then sewn up the edge. Again I didn't measure the length I just cut what I thought would be enough:

Fold ribbon in half.

Once you've sewn the edge of the ribbon simply stuff both ends into the opening of the leather and then stitch the entire opening closed.

For the pocket that will hold the name and address I used laminate sheeting. Most tutorials online suggest vinyl like the stuff blankets are often cased in but I couldn't find any (until I'd finished - typical) so I used laminate sheeting.
I cut a rectangle of laminate to fit the front of the leather and then stitched another piece of folded ribbon  across the top of the laminate where it will be left open on the leather (this is where you will insert card for name):

Sew the ribbon to the laminate

Finally I positioned the laminate onto the leather tag, used clips to hold it in place as it moves easily and then sewed down both sides and the bottom end leaving the top ribbon end of the laminate open.
That's it, that's all I did!

Finished.
Most online luggage tag tutorials suggest that you use a plastic sewing machine foot to sew the vinyl as it glides easier but I didn't have that problem with the laminate, I used the normal metal foot.
Another tip if using vinyl instead of laminate is to place some tissue down the edges of the vinyl and sew through that instead of directly through the vinyl. You can then tear the tissue away once you've finished sewing, I suspect this is to help the foot glide better but also to help control the holes that the machine makes in the vinyl. Again I did neither of those things with the laminate.
I'm going to make better ones in the summer but if you're looking for a quick and easy luggage tag to make in a hurry then this is the one for you.
Shared at:
Dear creatives
Shabby Nest 
Itsahodgepodgelife 
One Artsy Mama 
Craft Junkie too 
French Country Cottage 
Shabby Art Boutique 
Diana Rambles

Monday, 14 January 2013

The laundry room....or at least it will be....eventually!

I am soooooo excited!
Let me explain!
I'm getting a utility/laundry room! I know it doesn't sound much but to me it's huge. When we renovated this place the original plans included a kitchen/diner and a big utility/laundry room but during the build the layout changed slightly as I decided I wanted a separate Kitchen and Dining room (yes! yes, I do regret that decision now).
Anyway we now have the seperate rooms I wanted and have since passed planning permission to build an extension to the kitchen to create a Utility/Laundry room and a mud/dog room. The problem is that I now don't want the extension as I feel 1) the house is big enough as it is and 2) I don't want to lose side garden space. we do have plenty of acreage but the back garden that is 'my' area isn't very big - I'm not giving anymore of it up.
But what about a utility/laundry room? At the moment the washing machine and dryer are in the kitchen but I prefer a separate area so yesterday I had an Aha moment and ran some plans by hubby.
We have an area downstairs that leads to a downstairs loo, a storage cupboard and is waiting for a door to lead to the outside garden, but I don't need the door to the outside garden because the kitchen already leads to that area soooooooooo
Instead of a door we're installing a window and this teeny tiny space is literally just enough to put the washer and dryer side by side and then install storage above a worktop and around the new window.
I'm gonna have a utility room! It's tiny but doable and I'll be posting every single update and before and afters on here for all to see.
In the meantime I've been doing my research for laundry room ideas and design:-


This is literally the space I will have but look how much has been packed in.
laundry room idea
Southern living


Definitely taking the opportunity for some wall art
 laundry room wall art, laundry room, utility room
Indulgy.com


I love this. Everything HAS a place and everything In it's place. Bliss! Shame I won't have this amount of space without building the extension
laundry room, laundry room design, utility room
Houzz


I have to have one of these, though I suspect mine would have to hold a few more odd socks

Indulgy


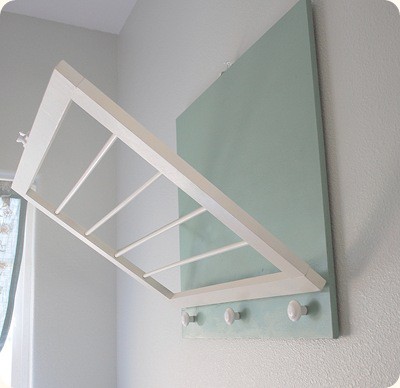
This drying rack is a brilliant idea. Check Centsational girls blog out for the tutorial.

drying rack, laundry room storage, laundry room
Centsational girl

How about this for lighting. Maybe it's not quite right for a laundry room but it's given me some ideas of how to make something unique myself - wow this one laundry room makeover is going to turn into many other craft projects

mason jar lights, diy lights
Etsy

I have heaps of inspiration pictures for the laundry room. In fact I have so many I'm probably going to struggle on a final decision for colour schemes etc but hey, what a fix to be in eh!

Sunday, 6 January 2013

My favourite DIY projects 2012


Hello peeps. For my first 2013 post I thought I'd share some of  my favourite DIY projects of 2012.
So let's go, just click on the description and you'll go straight to the postt.
Enjoy!


Scrap wood tealight holder.


 Scrap wood table lamp.


Scrap wood sewing table.
 

Home Blocks.


Compost tumbler from old plastic drum.


 Shared with:-
Nifty thrifty things.

Friday, 28 December 2012

Crafty highlights.


I haven't been able to craft much recently. I'm not sure why though as I've had the time to do at least a small something. I think maybe inspiration and motivation has been lacking and maybe this is due to the time of year and the weather.
I'm an outdoorsy gal and while it's nice to find the odd day where I can hit the craft room and make something it gets really meh when I'm doing it because I can't do anything else.
So I seem to have spent spare moments reading gardening and crafting blogs trying to make plans for 2013 and I thought I'd share some of what I found with you guys.

Leaf castings:- Fairegarden has an amazing tutorial on making leaf castings. I'm going to try this with Hosta and Gunnera leaves next year.


I came across Believe&Inspire while looking for hair ideas for my upcoming holiday. I love the tutorials and I now have some fabulous ideas for my long hair that would otherwise look limp and boring.


Weekend designer has a fantastic free pattern on her blog for this fabulous large tote bag. we can never have too many shopping bags and this one is certainly sturdy enough to be very useable.


There! Plenty to be getting on with.
Enjoy!