Saturday 12 October 2013

DIY Adirondack chair.

Usually when I build something I devise a plan in my head of what I want the finished item to look like and then I pretty much make it up as I go along, it's just the way I've always been - I've never built anything from plans! Until now that is.

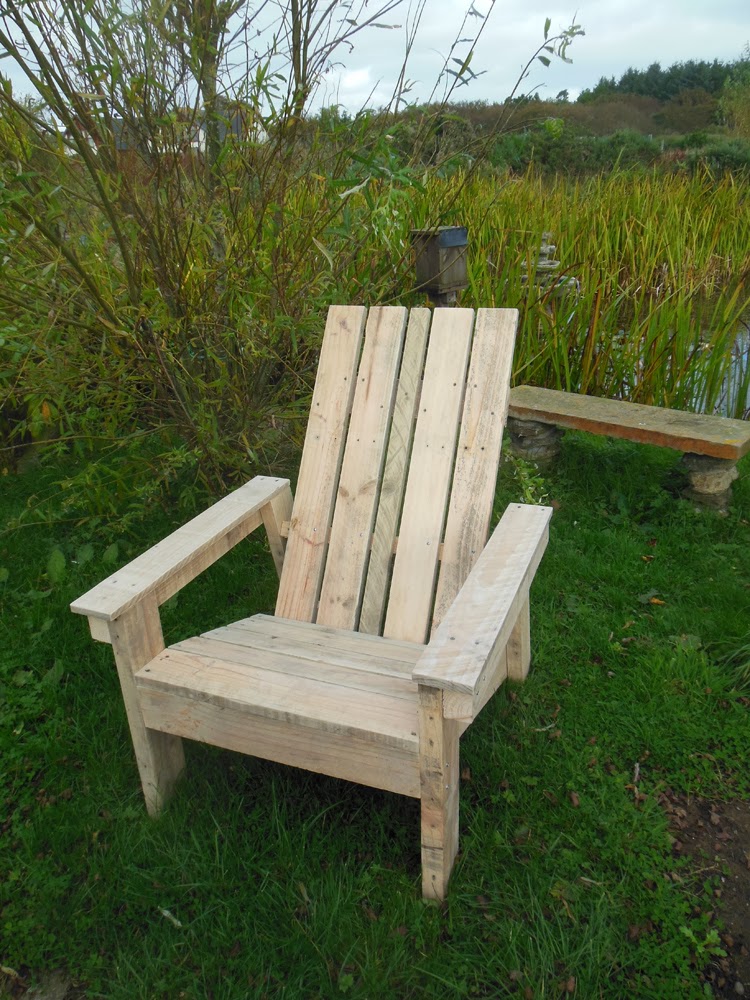
I've wanted to build an Adirondack chair for ages but just haven't had enough scrap wood to even make a start so when hubby had all those pallets delivered I was adding up the projects I could do as I was ripping them apart.
My pallet wood pile is precious to me though so I made the decision to make the chair following plans I found online on the Anna White website.
I have mixed feelings about these plans because while it helped immensely to have the guesswork taken out of dimensions and angles etc I found alot of the measurements inaccurate for the size of wood that was suggested to use. Most of the issues were easy enough to work round but the finished look isn't as per the diagram because I had to use a 2" piece of wood as a back slat instead of the 4" the plans stated - this is because the width of the back support is 19.5" yet the plans tell you to use five 4" slats and secure them to the 19.5" batten leaving a 0.5" gap in between, this totals 21" NOT the 19.5" that the plans state. There were a couple more discrepancies like this and had I been more experienced I would have noticed this before starting but I didn't! The finished chair still looks awesome though especially when you take into account that the wood cost me nothing more than time taking the pallets apart - all I have to do now is decide on a colour.

Adirondack chair, DIY, Pallet wood, Adirondack, Garden furniture

 Garden furniture, DIY garden, adirondack furniture, chair


 adirondack chair, garden DIY, pallet wood

I'm currently making the matching footstool via the same website but I'm having the same issue with inaccurate measurements. The length of the footstool is 23.5" and yet the plans require you to use six 4" slats with the 0.5" gap in between - this totals 27.5" NOT 23.5" so I'm yet again left with a 2" slat at the bottom.
I've checked the website and everyone else that has made the same chair appears to have been able to use the stated amount and sizes of wood so maybe I am doing something wrong, I just can't igure out what.

Wednesday 2 October 2013

Winter = Crafting time!

My poor blog! It must be feeling very unloved right now, my posts throughout the entire year have been hit and miss but it's not because I no longer care for this, my first ever blog, it's simply because I have spent so much time outside gardening that I haven't gotten around to crafting or creating as much as I would like, however with the changing of the seasons comes a shift from working outside to working inside.
It won't be long before the garden is all wrapped up for winter and my winter craft projects will take up my time instead. With that thought in mind I have a list ready with a few projects to get me going and no doubt more will follow as I go along.

I ran out of scrap wood earlier in the year - yes, I can hear that intake of breath, what is a girl supposed to do when her wood supply runs out and her whole ethos is crafting on a budget which doesn't allow for buying new wood in?
Well first off she moans to her hubby about the dire situation, give him time to mull it over in his head and wait for his solutions.
My hubbys solution came in the form of this


At first I thought he was taking the proverbial, I mean we all know how difficult these things are to take apart right?
Not to be out palleted I scoured the tinterweb for a solution and came up with this - though it really grated to have to buy something to dismantle free pallets I knew I wouldn't be getting anywhere without one.


I think the whole thing including shipping came in at around £63 but it's the most amazing tool for dismantling pallets and really does work as it says it should.
There are some pallets it won't work on for various reasons but it does the majority of pallets and the wood isn't annihilated so it's all reuseable.
Just 6 or so of the 6ft pallets has given me this little stack to work with


I have all the 3"x1" spacers on a separate pile too - all reusable.

So what am I going to make with my first heap of wood? Well I'm finally going to get a bookcase I really need for the lounge and all my lovely books are finally going to have their own permanent home instead of being dumped in the spare room - so this is one of my first projects

Cannot find the original website.

With Christmas just around the corner I just have to make this to sit on the dining room mantle

Roof Above Us
But it doesn't end there, just 5 mins on Pinterest searching Palletwood or scrapwood projects and you're hit with a veritable minefield of images. Here's some more favourites of mine that may well have to become personal projects


Cannot find where this image originated from but I would love to make this clock for both indoors and outdoors.


I'm not sure where I would put this sign from 'Three Mango Seeds' but I still want it!


So simple and yet so stunning, I love this christmas tree from 'The Wood Connection Blog'


And how about this from 'Shanty 2 Chic', it could be used as a Christmas sign holder in the winter and a hanging basket holder during the summer


Yes I think it's fair to say that I will soon be back on track with regular posts, not only will I be creating with pallet wood but I also have plenty of Christmas gifts to be getting on with.
Roll on winter!