pages

Friday, 28 December 2012

Crafty highlights.


I haven't been able to craft much recently. I'm not sure why though as I've had the time to do at least a small something. I think maybe inspiration and motivation has been lacking and maybe this is due to the time of year and the weather.
I'm an outdoorsy gal and while it's nice to find the odd day where I can hit the craft room and make something it gets really meh when I'm doing it because I can't do anything else.
So I seem to have spent spare moments reading gardening and crafting blogs trying to make plans for 2013 and I thought I'd share some of what I found with you guys.

Leaf castings:- Fairegarden has an amazing tutorial on making leaf castings. I'm going to try this with Hosta and Gunnera leaves next year.


I came across Believe&Inspire while looking for hair ideas for my upcoming holiday. I love the tutorials and I now have some fabulous ideas for my long hair that would otherwise look limp and boring.


Weekend designer has a fantastic free pattern on her blog for this fabulous large tote bag. we can never have too many shopping bags and this one is certainly sturdy enough to be very useable.


There! Plenty to be getting on with.
Enjoy!

Friday, 14 December 2012

A bit o xmas ruffle

With no real projects even remotely finished I thought maybe I would recycle some old ones. This is a mas tree ruffle skirt I made last year and looks just as awesome this year :)


Well I've been absent from the blog for a wee while due to a stinkin cold and a cough, lucky for me though I have a caring hubby that happily made sure I was warm, cooked meals and helped with the housework. Hmmmmm or maybe he did all that out of guilt because it was him that passed the bug on to me! Whatever the reason I was veeery grateful lol.

So, I'm all better now and to make myself feel better about not managing to make quite as many xmas cards as I'd hoped I decided to have a go at one of those gorgeous ruffle xmas tree skirts that are all over blogland at the moment.

This is what the finished project looks like:

Ruffles, ruffles everywhere.

Although there are a few mistakes in the skirt overall it looks quite pretty and I'm chuffed with it.

To cheat and make life easier for me (we're all for that huh!) I used our original tree skirt and just attached the ruffles to it.

Erm......what was I thinking?


Cute when we bought it many moons ago but a bit out dated and gruesome now isn't it!
I'd been looking for a new skirt for the last couple of years but couldn't find anything I liked. I know, I know pretty much anything would have to better than the monstrosity above but still.......

I have quite a bit of fabric stashed away that's come from many places including charity shops, giveaways of old showroom fabric, fabric sample books, old curtains and quite a bit from my mum.
I decided to use some quite thick cream fabric and had intended to use the glue gun to attach the ruffles but as usual I changed my plans!
I didn't want the frayed edge look to my ruffles cos I'd just be at them all the time with scissors to neaten them so once I'd cut enough strips for ruffles I hemmed the bottoms and the edges.
Then I figured that as I had the sewing machine out anyways I may as well just sew the ruffles on as well. I may have worked briefly as an overlock machinist and a bar tack machinist but I am no seamstress. I hate pinning stuff and measuring things just isn't in my vocabulary.
So I pleated the ruffles to the skirt base as I went - not something I would recommend. The end result was OK on the bottom layers because that's where the base is widest but once I got to the shorter areas at the neck of the skirt base I made some real whopper mistakes.
Once I'd readjusted though I just added some ties and that was it. In all it took me about 4 hours, it may have been quicker with a glue gun but I suspect I would now be nursing burnt fingers!

Easy Peasy tree skirt.


Thanks for taking a looksee, pop by again soon.


Wednesday, 3 October 2012

FMM

Friend Makin Mondays

I'm not sure why I haven't noticed FMM before on 'Missus.and.sausage' blog before but today I checked it out and thought it was a fabulous way for us bloggers to make new friends in common.
The idea is to answer the questions via a blog post, share the post with MissusMege and then check out the other linkers and make new friends :)

So here are my answers to this weeks topic 'Uniquely You'.

1) Do you prefer to talk or text? - Hmmmm, I'm gonna have to say text cos it's easier but if it's my mum, family or close friends that live hundreds of miles away then a text just seems too impersonal so I prefer to talk.
2) How often do you make your bed? - Daily. Every morning and quite often when I'm actually in it. I hate getting into an unmade bed and I think a nicely made bed is so much more appealing.
3) What sounds do you hear right now? - The TV! as usual! We're watching a documentary about the Tornado that hit Joplin in America - so so sad! I live in the Scottish Highlands so the only sound outside would be our birds of prey.
4) List 3 things you always carry with you - My phone (but not always with credit), gloves (it's cold all the time here) & a pen (haven't a clue why cos I never have paper to go with it).
5)What are your favourite TV shows? - Dallas 2012, The vampire diaries & The real housewives of pretty much anywhere (love to be reminded how money does not necessarily give you class, loyalty or happiness. Though it will buy you a plastic, wax work body job!)
6) Is there a hobby you'd like to devote more time to? - Sewing, cardmaking, scrapbooking, furniture revival and pretty much every hobby I already have.
7) What is your favourite drink? - Water, water and more water.
8) Share a couple of cool facts about your family - Seriously? Cool? Well what constitutes cool? Erm..........yeeeeeeeah...........hmmmmmmm..........we're obviously NOT a cool family cos I have nothing! Though no doubt I'll think of loads once I've posted our uncoolness.
9)List one thing you will do for yourself today - INSANITY!  It's a workout BTW.
10) Share something that you're thankful for today - The love of my husband and daughters.


Thursday, 27 September 2012

Happy Anniversary

I went through a faze earlier this year determined to make birthday and anniversary cards myself rather than buying them, after all I do love making them.  I get a bit cheesed off that I don't have the fancy fandangled machines that produce the perfect edges and shapes (even my straight cutter is dodgy now and I have to resort to a craft knife for cutting) but I've discovered ways of achieving the look I want with the few tools I have.
One day I will replace my broken Cricut and I'll purchase some nice card & paper and some of those lovely accessories plastered over Create & Craft tv, but for now I'll cope.

This is a card I made in July for my Sister & her husbands 25th wedding anniversary


These things never turn out quite how I imagined simply because I never know what card and paper I'm gonna use till I get going - I never plan ahead!

The stamp is from LOTV and I coloured it using my Promarkers.
The paper with the heartswas basically shoved through my sewing machine for that effect.
The flowers are the best part for me. I basically cut 3 flower shapes from Mulberry paper and followed an online tutorial to make the bigger ones and then cut strips of Mulberry paper and turned it as i rolled it to make the smaller ones.
The hat pins are simply glass bead sewing pins with jewellery findings glued on with my trusty 'Fixsall' glue.
The squirly wire is just that - thin craft wire wrapped round a pen for the shape and then glued on with 'fixsall'.


Friday, 21 September 2012

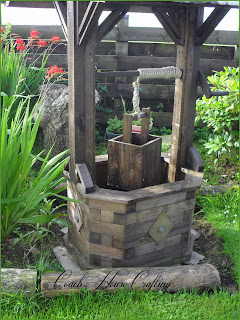
I made this wishing well a couple of years ago on a whim. I literally decided one day to make it with whatever scrap wood I could round up, but because I had absolutely no plan to work with I had to make it up as I went along using whatever wood I had managed to find.
The shape of the base probably caused me the most angst because I didn't want a bog standard square or round one. I'm not sure what this shape would be called but cutting all those little pieces to the exact right size and then nailing em all together was not as easy as I thought - 6" nails are not the easiest to hammer in, and back then I was too lazy to re-drill.
Once the base was made I then found scrap ply to line the inside and then the sides and the wood structure to the roof was made up bit by bit with whatever size wood I had enough of that I thought would be strong enough to hold a slated roof.
I used an old broom handle to make the rope pulley and created a fake handle out of wood scraps. Then I made a square bucket from wood scraps and pinched hubbys tow rope to wind round the pulley.
I am proud to say that every inch of this was cut, nailed, screwed and designed by myself. The only part that hubby had was to slate it and attach a lead ridge tile to it.
The final part was cut some diamonds out of ply, nail em to the base and then attach some little Lead Tudor Roses that hubby had had laying around for years.


Lead Tudor Rose:

wishing well, wooden well, DIY wishing well


Wishing well:
 wooden well, wishing well, scrap wood well


Bucket with rope pulley:
garden wishing well, DIY wooden well, garden ornament

The only problem we have found with the well so far is that it was supposed to be moveable - it's not!
We had to move it 50 yards or so and literally had to take it apart and re-roof it - it weighs a freaking tonne.
Since moving it I have decided that I'm not keen on the base now and am thinking about creating a stone one around it!
Linked to:
Delightful Order 
Bear rabbit Bear Crafts

Wednesday, 19 September 2012

Tealight holder - simple & easy

I've wantedto make a tealight holder or two for a while now but with so many projects on the go I felt real bad about starting something else. Soon got over the guilt though and tackled the tealight holder - mainly because I wanted to do something that I could finish in a quick time.

Here's the finished holder

tealight holder, wooden tealight holder, scrap wood, scrapwood tealight holder

Pretty cute huh?
So easy to make too. I just found an old lump of wood ( even wood with splits will work because it adds to the character), gave it a good sand down ( a very good sand down because this wood was actually an old fence post) and then I sectioned it off into quarters, found the middle point of each of the four sections and drilled a hole for the tealight.
I used a 40mm Forstner bit for the tealight holes but you could also use a 40mm flat drill bit.
Once that was done I gave it another light sand - including the tealight holes - and then gave it 2 coats of medium Oak wood dye and 1 coat of Satin finish varnish.

Looks lovely all lit up and burns my Yankee candle tealights brilliantly.

My next post will be abother holder I made only this one is upright and looks amazing too.


Linked to these partays

Joy 2 Journey
Funky Junk Interiors 
It's a Hodgepodge Life 
My 1929 charmer 
The Southern Insitute 
I should be mopping the floor 
Under the table and dreaming

Tuesday, 21 August 2012

Greenhouse space saver plus milk carton recycle

Wow, I've been absent for a while huh! well apologies for my lack of posting but I'm now back and will have new projects all ready to post on here pretty soon. Until I have them edited though I will repost a couple of my popular back posts and I thought this greenhouse space saver was the perfect post for these glorious gardening days!


I'm hiding indoors at the moment because the wind sounds awful outside. I placated the guilty feeling by convincing myself that I would use the indoor time to make my mums birthday card (it's her birthday in about 6 days) but I made the huge mistake of putting Create & Craft on the TV.  Just while I check my emails mind!
Yeah right!
I then logged in to my blog  to reply to some emails and comments but we all know what happens then don't we?  yup, I'm too engrossed in reading other blogs  that heading through to the cold craft room has just lost its appeal.
I could go outside and potter in the poytunnel BUT I figured instead of that I could just blog about a project I completed a couple of years ago before I had the polytunnel and needed some space saving ideas for the greenhouse - those rows of pots with seedling veg and flowers in em were just taking up too much room because I had to put them on just the one layer of staging.

Brainwave people!

I created this space saver (though excuse the dirty holders)

space saver, pot holder, DIY, garden diy, garden woodwork

The best bit is that it was easy enough to make with no technical tools needed if you don't have them AND it's all scrap wood AND it recycles those plastic milk containers.

OK so how to make it!
First gather your tools ( I have a habit of looking for what I need when I need it - not a good idea).
You'll need:
Wood - I used roof batten, small scrap bit of plywood, some scrap beading and some scrap pieces of  2"x 2". You can use any size you have though.
Screws (I literally use anything I can find. I used black plasterboard screws for this)
Nails if you don't want to use screws.
Tape measure.
Hammer.
Screwdriver.
Saw (unless you use a cutter as I do)
Pencil.
Milk cartons (I used 30 but you can make the frame and add them as you get them)
Scissors.

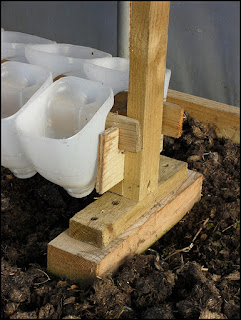
I made a basic 4 sided frame using scrap roofing batten and  nails or screws or whatever you have, and made corner supports for the top only.

 garden project, garden diy, garden space saver, seedling holder


Next I made 2 bottom plates to support the whole thing. I just used whatever cuts of wood we had for this as long as the bottom plate used is wider wood than the  top plate.

 garden diy, garden woodwork, seedling holder, greenhouse space saver, milk carton recycle

Screw the two bottom base blocks together then screw the actual square frame to the blocks - remembering to keep the corner supports to the top.

Then I cut some pieces of plywood into a rectangle shape and cut out 2 grooves to each one to hold the cross supports that the bottles attach to.


Those rectangle pieces were then attached to the frame with screws as shown above.
Next I cut some small beading to use as supports for the Milk cartons, making sure the cuts I made in the rectangles kept the supports supported but not so tightly that they were awkward to lift out.

Finally grab some milk cartons (I used either 4 pint or six pint ones) and cut around the carton just about where the label starts. You don't need deep holders if they are for seedling pots.
*TIP - put the lid on the carton before you cut it. This keeps the air in and makes it rigid for that first incision with the scissors - try to pierce it without the cap and it will just collapse*.
Once you have them cut just slot them onto the frame through the milk carton handle. Leave the lid on if you want but you can take the lid off to aid drainage too.

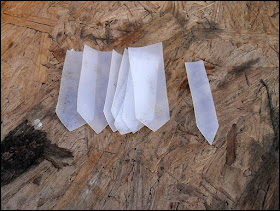
Now you're left with a load of bottoms to milk cartons so lets use em to make plant labels.

Cut down the middle of the leftover bases to the next mark that goes all the way round the container (would have been the bottom of the label) then turn and cut all the way round the circumference of the container so you end up with a large rectangle of plastic.
Finally cut slices off that plastic as wide as you require your labels to be and then cut points on one end od each and voila! Plastic plant labels for free.

 milk carton recycle, garden diy, seedling holder, garden woodwork, scrapwood diy

I use these labels all the time and because they're free to make I don't worry about cleaning them when they're really bad, I just throw them away and make some more. You can stick them in a container of bleach though as they are easy enough to clean that way.
p.s. Once you've cut the side off the container to make your labels you are left with small pots made from the very bottom, I use these holding the labels or collecting seed etc. So even the bases can be used!


Linked to:


'I heart Nap Time'
'Nifty thrifty things' 
'Youngancrafty' 
'My romantic home' 
'Funky junk interiors' 
'Country momma cooks' 
'My 1929 charmer' 
'Sew can do' 
'Keeping it simple' 
'diy home sweet home' 
'sassy sites' 
'ProjectQueen' 
'Kammys corner' 
'Organiseyourstuffnow' 
'Gingersnapcrafts'
'Common ground'

Friday, 20 July 2012

Handmade Trugs

Apologies for my lack of posting lately, life appears to be getting in the way and I seem to be mainly completing cards rather than any other kind of project.
I figured I would re-post an old post - nothing like a good recycle huh! As it's gardening time of year I figured maybe this trug tutorial would be of use to you.
Enjoy!

Handmade Trug

How many of you are like me I wonder?
Do you have a million and one projects on the go followed by a million more in your head yet to start on and then after spending too much time on craft sites you have a fair few more to add to the mix?
Well that's me too! Problem is I now have so many projects going on and in my head that nothing is getting done at all - I really need to learn to limit myself to a couple of projects until each one is done.
Take this week as an example - I've a trunk ready for painting (haven't a clue where to start), I'm making another scrapwood lamp like 'this one' (just different), I'm in the middle of sorting out my scrap room (which doubles as an office and trebles as a mini gym), I'm trying to make a quilt out of fabric swatches (never going to work as they're upholstery fabrics but I'm determined anyways), I'm trying to get good images with my DSLR so that I can post about about a fabulous Ebook I found and I'm trying to produce 3 wedding cards (which aren't needed until July but with my track record..........).
On top of all that I scan the web and have decided that on top of all the other million things I need to make for our home such as towel hooks, chair reupholster, quirky bathroom signs, blocks to sell .......you get the idea huh...........I now need to make my holiday beach bag (which isn't urgent as we don't go till January) and crochet some slippers!!!!!!!! THAT wouldn't be an issue but I can't even crochet - duh! I can knit pretty well but I can't find a pattern for knitted slippers that I like so I'm going to have to learn to crochet!
Be still my mind!

And..... breeeeeathe!

On to better stuff - I've entered a 10k run with my daughter so we're running together - yay!
4 miler round the forest today - double yay!
Mind you it was a walk / run as I have to build my fitness back up (my daughter appears to be uber fit already. Working with horses does that!)

But who cares bout all that. You wanna see something - anything that you can have a go at making yourselves don't you?
Well it's not finished yet - those pictures will follow soon - but I made this:

 garden trug, wooden trug, scrap wood trug

Here's the thing! Haven't a clue why I made it or what i'll use it as - that's probably why it's not finished.
I thought maybe I could put 3 small herb pots in it for the kitchen window sill after it had some kind of finish to it but the sides are too tall really.
I need an egg collector................ but not this.
Maybe a trug for my garden tools?

Who knows. Anyway here's how I made it and what you'll need:

  • Scrap wood - I used old fence panels.
  • Old broom handle.
  • Jigsaw - or handsaw.
  • Sander if the wood is a bit dodgy looking.
  • Hole cutter - I used one to fit my battery drill.
  • Battery drill.
  • Nails
My wooden fence panels were pretty grotty looking:

 scrapwood trug, garden trug, herb trug

I just gave them a good sand with my electric sander.
Next I decided on the width I wanted and cut 2 pieces exactly the same.
Then to make the two end pieces I made a template of the style I wanted on paper, traced this to the scrap wood and cut it out using a Jigsaw.
Then use this wood as a template to make a matching piece for the other end.
I cut a base that was slightly shorter than the side pieces because the side pieces were going to be nailed to the outside edge of the end pieces but the bottom would sit inside the rectangle created by the sides and ends. (hmmmmm, that makes no sense even to me but I don't know how else to explain it).

 diy trug, garden trug, herb holder

For the holes for the broom I marked the centre of each end piece and used a hole borer attached to my drill

 herb box, tool box, garden trug, wooden trug


Once the broom was cut to size it was a simple case of putting the whole thing together with nails and hammer.
It will need some kind of wood treatment and maybe some stencilling of some kind but voila! A trug that costs nothing if you have scrap wood.

Have you made any of these? If so I'd love to see em.


Linked to:

'Nifty Thrifty Things' 
'I heart Naptime' 
'My 1929 Charmer' 
'The Southern Institute' 
'The Three Mango Seeds' 
'Sew can do' 
'C.R.A.F.T' 
'The girl creative' 
'Creative Jewish mom'

Friday, 6 July 2012

I'm finallymanaging to get some cards made again - yay!
This one is one that I made for my sisters 40th birthday.


The style of card I like has changed since I started making them many moons ago. The problem I have is that I don't have the fancy fandangled equipment that is showcased on the likes of 'create & craft' TV, I just feel that the prices are ridiculous and soon obsolete anyways.
My mum sent me her Cricut machine when she upgraded but it must have got damaged on the way here and now the cutter won't go up and down properly. The machine isn't old at all but Cricut have informed me it can't be fixed which I find ridiculous seeing as the carriage is a part all of it's own and removeable from the rest of the machine :(
Anyway the lack of cutting machines means I depend on the old Fiskars scissors for any cutting so I have to get quite creative to achieve some of the looks I like.

The stamp I used is by LOTV and I coloured it in using Promarkers on Rymans cardstock.
I used my sewing machine for the effect on the backing paper - love this effect!
The flowers are some random ones I bought on EBay.
The pins I made myself using ordinary sewing pins with coloured heads and then just glued on a jewellery finding to it. The best glue for this I find is 'Fixsal' glue - bonds in seconds once the air is expelled, so you have time to move it about before setting it.
The stamp base is a freebie I found online and then I added a top piece to it - all cut out by hand - and added the words i wanted in Photoshop before printing it out onto cardstock. Then I blinged the stamp up using diamantes & 'Fixsall' glue.


Enjoy!

Sunday, 17 June 2012

Letter to your 13 yr old self

I've seen this on a few blogs lately and thought it would be fun to join in with.
The idea is to write a letter to your 13yr old self with all the wisdom that your advancing years have to offer.

What would you write? What would you warn yourself about?

Here's mine!


Dear Linda,

Life is going to throw you Lemons - a whole heap of em! You can choose to spend years chewing on them with all the avarice of a sour faced Bulldog or you can plant the pip, grow a tree and discard the bitter remains.
To warn you of what is to come would be to change the person you become because of it. I'm still unsure whether that would be a good thing or a bad thing however there are a few situations where you could do with a heads up.
Despite what you feel right now your parents DO love you and you ARE worth something. 
Your soul mate is but 5 years away!
Try to apply yourself at least a teensy bit more at school, forget those hurtful remarks from adolescent young boys - one of which will apologise to you later in life and is going through the same shit you are!
Chocolate is not your friend!
Help mum more, She's going through crap and feels isolated and alone.
Work your shit out with dad. He is what he is but he does love you. When he reaches out to you to rebuild a relationship take his hand. This may very well prevent your younger sister from having to identify his swollen body and could prevent years of regret on your part.
Talk Pat out of going on the cruise ship in December 1989.
Be aware of 'The Black Dog' - you will not understand that right now but he's already there at your heels.
That's all the warnings you get because the rest is for you to work out as life drags you along.

On a good note, your life is full of love, travel, hard times, good times, friends that come and go and a couple that stay forever.

Live your life and trust your instincts always.

Me.x


Friday, 15 June 2012

Wooden upright Tlight holders

It's been a while since I've actually posted on here hasn't it!

I'm still working on a few projects and they're slow to finish because I'm having to do them in between gardening (we have ALOT of garden), housework, making cards (seem to be a lot needed this year) and life in general.

The TLight holders I made in my last post gave me the idea to make another set for the bathroom. I used the same materials - scrap fence posts - and had to give them a really good sand down as they were in really bad shape.
Then I just cut them into 3 different sizes and used my Forstner bit to drill a hole in the end of each one to hold the Tlight.
I found these ones really hard to drill into though hence why the Tlights don't sit in as deep as the previous one I made for the table. I think it's because I was going into the end grain of some seriously hard wood and maybe because I had to use my Dewalt drill to do it. I could have waited and asked hubby where the decent power drill was but I'm too impatient for that.
Hubby has suggested that 2 more taller ones would look even better added to these 3 because they look a little lost on the bathroom floor as is so I guess I'll have to find that power drill after all.
Once the holes were drilled I just gave them a coat of Medium Oak wood dye followed by a coat of satin clear varnish and voila!

wooden holder, Tea light holder, tlight holder, wooden tlight holder, scrap wood holder

So easy to make and means I can finally burn my Yankee Candle Tlights in the bathroom.

Friday, 18 May 2012

Scrap wood table lamp

Finally!
I have one project finished. yay!

And here it is


I made a different table lamp a while ago (check it out HERE) and have been itching to make another one. Originally I was going to make one similar to my last one but use square blocks of wood instead of circles but then I cam across this small hunk of naff looking wood

 rustic table lamp, wood lamp, recycled lamp

Maybe some people would have chucked it on the burn pile but I instantly knew what I wanted to use it for even though it had obviously been drenched in creosote at some point in the past.
So I got the orbital sander out and got to work on it, followed by the detail sander.

recycled wood lamp, fabric flowers, handmade, rustic lamp

It didn't actually take too long to sand. In fact I had to stop myself going too far (it's soooo addictive) because I wanted to leave some darker areas so i got different tones with the finished colour.
Next part involved that monstrous looking drill bit!
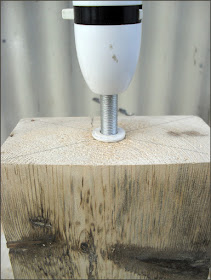
I found a drill bit that was a tad wider than the lamp wire and long enough to drill through to about 1" from the base of the wood. Once I had that bit drilled I then had to drill an upward angle from the back to meet the drill hole going through the middle, then I threaded the lamp wire through and pulled it out the back.
Here's the pendant sitting on the top.

rustic lamp, handmade wood lamp, fabric flowers, wooden table lamp


Next I gave it 2 coats of Antique Oak wood dye and one coat of clear satin Varnish.
Then came the lampshade. I bought a cheap one from 'B&Q' (I checked the charity shops first but no luck) and blinged it up with the fabric flowers I made.
I am now addicted to making fabric flowers, there are numerous tutorials online so I haven't done one here but be warned - once you start you won't be able to stop.

So there's my new table lamp. Easy to make, cheap to make and that makes it all the more interesting to look at.


Enjoy!


Linkin up to

Joy2Journey
The Southern Institute 
My 1929 Charmer 
Sew can do

Thursday, 17 May 2012

EditMe Challenge wk20


 Meet Nancy from A Rural Journal.com this weeks guest judge and owner of this beautiful cat and image
 I am a 52 year-old farm wife and mother of two grown sons. My union iron worker husband and I live in a 100+ year-old farm house in eastern Nebraska, United States. In my spare time, I enjoy photography, knitting, reading, cooking, hiking and blogging (which I've been loving since 2007.) We live on 80 acres of conservation reserve land in a rural county of about 20,000 people. We have three dogs, several farm cats, geese, ducks, turkeys, chickens and one guinea -- all of which keep me company and extremely busy. My blog is primarily a place to feature my rural photography, talk about what's happening on our quiet, lazy farm and to meet talented, friendly people from all over the world.
  
Here is the SOOC image
And here is my edit


I decided this week that I was bored with CS5 so I thought I would do the entire edit in Picmonkey - I've heard alot about Picmonkey but have never used it before so I just played until I got something half decent.
  • Opened in Picmonkey.
  • Cropped tighter.
  • Boosted the colours and played about until I got some definition in the coat and its colours.
  • Used a focus filter to focus mainly on the head.
  • Blurred the background a bit more.
  • Added some warmth somehow - sorry I don't remember how.
  • Added one of the textures which added a bit more warmth.
  • Added a border and photo edges.

I must say I'm quite impressed with Picmonkey. This edit was quick and easy, it only took me longer because I wanted to see what each thing did. It would never replace my CS5 but I'll definitely use parts of it again when editing in the future.

Thank you to Branson & Stephanie as always - a fab challenge.
Thank you also to Nancy our guest judge.

If you guys want to give this challenge a go then head on over to the EditMe blogsite and feel free to join in.


Thursday, 10 May 2012

EditMe challenge Wk19


EditMe Challenge wk19


This week's fabulous guest judge is Andi @ The Hollie Rogue!
A bit about Andi:  I am Andi--an elementary teacher turned SAHM to two little ones, a wife, follower of Christ, crafter, etsy shop owner, and lover of all things vintage. I am a self-taught wanna-be photographer who just loves to learn new things about the art of photography. I am on a journey to learn more about myself and my passions through this amazing avenue of blogging.

Here's the SOOC


Here's my edit


  • Opened in CS5
  • Cropped tighter.
  • Adjusted vibrancy.
  • Adjusted tones.
  • Adjusted saturation.
  • Adjusted in curves,
  • Ran a Coffeeshop action.
  • Gave it a border via canvas size.

Have to thank Branson and Stephanie for hosting this brilliant challenge and thank you also to Andi for such a cute image to play with.

Now if you guys want to take part in this challenge then feel free to hop on over to the EditMe Challenge blogsite and join in. Or just check out all the other awesome edits.