pages

Friday, 27 April 2012

Guest post

Today I'm guest posting for Kaysi over at 'Keeping it simple'.

I love creating items for the home and garden using scrap or recycled materials. If I see something I like at the garden centres or online then I find a way to make something similar with as little cost as possible - preferably no cost at all.
My guest post for Kaysi today is all about  showing you exactly how I created this lovely bench planter from scrap wood, in just a couple of days and making it up as I went along,


This planter with built in seat was amazingly simple to build and can easily be completed over a weekend.
With just a few adjustments you can adapt it to be able to use whatever scrap wood you have laying about or can scrounge. As it happened for me my husband saved a load of lengths of 5"x2" from a wood workshop he demolished. I'd been wondering what I could make with the wood and that's when I happened upon this idea, plus I still have enough lengths left to build a picnic table for the garden and maybe even an Adirondack chair as well (tutorial on my blog soon).

To start with you need to collect all your tools and materials. I tend not to do this and always regret it later on when I'm hunting around looking for what I need and usually find I don't have it.
You'll need:
  • Wood. I didn't calculate what I needed and never work from plans but it's obviously going to be more convenient to measure beforehand. You'll need wood for the main construction and the seat, battens for a base ledge, slats to create the base and wood to make the top rim.
  • Screws/nails.
  • Tape measure & pencil
  • Hand saw or Cross cutter (electric all the way for me).
  • Dewalt drill or similar.
  • Plastic if you want to line the planter.
  • Fence paint or exterior varnish. 
Next head on over to 'keeping it simple' and check out the full tutorial.
Please say Hi to Kaysi and hopefully enjoy the tutorial enough to maybe have a go at something similar yourself!

Enjoy!


Linked to these partays:

Thursday, 26 April 2012

EditMe challenge wk17

EditMe Challenge Wk17

I've missed the last couple of challenges but I simply couldn't resist getting back into the swing of it with this weeks image.

Our guest judge this week is Diane from Butterflies In Time Photography. Here is a little bit more about her...


Hi, My name is Diane O’Connor and I share my photography work at Butterflies In Time Photography.  Truth be told, photography is not my main profession (not yet anyway) but I do have a never-ending craving to be creative in everything I do.   Although I only began to seriously delve into photography in 2011, my husband encouraged me long before this to do “something creative”.  Well, after much contemplation, I bit the bullet and here I am and I absolutely love it!  I truly am a diehard photo-enthusiast who takes pictures of everything (and I mean everything!), wherever I go.


Here's Dianes image:


and here's what I did with it:


  •  Opened in CS5.
  • Created a background copy.
  • Used a tool (sorry don't know the name of it) that let me select parts of the image to seperate from the background. This took me an age because I'm not familiar with this tool.
  • Inverted the selected flowers and deleted the background.
  • Cloned some of the leaf edges that had been made messy due to the previous action.
  • Added 3 different textures and set each one to Multiply.
  • Messed about with the opacity of each action until I got what I wanted.
  • Created a 30 pixel border via canvas size.
  • Flattened the image.
Well, thanks for checking this out.
Thank you as always to Brandy & Stephanie for hosting the challenge.
If you fancy having a go at the challenge then mosey on over to the EditMe blogsite and join in.

Tuesday, 24 April 2012

Beach pebble table re-do

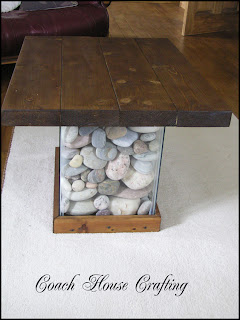
Beach pebble table re-do.

One of the first projects I ever completed for our new house was this coffee table made from an old fish tank, some beach pebbles and some scrap wood.
Over the past year the wood table top has gradually shrunk and separated and has gotten to the stage where it looks horrendous!
This was one of my first ever wood projects and so I never really understood the need to completely dry the wood out before using it, I figured storing it in my husbands shed would be sufficient for drying purposes but in hind sight I can see just how much moisture is in the air in there and with no real sunlight from windows, the wood wasn't as dry as I had thought.
So this is what has happened to every corner and even to the in fills:

scrap wood table

See how much the wood has separated? The tip of the corners have stayed pretty tight but that's due to the screws I used there.

So I finally decided to get a new top made with wood that has been stored in my polytunnel where it has completely dried out.
The top is made from 5" x 2" wood that I have plenty of thanks to hubby saving it for me from a building he demolished.
I never work from plans because I'm pretty good at memorising what I want and as long as I can visualise the finished effect then I'm happy to just go with it - besides, a table top is hardly complicated to do.
Basically I cut the wood to the length I wanted the table to be, glued the edges, butted the sides together and clamped the whole thing together for a couple of days - I omitted the clamping last time which I would never do again.
A couple of days later I sanded the top down with various paper grits and using first a circular sander and then a detail sander - this wood needed alot of sanding! (The last top was sanded entirely by hand - Eek!).
Once it was sanded I gave it a couple of coats of Wickes wood dye in a Medium Oak colour and left it for a further 2 days.
Once this was dry it was evident just how different the wood dye tone was on the old top compared to the new top despite using the same tin of dye on both:

 scrap wood table

Next I gave it a couple of coats of Satin wood varnish.
Once it was dry I simply transferred the base plate from the old top and screwed it to the underside of the new top - this holds the whole thing together and secures it inside the fish tank:


Then it was simply a case of slotting that on to this:


If you look close you should be able to see the lip just inside the top of the fishtank running the length of each side - this is what the wooden battens on the base of the top will sit on, creating this:

fish tank table, pebble table, wood coffee table, scrap wood table,recycled table, easy table

Much better!

Monday, 23 April 2012

Book review - Invasion - Jon S Lewis

Invasion - Jon S Lewis
'MIB'  meets  'Stargate'


Colt McAlister is drawn into a war against things he thought only existed in comic books.
After a car wreck takes the lives of his parents, Colt moves to Arizona to stay with his grandfather. There, an informant tells him that his parents were actually murdered because his mom, a journalist, was getting ready to write a story exposing Trident Industries.
Along with Oz and Danielle, his new comrades at Chandler High, Colt vows to uncover the truth. But the more they learn, the more bizarre reality becomes. Mind control, jet packs, and flying motorcycles only scratch the surface of what they discover.
Colt is recruited by a secret organization called the Central Headquarters Against the Occult and Supernatural. But the battle isn't just against an out-of-control giant corporation. A gateway to another world is opening, and the invasion has already begun.

The first few pages of this book had me hooked. The storyline was kind of 'Men in Black'  crossed with 'Stargate'  and although it was immediately over the top it kinda had you enjoying it!
A couple of chapters in however and I was dreading reading the next page let alone the next chapter, the plot suddenly became boring and that enjoyable unbelieveable 'MIB' action just wasn't enough to pick up what the author had managed to lose.
I read this book to the very last page because that is what I agreed to do but it was hard.
This book has many 4 star reviews so and for the first couple of chapters I honestly thought I would be giving it the same however I wonder if the reader needs to be more of a teenager than someone hitting 40.

Friday, 13 April 2012

Tame that 'Black Dog'. Depression bites!

The Black dog is snapping & snarling!

It's no secret that I have the odd lapse of feeling low and the past couple of weeks I have been completely absent from any kind of blogging.
I thought I had my Black Dog well and truly in his kennel or at least to heel but he's snarling and snapping again and so I've been trying to gain back some control.
That has meant though that nothing has interested me and I could not for the life of me find any interest in anything that I would normally love - gardening, photography even blogging and I guess that just completes the vicious cycle of depression (hate that term).
One day I'll venture outside and begin a project and then 10 minutes later I'll find myself thinking 'what's the point? Seriously what is the point?' and that usually results in me downing tools, heading indoors and pretty much feeling sorry for myself!
I see the pattern daily, I know it's there and I understand that to break it I have to force myself to do something - anything - but jeepers it's hard!
So what do I do? Well, music helps. I find if I'm listening to my MP3 then the snarling Black dog is easier to ignore and the more I am able to ignore it the tamer he becomes(the Black dog does not like music).
But what when I'm not listening to music? Well I've been trying to force myself to hit the treadmill (the black dog does not like exercise) to release those feel good endorphins.
Every other moment of the day is spent literally being aware of what makes that dog snap and have me ducking for cover and it's really difficult to emerge from that cover once the Black dog is standing over you all slathery and snarling.

So why bother writing this?
Well firstly because I have nothing else to say right now, secondly because there are so many sufferers out there and it's good not to feel like the only one and finally because it's supposed to be therapeutic - hmmm, I'll let you know about that one.

But why do I refer to depression as a 'Black Dog'?
Well many years ago I read a fabulous book titled 'Taming the black dog' by Patrick Elverton and it seriously helped me control the frequency and depth of those low points.
The term 'Black Dog' I believe was first used by Winston Churchill who despite being such a monumental leader of Great Britain suffered from severe depression.

This has been my first bad bout for around a year (at least) and I hate looking outside at this wonderful view of the fields and the sea and thinking 'whatever'. I used to just sit and stare at this gorgeous view for ages but not at the moment. I have the odd positive thought but it's soon snapped away and replaced with 'Blah!'.
BUT I'm getting there. I still feel deep down that nothing I do is worth the effort or the bother or good enough but I am getting back to being able to stop those negative thoughts before they feed the Black Dog. It's not easy but I'm relearning to train my mind to not listen to those negative thoughts, stop them early and replace them with positive thoughts.

Guess there's hope for me yet!