pages

Wednesday, 31 August 2011

Scrap wood lamp.

A short while ago I had a go at transforming the base of an old lamp I had. To cut a long story short it all went Pete Tong and I made a mess of the whole thing. Not to be too badly put off I salvaged the guts of the lamp (the wire, the elements etc) and scoured the net for a lamp base tutorial that I thought I could make.
Enter 'Not just a housewife' and her fabulous tutorial for an MDF lamp. I had some leftover MDF, the salvaged lamp guts, a jigsaw to cut the wood and pretty much everything else I needed so thought 'let's give it a go'.
This is the end result:


I love it! My only regret is that a) I painted the circles in Gloss paint and wish I hadn't - it's too thick and too shiny & I prefer NJAH's end result, and b) I wish I'd done more than 3 different sizes of circles.
The tutorial was very easy to follow and I pretty much followed it to the letter. The tip for running the lamp wire through the base was a brilliant one and gives it that tidier look from behind.
I used narrow plastic piping through the centre of the lamp and it worked just great and gave the lamp more stability.
When it came to fixing the element to the top small circle I used 'Fixsall' glue. This glue is better than any craft glue I've used and I use it for pretty much everything, but be warned it's super strong. It's not a superglue, it's so much more than that and IMO so much better.
Begrudgingly I did buy the shade. I had tried to recover a smaller one but me and spray adhesive don't get along and it was a complete disaster. I was going to give it another go but I'd ran out of my first choice of fabric and then I spotted this one for sale at 1/2price (£7) at Homebase so bought it - after ALOT of umming and arring.
So there you are, my £7 lamp now sitting happily on my handbuilt side table in the front room.
I think this one from 'Not just a housewife' will be my next lamp to make.
Enjoy and Thank you 'Not just a housewife'

This post is linked to:-

The DIY Show Off


Thirty Hand Made Days


It's a Blog Party


I'm topsy turvy tuesdays


'2805'
'Three Mango Seeds'

Tuesday, 30 August 2011

To brighten a crappy day!

Since the weather has been sooooo bad here over the last few days (though we have it easy compared to the States at the moment) I've not really been able to work on my current projects (Too damp, nothing dries). So, I've been looking through my photo albums and thought these bright pictures I took may just bring a smile to someones face.


I don't remember the name of this one but I took this at 'Dunrobin Castle'


I can't really decide if the bug ruins or makes the picture? Another 'Dunrobin' flower anywho.


A pond lily. We have a few different ones growing on our mini lake but I've not been brave enough to don the waders and get out to the prettier ones - yet! We do have a paddle boat but wobbles and leaky boats are not conducive to a good photo are they! Plus we only have one oar!!!!!!!
I did manage once on a blow up dinghy but that's a whole other hilarious (for others) nightmare (for me) story - maybe one day!


A Passion flower. I grew this one year but it only survived the one year, it's just too windy here next to the sea.


Here's to hoping that the weather improves just a tad so I can work on my current project - computer station morphed into a dressing table.
Keep an eye out on here for before, during and after photos - yes, I finally remembered to photograph the process - and see what you think.


Sunday, 28 August 2011

old chest of drawers makeover

Before starting this Blog I didn't take photos of my projects as they were on going, only once finished. Now however all my current projects are being photographed during the makeover process.
This Blog is one of the furniture makeovers I recently completed without photographing the stages, so apologies for that!

This furniture item was a battered old chest of drawers (cheap Argos make) that was so battered it was destined for the fire heap. I honestly cannot describe the level of damage (teach me to not take piccies, you're gonna have to take my word for it) and I really did not see what could be done with it. It's made of veneer covered chip board and the drawer runners had given up ages ago and so pieces of wooden batten had been screwed on to make the drawers at least function.
It was full of holes (even more so once all the screws from the battens had been removed) and was minutes away from a brutal end!

Now:


I just couldn't bring myself to scrap this old battered chest of drawers - what crafter could! And I'd always intended to add a unit to the end of our bed, so I figured maybe with a load of work I could turn this item of furniture into what I wanted. Eventually the unit will hold baskets but for now ............

I think my husband thought I was nuts for even giving it a go but give it a go I did!
First I stripped it of all the screwed on wood and the back board (drawers had given up ages ago) and gave the whole sorry item a good sand down.
Next I added a middle and bottom shelf made from some scrap wood we had from demolishing a mobile home. These were sanded down also.
I then used my jigsaw to make a patterned piece out of MDF for the bottom front and the bottom sides and then added a bit of old dado rail to the front of the middle shelf.
I cut a new piece of backboard and painted this the purply plum colour of our bedroom, using a tester pot from Homebase. Once it had had a couple of coats (All you'll get from a tester pot) I gave it a couple of coats of floor varnish.
The actual unit was then given a coat of primer followed by about 3 very thin coats of emulsion paint that matched the bedroom and completed with a couple of coats of floor varnish.
The new backboard was then nailed on and voila! it's now sitting at the end of my bed showcasing my handmade jewellery box and Oakley, my Charlie Bear!

This post is linked with


Furniture Feature Fridays

Friday, 26 August 2011

Seashell / wooden cord pull

For the first set of Roman Blinds I made I had to buy the cord pull for it and was gobsmacked by the prices some folk were charging for such a small and simple item. So when I made the next 3 sets of Roman Blinds I decided I needed to put my creative, crafty mind into gear and come up with some thrifty solutions for the job.
I searched the web and found some pretty nifty ideas but nothing that I felt would suit what I wanted so instead I started looking around home and seeing what I could salvage.
I really wanted 2 Seashell pulls for the downstairs loo - 1 for the light cord and 1 for the shower cord (ok, so not Roman Blind pulls exactly) and after rooting around in the top of a plant pot in the front room I found exactly what I needed


2 large spiral seashells.
Obviously they couldn't be attached to the cord without a hole and this is where my trusty Dewalt drill comes in.
These shells have spirals inside them so instead of just having to drill through one shell wall I had to drill through about 3, though I made sure I didn't go through the final wall.
Once the hole went right through I simply threaded the cord through until it hit the final wall, then it was just a case of continuing to thread the cord until it wound its way through the final spiral and out the end.
Once I could grab the cord I simply knotted the end and pulled the cord back up from the top until the knot lodged itself. Because I didn't go through the final spiral wall the knot actually goes inside the shell and can't be seen.


Perfect!


Next I needed 2 pulls for the kitchen Roman Blinds I made. Again I was too stingy to buy them so had another scout around the workshop to see what I could come up with.
Finally I noticed an old wooden curtain pole that had screw on finials on the end - perfect!
I gave them a good clean and then a quick sand down before drilling a hole straight through from the top to the bottom. To make sure this hole was perfectly straight I ditched the hand held Dewalt drill and opted for my husbands hole drilling thingy machine (don't know what it's called but it makes holes. Very quickly & very straight).
Once it had gone all the way through I turned the finial over and drilled a wider hole from the bottom up, though this hole was only a couple of cms deep as it's only intended for the cord knot to sit in to hide it.
Then I gave it another quick sand down and a couple of coats of Black craft paint, threaded the Roman Blind cords through, knotted them at the end and voila! another 2 cord pulls that cost nothing.

Here's the finished cord pull.


This is the underneath.


This post is linked to:
DIY under $5


The Girl Creative

'Thrifty decorating'
'Night owl crafting' 
'Nifty Thrifty Things'

Thursday, 25 August 2011

Easy to make Roman Blinds

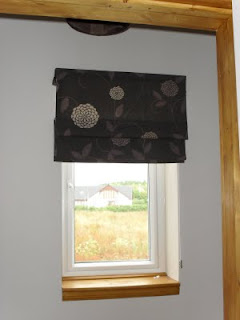
I found this tutorial for Roman Blinds and figured I'd give it a go for our new home.
I needed at least 4 Roman Blinds and to get them made to measure would have been amazingly costly, however I'd never made anything like these before and was a bit worried I'd mess it all up.
Not so! - Terrell Designs have fabulous step by step instructions on their website and absolutely everything was there to make Blinds that look pretty amazing.

This is the first set I made.

 roman blinds, diy blinds, fixsall glue,fabric blinds

Strangely this first set was the easiest and the better ones, I guess I really took my time to get the measurements perfect and may have got a bit slack with the others. I made these from a set of curtains I bought from EBay, in fact I made alot of stuff from this one set of curtains: Firstly I took one curtain, cut it into two, sewed up the edges and made a pair of hallway curtains. Then I used the other curtain to make the Roman Blind (curtains were lined so I didn't even have to buy extra lining). I also covered 3 canvases with some of the fabric to hang in the hallway upstairs and I also managed to get 4 cushion covers too. All from one pair of lined curtains - thrifty or what!
The little tab you see hanging on the top left of them actually hides the runners from being seen from the side.

This was the next one I made.

fabric blinds, roman blinds, diy blinds, fixsall glue

I found this a little harder as the fabric was so sheer and lightweight. Terrell advises to use Gemtack glue or similar for the internal battens but I found the glue rubbish to say the least. On these ones I actually stitched the batten to the front rather than glued, I just made sure that the stitches were tiny so as not to show up.
I did put a weight bar (old plastic curtain runner actually) into the hen lining of this Roman Blind (I didn't on any of the others) but this was only because of the fabric being so lightweight. I found it didn't always roll up properly without the weight.
The pull cord is simply an old earring with beads attached.

Finally I made 2 of these.

cheap blinds, roman blinds, fixsall, diy roman blinds

These ones were more fiddly due to the size and my measurements aren't perfect but they are still fabulous and work perfectly.
The pull cords were some wooden finial ends from an old curtain pole. I simply drilled a hole through the middle from the top, painted them black and voila!
These were also made from one pair of 90x90 lined curtains acquired via EBay.

Terrell Roman Blinds are so easy to make, believe me if I can do it then anyone can and they don't have to cost the earth either. The costliest part of it for me was the runners and the locks but even these weren't expensive.

A NOTE ON GLUE: Terrel advises Gemtack or similar and most people who have replied to her website find the glue fantastic. However I found it terrible and couldn't get along with it so I turned to my favourite glue of all time - Fixsall. This glue is industrial strength and will bond anything. It's NOT a superglue, it's so much better. At some point I will post some info on this glue as I use it for absolutely everything from crafting to fixing MF diggers (seriously. And we're not talking toys either!)

Linked with


Keeping It Simple

'It's a hodgepodge life'
'Aworldofcrafts' 
'Sew happy geek'

Tuesday, 23 August 2011

Tutorial: A fish tank, scrap wood and a pile of pebbles makes ...........

This is one of the first items I made for our new home, a coffee table for the front room. Well actually it was originally intended as a piece of furniture for the patio but my husband liked it so much he asked if it could be relocated inside. Great! I was super chuffed he liked it that much (though I suspect it was partly a form of encouragement for me, bless him) but it meant starting all the wooden structure of it from scratch as it had been stained the wrong colour for indoors. Anyway, I gave it a go and I must admit I am rather chuffed with the outcome.

So here is the finished piece (Spot the dog). Sorry I just didn't think to take pictures as I made it, just the finished item.

scrap wood,fish tank, pebble coffee table, handmade furniture


So how did I make it?
Unfortunately I'm one of "those" people who makes it up as I go along. Usually it works out in the end but I suspect I would save myself alot of heartache if I worked out plans to start with. Sorry, but not me! A tape measure is about as technical and planned as I get.

Firstly I measured the tank and made a base from whatever scrap wood I could find. I wasn't too worried about the look of this bit of wood as it wouldn't be seen but it needed to be strong as the tank weighs a bit when full.
I then made an edging to go round the base and the tank sits inside this edging and on the base I made. Mitres always seem to go over my head but I managed these ones just fine - at least that's what you'd think by the pictures and I ain't breaking that illusion! Or have I just done that.......
Then for the table top I used some leftover wood from the roof rafters in our new home, solid 6x2. I mitred the corners again and added a middle insert of the same wood.
To attach the table top to the tank I simply added a plate of MDF underneath the table top (to hold all those bits of wood together) and then added a square ridge of 2x1 timber that enables the table top to sit snuggly inside the top of the tank. That's it!
I then stained it to match the front room and gave it a couple of coats of Varnish - voila!
Normally I would have counter sunk the screws but I dislike wood filler as it always shows so I just used Black screws (Plasterboard screws - I love em) and spaced them evenly.
On the original, patio version there was a wooden bar through the tank hidden by the pebbles and screwed to the underneath of the top to keep the table top in place but when I re did it all I didn't feel it necessary. This wood is heavy and it goes nowhere - very substantial.
Obviously the pebbles (courtesy of local beach) had to be put in insitu as it makes the whole thing impossible to move but overall it was a pretty easy piece of furniture to make and best of all it cost me nothing, unless you count the cost of petrol to the beach 2 minutes away.

Now the downside. Me being me (impatient) I didn't dry the wood thoroughly first but used it fresh from my husbands workshop. As such it held a lot of moisture and since it's been sitting in the house it's dried out and shrunk! Somewhat! Bit cheesed off with that but it was entirely my fault and should teach me to dry the wood properly first.
No matter,I will take the top to the workshop and recut it and put it back on.

This post is linked to:-


'Momma Hens Coop' Link party.


Transformation Thursday


Craft Junkie Too Friend